Table of Contents
Advertisement
Quick Links
Advertisement
Table of Contents

Related Manuals for Mira VGX-21


Summary of Contents for Mira VGX-21
- Page 1 Instruction manual English (EN) Precision valve seat refacing device...
-
Page 2: Table Of Contents
Advancing device (Feed nut) ......................27 Hydraulic oil clamping system ......................28 Spare parts list ..........................29 Assembly drawing of the VGX-21 (with crank handle) ..............31 10 Schematic diagram .......................... 32 11 Special accessories ........................33 18 July 2023/ v1.6 VGX-21 |Serial-No. -
Page 3: Safety Regulations
5. Service and adjusting operations must always be done by a minimum of 2 people. In an emergency, there must be a person that can cut off the electric circuit to execute first aid. 6. This device must not be used for emergency- and safety tests. A failure or damage of the connected VGX-21 by the running electric tension can be induced. -
Page 4: Elementary Safety-Advices
Risk in using the device The device VGX-21 has been developed based on the newest state of technology and was constructed by the accepted safety-related regulation. However, it is possible by using the device, that there appear some risks for the user or third persons, especially if the device is misused and operated not accordingly to the MIRA operation manual. - Page 5 Warranty and liability Warranty matters are described in MIRA‘s terms of sales and return policy conditions and are a integral part of any sales contract between MIRA an the customer. Warranty- and liability by people and material assets are void, if they had one or more of the following causations: ➢...
- Page 6 (long) hair, hands and fingers. Wear suitable safety equipment (e.g. hairnet etc.). • The magnetic base of the VGX-21 may be a risk of squeezing fingers and hands by clamping down the device on a handling plate. The device must be clamped carefully and thoughtful.
- Page 7 Oro-pax etc.) Safety advices for carrying • For transport, the VGX-21 must be carried in the storage box (in the same as it was delivered from the Minelli Corporation). • Ensure all moving parts from the device against loosening, by the transport.
-
Page 8: Copyright
Copyright © The exclusive copyright of this instruction manual remains in the hands of the MINELLI Corporation. (MIRA) This instruction manual is appointed for the operator and his personal. Minelli Corporation MIRA Division Mattenstrasse 3 CH-8330 Pfäffikon ZH Switzerland CH For the provided technical documentation see the assigned person at chapter “Declaration of conformity”... -
Page 9: Non-Liability
Non-liability The valve seat refacing device VGX-21 may only be operated according to the Operating Instructions. The manufacturer refuses to accept any liability for accidents and damages caused by incorrect operation. He also refuses any liability for alienated use of the device. -
Page 10: Declaration Of Conformity
Declaration of conformity 18 July 2023/ v1.6 VGX-21 |Serial-No. 963 © (All rights reserved) - Page 11 We congratulate you for your purchase of the VGX-21 valve seat refacing unit with hydraulic clamping system. The VGX-21 allows to process extremely precise valve seats in a very efficient way. This device is the product of many years of experience in valve seat recutting.
-
Page 12: Device Parts Vgx-21
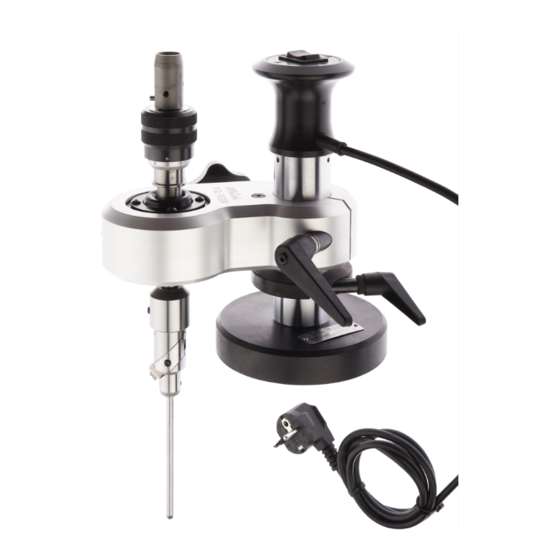
1 Device parts VGX-21 Handle Tumbler switch (Magnet On/Off) Adapter for crank handle or Vario Drive Pivot arm guide Clamping lever (Pivot Clamping lever arm) of the stopping ring Advancing device Power cord (230V/110V) Spindle guide Pivot arm Bleeding screw... -
Page 13: Device Parts Av-Mobile
Stop brackets Wall support with socket Carry arm Inclining plate The AV-Mobile should be installed, Star grip handles with the help of two employees, on a solid wall side! 18 July 2023/ v1.6 VGX-21 |Serial-No. 963 © (All rights reserved) -
Page 14: Installation Of The Cylinderhead Support Av-Mobile
2 Installation of the cylinderhead support AV-Mobile The universal cylinderhead support requires a clean, proper installation on a solid wall in order to ensure best results with the Mira VGX-21 Valve seat refacing device. The carry arms are installed, approximately 90cm, above the floor. Fig. 1... -
Page 15: Clamping Of The Cylinderheads
There are different possibilities for clamping cylinderheads. When fixing cylinderheads, attention must be paid that the magnet base and the clamping plate are in a clean condition and placed at level. At Fig. 3, the cylinderhead is fixed upright on to the MIRA cylinderhead support AV. This situation shows the standard position for straight valve seat processing. -
Page 16: Processing Of Valve Seats
Dip in the brush into industrial cleaner before using. Fig. 6 Fig. 6 3. Clamp the VGX-21 on the storage table (AT) or on a clean workbench surface by activating the magnet base (Pos.1), clamp the pivot arm and lock the star grip. - Page 17 5. Insert the correct pilot into the tool-head and secure the lower setscrew, by using the enclosed inhex key. Turn the advancing device to the upper position. Fig. 9 Fig. 9 18 July 2023/ v1.6 VGX-21 |Serial-No. 963 © (All rights reserved)
- Page 18 8. The grinded valve can be inserted in the formtool setting gauge and the knurled head screw can be slightly tightened. In this position the valve stem must remain moveable. Fig. 12 Fig. 12 18 July 2023/ v1.6 VGX-21 |Serial-No. 963 © (All rights reserved)
- Page 19 (line) of the upper correction angle (Fig. 15). Tighten the formtool in following and remove the formtool setting gauge. Correct final adjustment Fig. 15 18 July 2023/ v1.6 VGX-21 |Serial-No. 963 © (All rights reserved)
- Page 20 Fig. 17 Fig. 17 Place one hand on the magnetic base, when you clamping down the VGX-21 on the steel table. By activating the magnetic base, you can feel any uneveness on your finger tips. Fig. 18 If unevenness on the magnet base occurs, repeat step 13-14.
- Page 21 After this check, pay attention again to step 16! Accordingly the pivot arm must be clamped firmly by the clamping lever of the pivot arm. Fig. 21 Fig. 21 18 July 2023/ v1.6 VGX-21 |Serial-No. 963 © (All rights reserved)
- Page 22 20. Put the Vario Drive on the adapter until the pin engages in the shaft. Place your left hand around the advancing device. With your right hand hold the handle of the Vario Drive firmly. Fig. 24 Fig. 24 18 July 2023/ v1.6 VGX-21 |Serial-No. 963 © (All rights reserved)
- Page 23 21. To process the valve seats with the MIRA VGX-21 we highly recommend to work with the electrical Vario Drive (See “Special accessories” on page 33) as following: Switch on the Vario Drive and select the suitable rotation speed, by turning the knob clockwise of the control box.
- Page 24 13 to 26 (except step 15!). Fig. 28 Fig. 28 27. After finishing the valve seats, check the seat for proper sealing, preferably using the separate MIRA “Special Multivac Vacuum...
-
Page 25: Processing Of Insert Counterbores (Ring Seats)
33) Fig. 30 2. For setting the formtool, preferably use the direct- reading micrometer MIRA EM19-75 (See also “Special accessories” on page 33). For this purpose the included gauge must be used. Fig. 31 PLEASE PAY ATTENTION! -
Page 26: Processing The Counterbores
Fig. 33 Pay special attention to the correct press-fit! An incorrect press-fit can lead to a total damage of the cylinderhead! Fig. 33 18 July 2023/ v1.6 VGX-21 |Serial-No. 963 © (All rights reserved) -
Page 27: Changing Tool-Heads
(Fig. 35). Lock the clamping lever and the star grip of the VGX-21 for a solid work base. Fig. 35 2. The setscrew can be released by using the gripped inhex key. -
Page 28: Maintenance Of The Vgx-21
7 Maintenance of the VGX-21 The VGX-21 valve seat refacing unit is a precision device which asks for careful handling and maintenance. It is recommended to keep it always clean and to spray the blank parts with an anti-rust liquid after each use. -
Page 29: Hydraulic Oil Clamping System
In this case hydraulic oli must be refilled as following: Tilt the VGX-21 to the side. To fill-in hydraulic oil, the star grip must be carefully turned out. Dismount the hexagon screw and turn out carefully the piston by using a long M6 screw or a threaded rod. -
Page 30: Spare Parts List
1N0019M04x006 Lens head screw 1N0019M04x008 Setscrew 1N0024M04x004 Setscrew 1N0024M06x006 Blind nut 1N0154M06 Washer 1N0715M04 Spring washer 1N0760M04 Lock washer 1N0782M04 O-Ring ø13x2 1ORM0130-20 O-Ring ø69.5x3 1ORM0695-30 O-Ring ø74.5x3 1ORM0745-30 18 July 2023/ v1.6 VGX-21 |Serial-No. 963 © (All rights reserved) - Page 31 Ball headed inhex key 4mm 1WKS4.0 Cleaning brush 1WBP01 Formtool setting gauge EL 11031.4.1885 Instruction manual DE 1PBA01b Instruction manual EN 1PBA01c Formtool catalogue 1PKA03 Cardboard box 1VKS09 Special accessories See page 33 18 July 2023/ v1.6 VGX-21 |Serial-No. 963 © (All rights reserved)
-
Page 32: Assembly Drawing Of The Vgx-21 (With Crank Handle)
9 Assembly drawing of the VGX-21 (with crank handle) 18 July 2023/ v1.6 VGX-21 |Serial-No. 963 © (All rights reserved) -
Page 33: Schematic Diagram
10 Schematic diagram 18 July 2023/ v1.6 VGX-21 |Serial-No. 963 © (All rights reserved) -
Page 34: Special Accessories
11 Special accessories MIRA tooling and equipment are available through the MIRA Webshop www.miratool.ch! Tool-heads To process different valve seat diameters, there are three tool- heads available in variable diameter-sizes (Fig. 41). The tool- head DT1 is included in the standard MIRA VGX-21 package... - Page 35 Formtools Formtools are available in a multitude of shapes. For certain vehicle types there are special formtool with the original shape. Fig. 45 See formtool catalogue separately. Fig. 45 18 July 2023/ v1.6 VGX-21 |Serial-No. 963 © (All rights reserved)
- Page 36 Instruction Manual 1PBA13a Micrometer with gauge EM25-75 The Mira adjusting micrometer EM25-75 makes it possible to rapidly adjust the selected double edge tool-heads for seat ring processing to the exact and desired overdimension. Based on the rapid adjustability a high degree of productivity is achieved (Fig.
- Page 37 Storage table (AT) To be fixed on the vertical guide post of the wall support AV. The MIRA units (VGX-21, VG-91 and Centronic NG) can be placed on this storage table and gives an ideal platform for replacing tools and pilots (Fig. 50): Installation-Kit No: 11232.2.1111...
- Page 38 To process valve seats from small and medium cylinderheads, best results will be achieved with the cylinderhead support. The wall support reaches a high precision level in combination with the devices VG-91 and VGX-21 (Fig. 52): Installation-Kit No: 11211.1.1571 Replacement parts: Description Pos.
- Page 39 Notes 18 July 2023/ v1.6 VGX-21 |Serial-No. 963 © (All rights reserved)
- Page 40 Manufacturer and worldwide distributor: Your local distributor: MINELLI CORPORATION Mattenstrasse 3 8330 Pfäffikon ZH Switzerland www.miratool.ch 18 July 2023/ v1.6 VGX-21 |Serial-No. 963 © (All rights reserved)