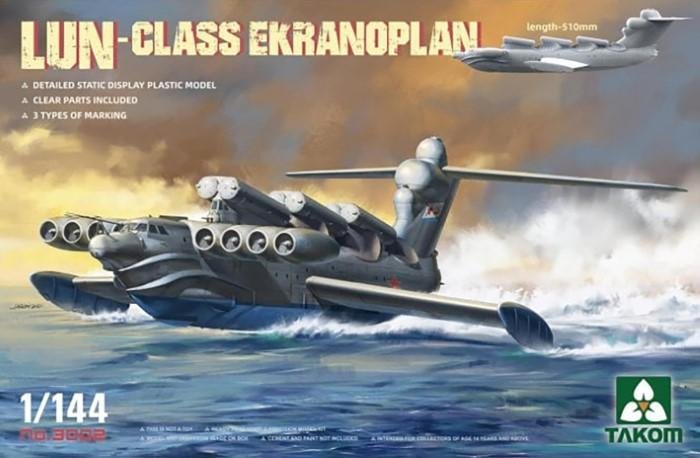
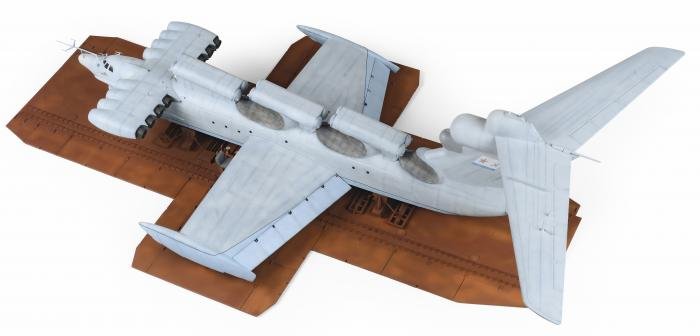
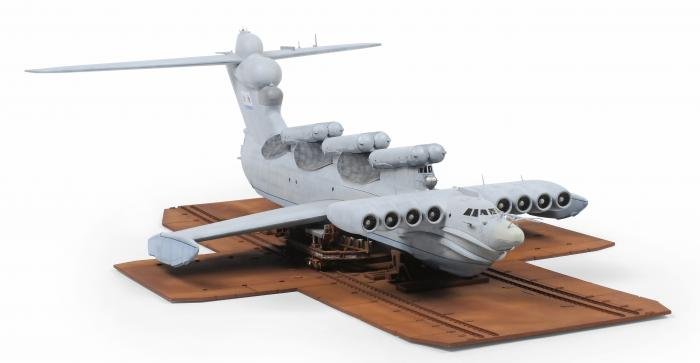
Takom has forged a reputation for releasing kits of unusual subjects. Here, Andy Davies tackles the Chinese firm’s 1/144 depiction of the imposing Lun-class Ekranoplan.
Designed by Rostislav Alekseyev in 1975, the Lun-class Ekranoplan (Lun is Russian for a harrier bird of prey) was a wing in ground effect (WIG) vehicle. Although it was never used in combat, the Soviet and Russian Navies operated the type from 1987 until the late 1990s. It flew via lift generated by the ground effect formed by its large wings when approximately 4m above the surface of water. The Lun was powered by eight Kuznetsov NK-87 turbofans mounted on canards and utilising vectored nozzles – it could reach a top speed of 340mph. Manned by a crew of 15, six officers and nine midshipmen, it could spend up to five days at sea without resupply.
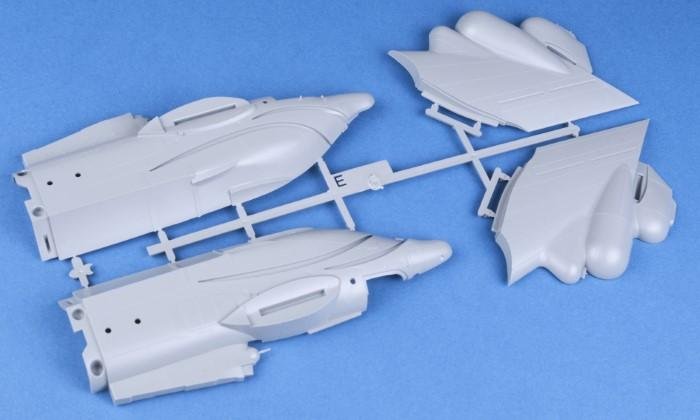
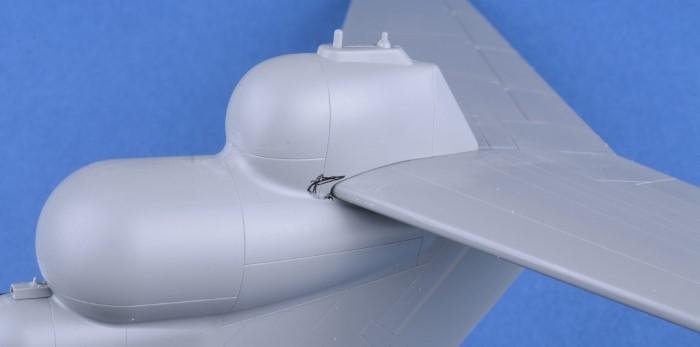
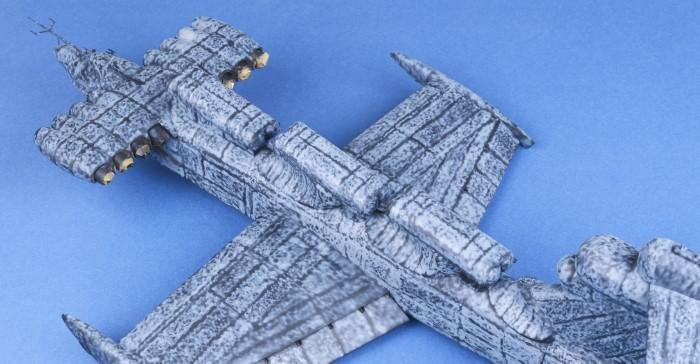
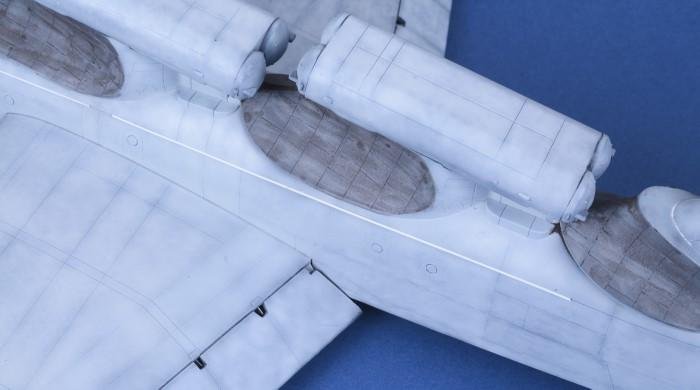
Above: Modular fuselage parts appeared crisply moulded with excellent surface detail; the fit also proved superb, resulting in neat joins.
The type carried six P-270 Moskit (Mosquito) guided anti-ship missiles, mounted in three paired launchers along the top of the fuselage. Just one of this class was built, entering service as MD-160 with the Soviet Caspian Flotilla before being retired and abandoned at Kaspisyk naval base. It has since been moved and pulled ashore with a view to restoration and display at the Patriot Park near Moscow.
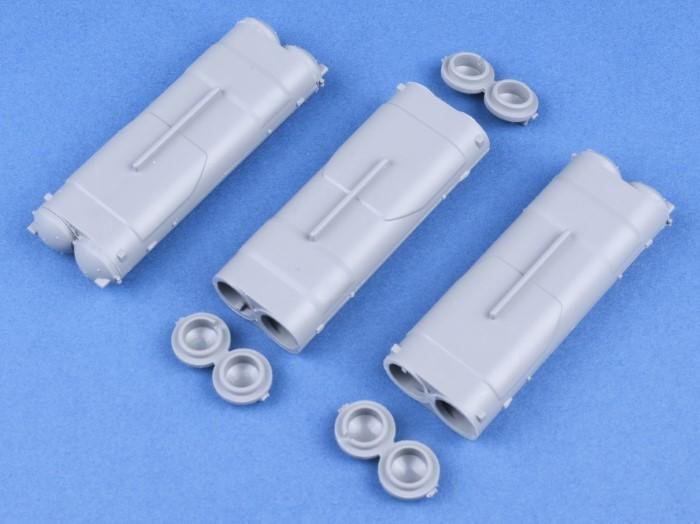
Above: Three dual P-270 Moskit anti-shipping missile launchers were supplied, sadly without munitions. Covers featured raised numerals for each tube.
| Lun-Class Ekranoplan | |
|---|---|
| By: | Takom |
| Scale: | 1/144 |
| Stock Code: | 3002 |
| Price: | £59.99 |
| Available from: | Bachmann Europe |
Mission launch
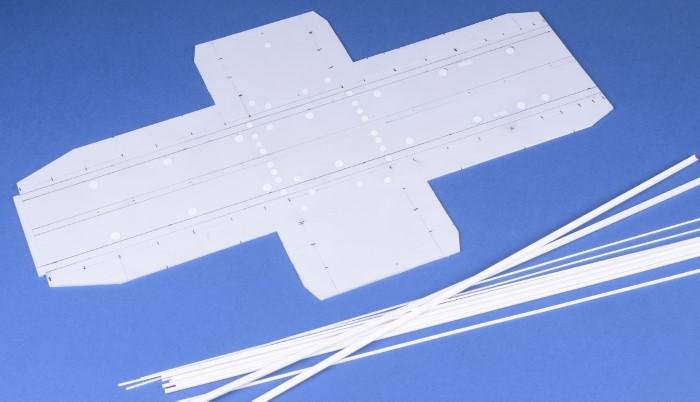
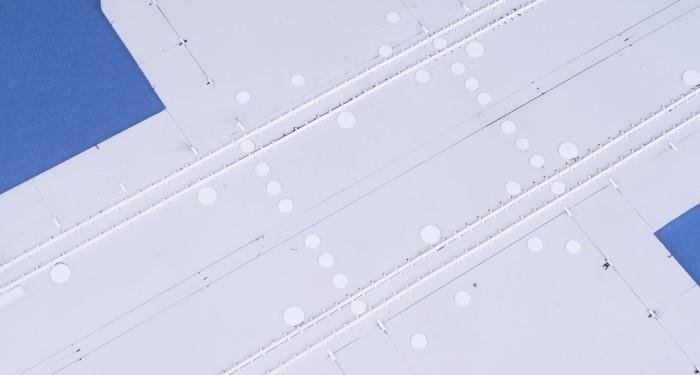
The sturdy, top-opening box revealed five light-grey styrene runners holding 62 parts, a single frame of clear components, an instruction booklet with a full-colour paint guide and a decal sheet covering three different schemes. The parts were of standard Takom quality, having been moulded crisply, engineered well and featuring excellent surface detail. As is customary, assembly began with the cockpit. Given the scale, Takom provided a reasonably detailed ‘tub’ that benefitted greatly from careful painting and the addition of a throttle quadrant, seatbelts, armrests and cushions. These were fabricated from styrene rod, small strips of aluminium foil for the belts, wire and plastic card for the armrests and Model Sculpt putty for the cushions.
Akan Paint 63006 Emerald Green Faded (www.lindenhillimports.com) was close to the original colour when compared to reference images and was used on the control yokes, instrument and side-panels. The pilot seats received LifeColor LC-11 Matt Light Green (www.airbrushes.com) and dials were painted on the instrument and side-panels via a 000 sable paintbrush. This would be sufficient for the amount of detail visible through the clear parts.
Above: The horizontal tailplane was set too far aft, resulting in the trailing edge not being flush with the top of the rudder. This was fixed with a round file and a new scalpel blade.
Above: A study of walk-round photographs revealed several items of equipment fitted to the tailplane that Takom had overlooked, including a pair of vertical aerials, a small deflector fence and a long plate aerial.
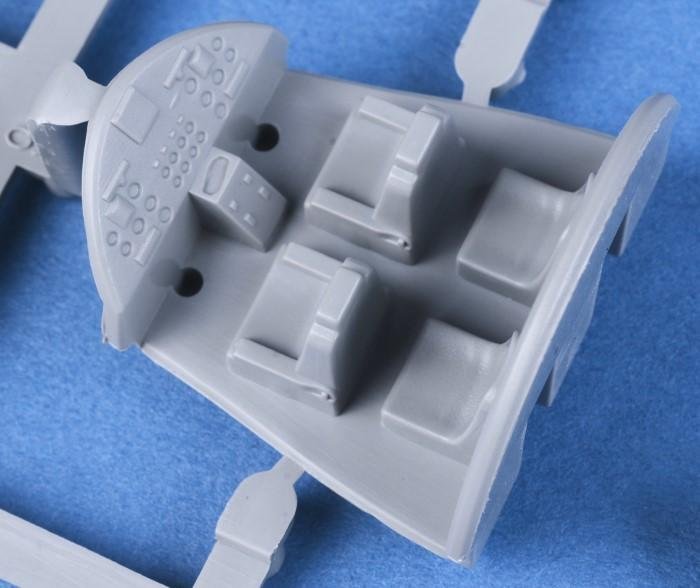
Above: Given the scale, cockpit detail was impressive – especially as much of it would be hidden. The seats were a little plain though and benefitted from improvement.
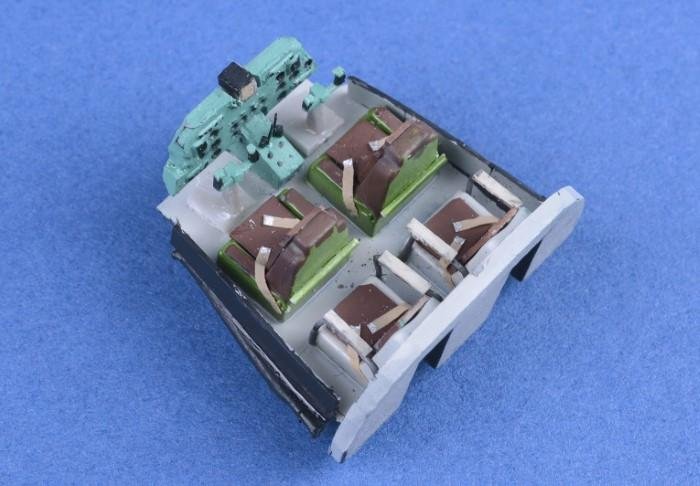
Above: The completed cockpit tub with instrument panel and yokes fitted, armrests and seat belts added – some small items remained.
Deadly cargo
Following completion of the cockpit interior, focus shifted to the fuselage/hull. This was provided in four sections, allowing the forward section to be completed before attaching to the rear. As with any multi-part arrangement, I prefer to glue the forward area to the rear to ensure smooth and continuous fit before gluing the completed halves together. Paired circular ‘port holes’ were included on large combined parts, which fitted neatly into oval reveals on the fuselage’s inner surfaces. AMMO-MIG’s A.MIG-2031 Ultra Glue PVA was used to fix them.
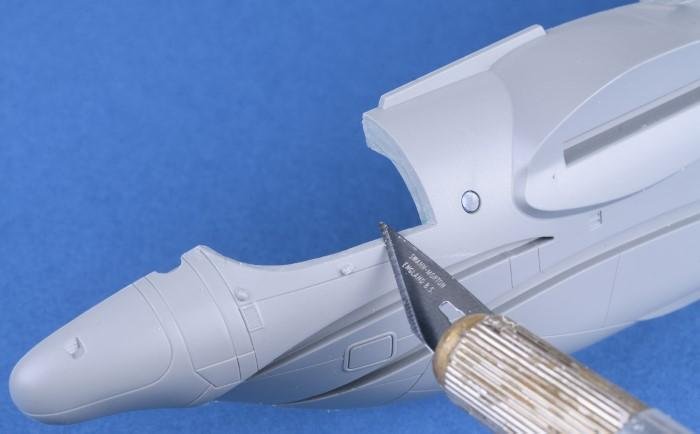
Before gluing the fuselage halves together, the clear canopy sill was removed with a 10A scalpel blade as it prevented a flush fit. Following this, the pieces were combined and the canopy fixed, again using Ultra Glue. Another modification concerned the incorrect placement of the long, flat VHF aerial fitted to the upper area between the cockpit and engine nacelles. Takom had it positioned centrally, but it was actually off-centre to port.
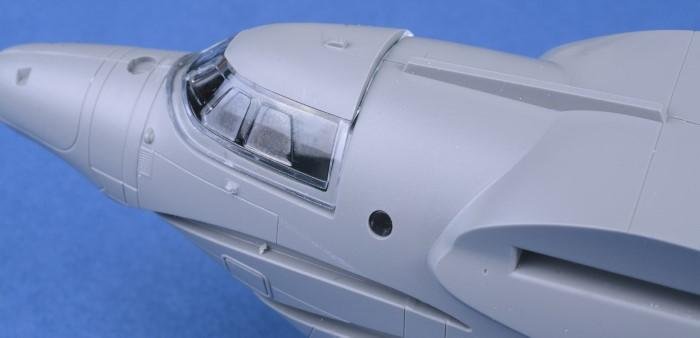
Above: An overly thick sill meant the canopy sat too high...
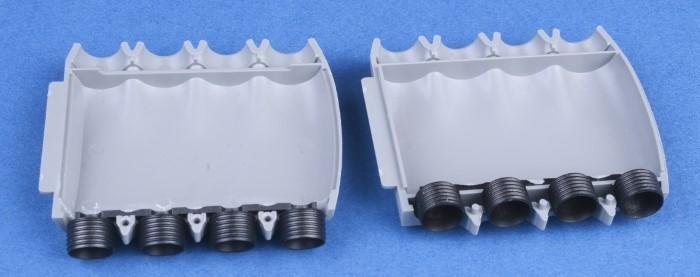
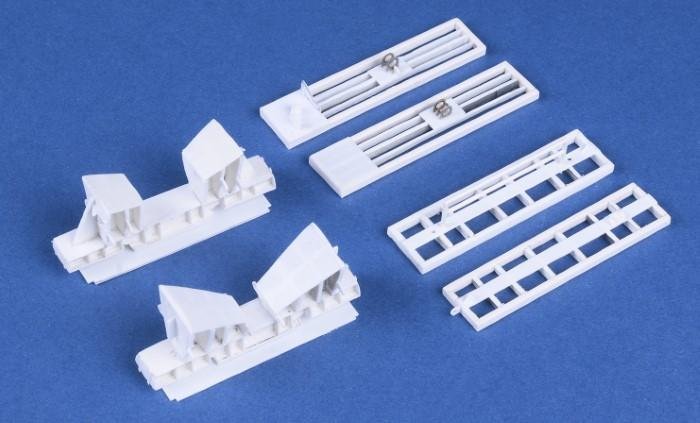
The Lun featured two 23mm Pl-23 cannon in a twin tail turret (‘borrowed’ from an Il-76M) and a further pair under the forward missile tubes – all for defensive armament. Due to the styrene barrels being overly thick, these were replaced with lengths of 0.3mm hollow aluminium rod from Albion Alloys. Three dual launchers for the P-270 Moskit anti-shipping missiles came in four pieces each, with end caps featuring raised detail denoting tube numbers. The hatches could be removed and refitted in the open position if necessary, adding extra visual interest.At the forward end of the fuselage, there was a pair of short canards carrying the eight Kuznetsov NK-87 turbofans
Above: ... so tabs lining the aperture were removed carefully with a fresh scalpel blade and neatened with a flat file. Note the flush-fitting ‘porthole’.
Above: The Lun’s engine nozzles could be angled downwards to provide thrust under the wings, but Takom depicted them horizontal. Retaining tabs were removed so the strips could sit at the correct angle.
Above: Furthermore, Kuznetzov NK-87 engine facing ‘bullets’ were undersized, so were removed and replaced with correctly sized items fabricated from resin.
Interestingly, the real craft’s jet pipes could be angled downward to deflect thrust beneath the large wings to provide an air cushion, thus giving lift while flying. The kit’s examples were well detailed, but they were also designed to fit just horizontally. These were supplied on a common runner in two strips of four, so were fettled to fit into the nacelles and angled down to 40° to correct this issue. Furthermore, the compressor fan ‘bullet’ caps on the engines were noticeably undersized and improved with parts from the spares box. Extra detail was added to the upper surface of the engine nacelles in the form of four-blade aerials and a quartet of vents fitted facing rearward. A single missing vent was also fitted to the upper fuselage on the port side, just behind the engine nacelles.
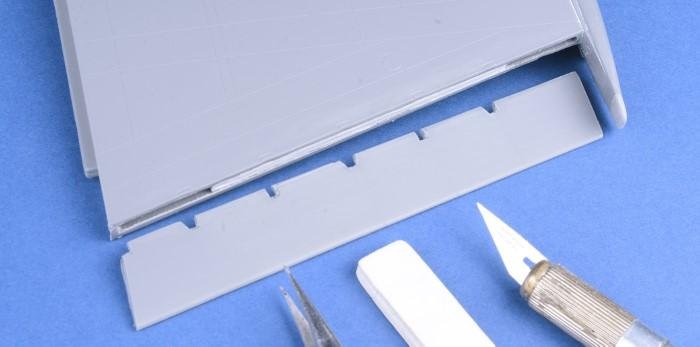
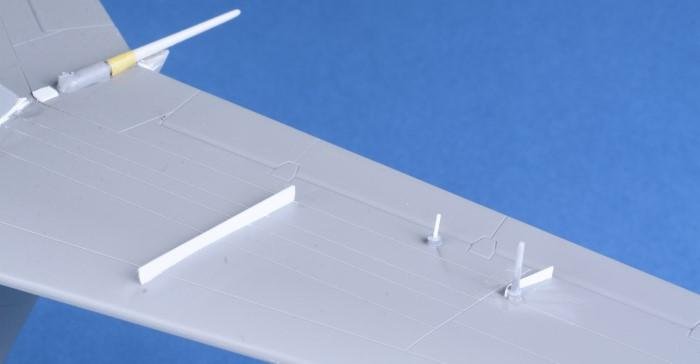
Above: It was decided to lower the flaps for accuracy and visual interest. After their removal, 3mm shims were added to prevent flexing, and notches cut for hinge actuator points.
Above: Due to gaps left in the fuselage by the removal of the flaps from the wings, the innermost portions were removed and relocated into the location slots. These were then filled using Grey Tamiya Basic filler and smoothed.
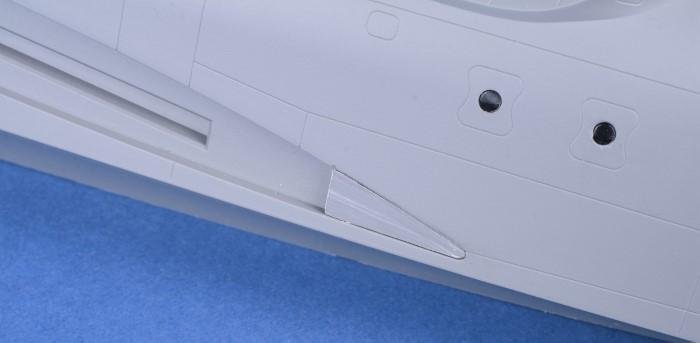
Finally, the nose received extra detailing forward of the windscreen. The long nose-mounted sensor was quite accurate in shape but the forward supports were too thick and needed replacing with 1.5mm styrene strip. Two sensors either side of the cockpit side windows also needed alteration as they lacked the rear-facing rods to match those pointing forward. Moving further along the fuselage were tiled blast shields fitted to the rear of the missile launch tubes. These featured a distinct ‘brick wall’ pattern, totally missing from the kit parts, so the areas were carefully sanded and the pattern scribed using a GSI engraving tool and masking tape. Also missing from the fuselage was the hydro-ski fitted to the keel, seen partially lowered in a few photographs. This entire unit would be difficult to replicate and would add to the build time, so was omitted.

Above: With the flaps fitted, hinge actuators were added using small lengths of 1mm styrene rod. Here you can also see the section of the inner flap that was removed and fitted into the fuselage.
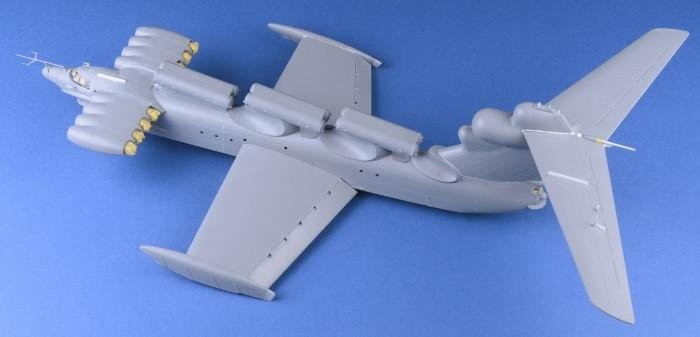
Above: With assembly complete, the bizarre shape of the Ekranoplan became evident. Masking was applied to the engine intakes and outlets, canopy and gun turrets – circles were used to set the portholes.
Above: Painting began with a primer coat of Mr. Finishing Surfacer 1500 Black followed by marbling with MRP-112 Medium Sea Grey and MRP-186 Light Grey, leaving the panel lines dark grey.
All in a flap
The Lun featured a 45m (148ft) swept horizontal tailplane, upon which sat a large centrally mounted radome housing an advanced (for its time) ECM suite, plus a long, tapering ‘spike’ used as part of the same system. Takom’s part was too short, too far aft and lacked detail, so a replacement was fabricated from shaped styrene rod of matching diameter. Reference images revealed the upper port tailplane surface had detail missing, including a short wing fence, a pair of vertical rods and a small defector fence seated around the outermost rod. Again, these were added from styrene rod and scrap photo-etched (PE) brass parts. The top of the radar dome was adorned with more aerials and what appeared to be a beacon.
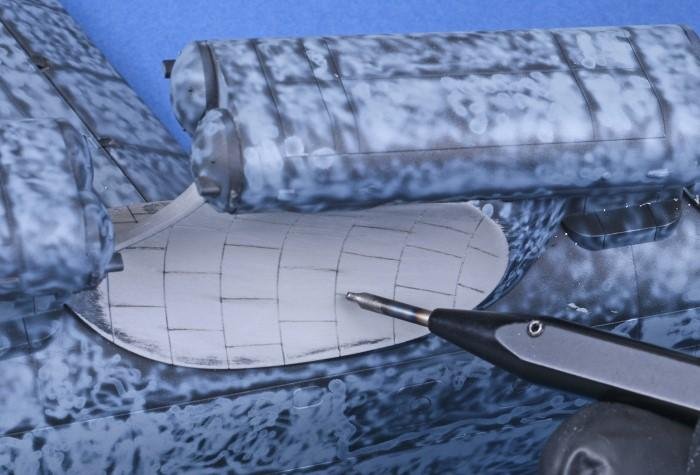
Above: Patterning omitted from the blast shields was added; the parts were sanded until smooth, then a GSI engraving tool used to add the tiling.
Moving to the wings, it was decided to lower the trailing-edge flaps as this appeared to be the default position when the machine was powered-down and when undertaking ground-effect flight, making the choice viable for either option. They were removed, first by scoring the hinge lines with a re-scribing tool, then carefully paring the engravings using a fresh scalpel blade. Once removed and neatened with a flat file, the exposed ends were filled with single lengths of ‘C’-shaped styrene strip, shaped to fit. Lengths of ‘D’-shaped material were then fitted to the forward face of the flap section to ensure that there would be no gaps visible once they were refitted. The flaps were then attached to the wings at the correct angle; a small portion of the innermost area was removed and fitted into the fuselage reveal, filled with Tamiya Basic Grey putty and smoothed with Infini sanding sticks. The rearmost ends of the floats also needed to be altered, as these were too long and of the wrong shape; after removing the kit parts, scrap resin was cut to length, sanded to shape and glued with cyanoacrylate (CA).
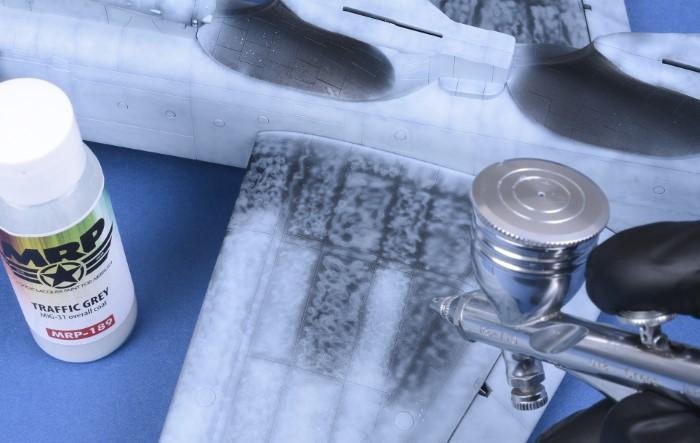
Above: Having weathered rapidly under harsh conditions, the original medium grey/blue paintwork faded – MRP-189 Traffic Grey was applied in thin layers over the marbling to replicate this effect.
Above: Blast shields were weathered with LifeColor UA705 Dust Type 1 and UMP005 Dark Dirt clay wash, after which UMP007 Concrete and UMP004 Light Dirt (www.umpretail.com) were applied.
Faded glory
Following masking – achieved using a mixture of Maketar MMS012 Circles, Aizu (www.premiumhobbies.co.uk) and Tamiya tape (www.hobbyco.net), although a dedicated set is now available from KV Models – it was time to paint the beast. The Lun initially sported a medium grey paint scheme with light blue undersides, separated by a thin dark blue cheatline. Due to the harsh operating environment, the paint faded and chipped rapidly, giving the surfaces a distinctly tatty and mottled appearance. The two uppermost search radar/ECM radomes fitted to the leading edge of the vertical fin were originally painted white, while the lower example was painted a medium/light grey. A further radome was fitted to the extreme nose, housing the Puluchas search radar suite, this also being finished in white, which rapidly faded to a light grey/off white colour.
The model was first primed using Mr. Finishing Surfacer 1500 Black (www.albionhobbies.com) to provide a contrasting black base coat for the marbling and highlighting to come. Mr. Paint’s MRP-189 Traffic Grey and MRP-186 Light Grey were used for the upper surface colour, with a few drops of MRP-004 White added in varying amounts to act as highlights or shadowed areas.
Faded radomes received Mr. Hobby H-21 Off-White while H-332 Light Aircraft Grey was used for the lower fin example. The underside was masked with 18mm Tamiya tape and painted with H-417 RLM 76 Light Blue, then H-21 was mixed with the blue to create a faded variation, which was applied to some of the panels and service hatches. Finally, dark blue cheat lines were airbrushed directly on to the surface using XF-8 Flat Blue and strips of 10mm masking tape. The gap was measured using digital calipers to maintain an even width to the lines, as any variation would be noticeable on the finished model. Decals were provided for three variants of the single production machine, MD-160, all being fictitious as far as my research showed. The only markings visible on the real aircraft appeared to be large Naval Ensign flags on the sides of the tailfin. While Takom provided Soviet red stars, Russian Navy St Andrew’s flag motifs and large white fuselage codes, I could not find any photographic evidence to support these markings. As such, the model was completed in line with reference publications and period video footage found on the internet.
Dry-Dock Detail
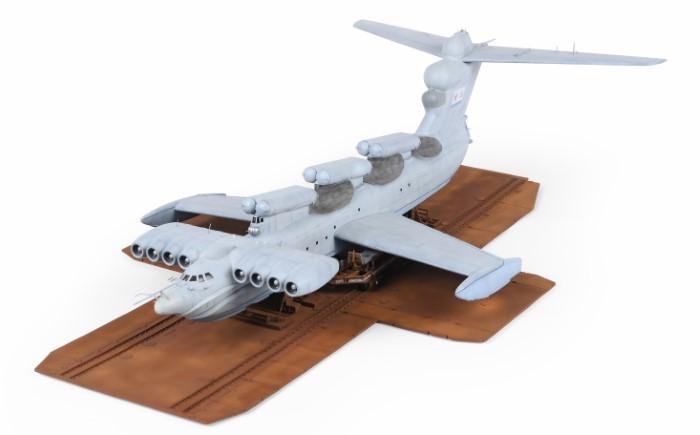
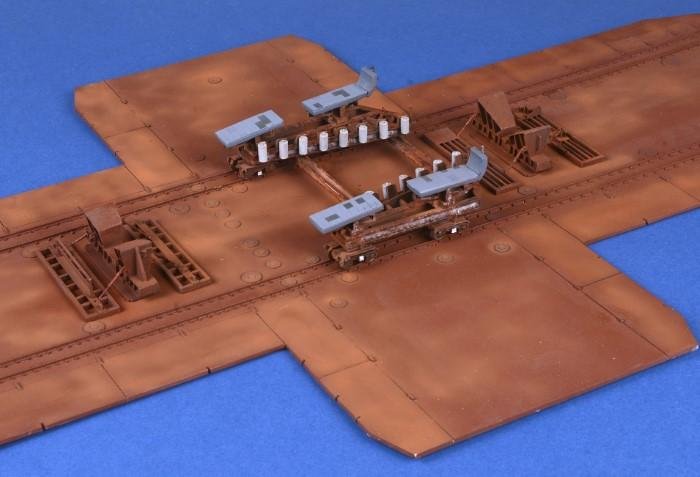
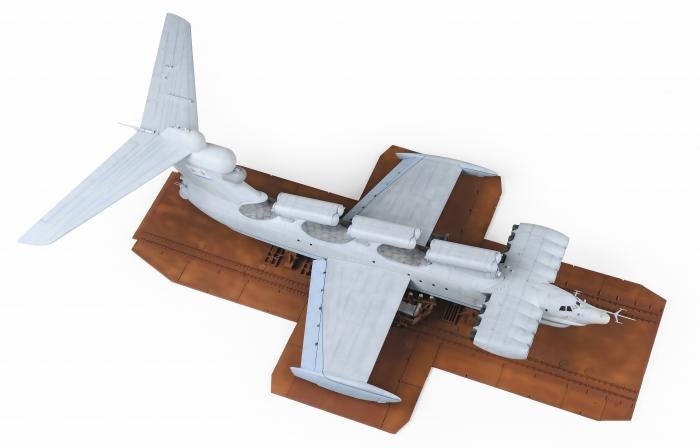
Unfortunately, Takom did not include a stand for the model, which is a little odd as it otherwise just sits on its hull canted to one side, looking rather forlorn. My intention was always to have the craft sit on a base of some kind. The options were either to create an acrylic resin seascape depicting the craft stationary in the water or skimming over the surface at high-speed, or alternatively have it sitting in a dry-dock. The decision was made to replicate the unique floating facility designed specifically for Lun-class operation.
Above: The cruciform base structure was cut to shape from Evergreen 4mm card stock. Rods of differing diameters were cut to size and used as side panel hinges and service hatches.
Above: With the hatches in position, two sets of rail lines used for transportation were made from ‘T’-section styrene and the short support ‘sleepers’ added to either side.
Above: Here, the support cradles and tie-down structures have been completed using a mixture of 0.5mm, 1.5mm and 2mm plastic card, 1mm rod and a few PE rings from the spares box.
An excellent series of walk-round photographs of the craft at Kaspisyk naval base was used for reference. As more detailed information became available, what began as a basic rendition quickly grew into a major undertaking. No published dimensions were available, so the unique cruciform base was fabricated from 4mm Evergreen Plastic Card using the model’s size as a baseline. Fortunately, excellent overhead images were available, which proved invaluable for sizing and positioning.
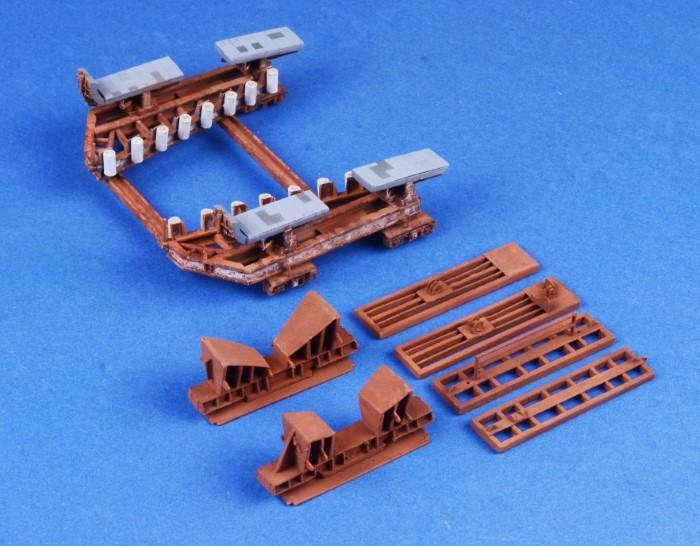
Surface detail, such as hinges, panel lines, vents, circular service covers and rail lines for the massive dolly structure to move along were fabricated from cardboard, plastic card, rod and ‘T’-shaped sections after the base was measured and cut to shape. Two cradles and four tie-down grids were rebuilt four times as more information was discovered. Working out the relative sizes was time-consuming, adding greatly to the overall build time of approximately five months. In fact, the base took twice as long as the model itself! Due to the dry-dock being partially submerged when launching and retrieving the vehicle, it was obviously subject to rusting and salt damage.

Above: Due to the constant immersion in seawater and the rigors of the Russian winter, the dry dock was obviously subject to corrosion. Texture was added using Deluxe Materials’ Scenic Rust powder.
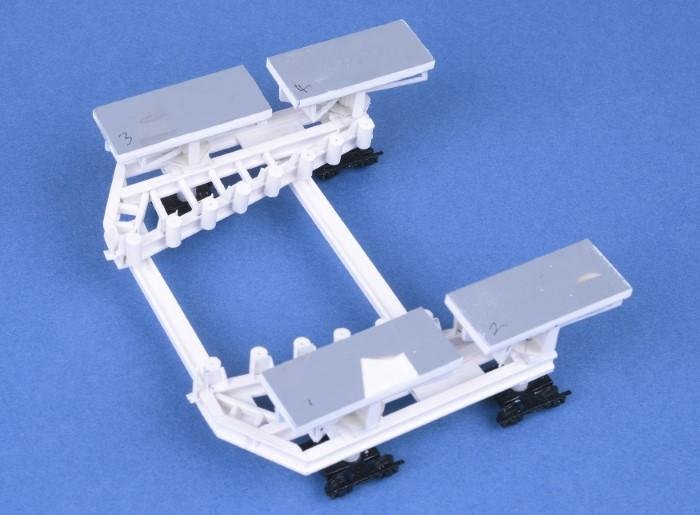
Above: With the chassis completed, four support frames were built and added via brass pins for accurate fitting. Support pads were slightly too long at this stage.
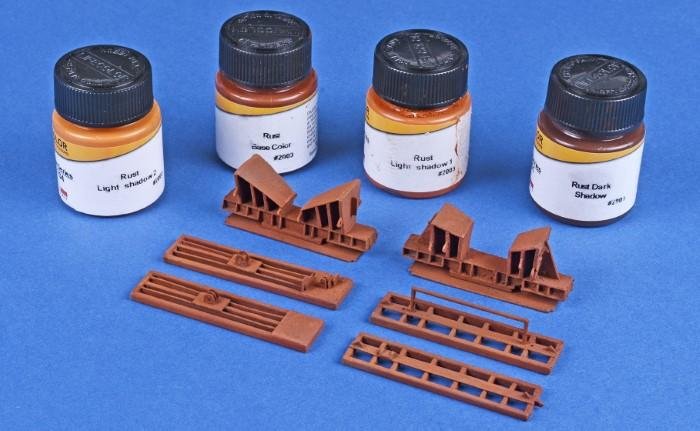
Above: Paints from LifeColor’s LC-CS10 Rust and Dust set were used to replicate corrosion, starting with the darkest and building gradually with lighter hues.
Parts were first coated with decanted automotive red primer before being given a layer of Deluxe Materials’ Scenic Rust base – this was to add texture, but not tone. Paint-wise, LifeColor’s UA-702 Rust Base was used first, followed by UA-701 Dark Shadow. Once dry, a light coat of UA-703 Rust Light Shadow 1 was airbrushed, then UA-704 Rust Light Shadow 2 applied in varying degrees until the desired effect was achieved. The same method was used for the transportation dolly, although some of the original light cream paintwork was allowed to show. It took some time to position and glue all these parts to the base using A.MIG-2031 Ultra Glue and to ensure proper alignment and fit of the Ekranoplan itself. Finally, four tie-down rods were made from styrene rod and attached to the oblong grid structures either side of the support cradles. With that, this somewhat complex build was finished.
Above: Completed dolly;the pale cylinders were probably bump stops to prevent hull contact, while foam panels were replicated on the support pads.
Above: The machinery in position and glued to the base. Once the craft was positioned, eight tie-down rods were added using resin and styrene rod.
Winged sea beast
Takom has been releasing wonderfully eclectic subjects for quite some time now, and the Lun Ekranoplan certainly falls into that category. This kit was well engineered and parts moulded crisply, with excellent fit and good surface detail. While several details were missing, the parts are present to construct a basic representation of this fascinating maritime subject. As mentioned, KV Models recently released a masking set for the kit, and Chuyanu Model Ship has produced a metal barrel and tail antenna set.
Let’s hope model companies can be persuaded to follow this with the larger ‘bigger brother’: the mighty Korabl Maket (KM) Ekranoplan, better known as the ‘Caspian Sea Monster’ – hopefully with a base! Overall, I thoroughly enjoyed this project and can highly recommend the kit to all those modellers interested in trying something a little different.