
Wax moths eat beeswax.
They also eat eggs, brood, cocoons, feces, pollen, and honey.
In nature, wax moths are like a "cleaning crew" for an abandoned hive.
Once the colony has left, the wax moths get to work and devour anything left behind.
They clear out the cavity and make it ready for the next colony to live in.
The problem is that sometimes the clean-up crew arrives early.
If your bees are still around and you're having wax moths problems, you should act quickly to try to keep them from swarming.
This article will give you some helpful hints on how to fix and prevent a wax moth infestation.
Table of Contents (Click to Skip Around)

How to Tell If You Have Wax Moths
Wax moths can wreak all sorts of havoc in your hive.
They'll muck up your comb, scarf down your brood, and drive out your bees.
Clearly, wax moths can be an issue, but before we go in guns-blazing, let's learn how to diagnose a wax moth problem.
Silky Cells
One of the first signs that you'll see is a layer of silk on the frames.
This silk isn't from spiders.
No, the spiders keep to themselves. Spiders prefer to stay up in the area between the top and inner cover.
The silk on your frames isn't from Small Hive Beetles either. Instead, SHB larvae leave slime. Not silk.
Rather, silk is a sure sign of the wax moth larvae.
Wax moth larvae leave a destructive path behind them everywhere they go. This silk creates a shield that the wax moth larvae use to protect themselves from the bees. If a bee tries to clean it up, it may end up trapped in the silk.
What's worse is that these larvae don't dip in and out of the cells like Varroa Mites or Small Hive Beetles. Rather, they blast right through the wax walls leaving a mess behind them.
If you see the larvae, you should definitely squish and remove them.

Frass
Technically, poop.
It's just the nice way to say it.
It looks very similar to mouse excrements, but a little smaller.
Another difference is that wax moth frass is everywhere while mouse droppings tend to drop to the bottom board.
Pupae Casings
If you have these casings in your hive then the larvae have had their fill of protein.
Only after they've eaten enough brood and eggs do the larvae spin these silk cocoons.
Each casing is about 1/2" long and looks like tiny little silk cigars.
While choosing a spot to pupate, the larvae will carve out a notch in your wood. Although the hive will still be functional, this notch will end up leaving scars and damaging your hive.
Once removed, you can throw them away or feed them to your chickens.

Why Do I Have Wax Moths?
Like most moths, Wax Moths are nocturnal. This makes it easy for them to slip into your hive.
They simply fly in at night when it's unguarded.
Seeing one or two of them in your hive is pretty common and isn't really a cause for concern. When you see them there, just squish them with your fingers or hive tool.
Even if you don't get rid of them yourself, it won't be long before your girls do. The adult wax moth is relatively easy for your bees to kick out of the hive.
Wax moths are attracted to your hive by smell.
Unfortunately, by the time the wax moth is removed, it probably already accomplished what it came to do.
The whole reason adult wax moths go into your hive is so that they can lay eggs.
The mother moth will lay about 300 to 600 eggs in whatever cracks and crevices she can find in your hive.
Once they're laid, your bees have about 3 to 8 days to find and get rid of these eggs before they hatch into larvae. Usually, the warmer the weather, the faster they hatch.
Your bees make light work out of this task and simply remove the eggs as they're cleaning the hive.
Although, if your hive is weak, it's likely they'll fail to find and remove every single egg.
That's when you start to see wax moth issues.
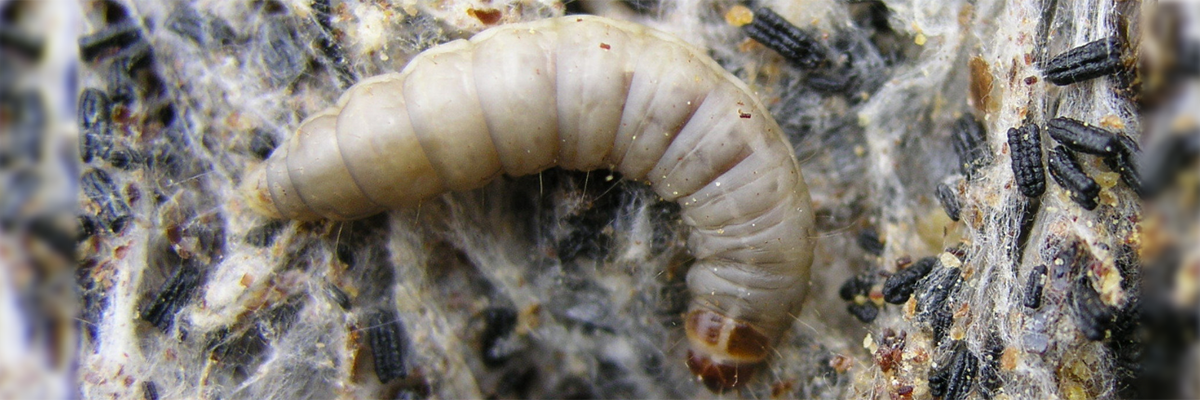
The larvae that hatch are much more destructive and difficult to deal with than the adult wax moths are.
This creates a compounding effect that gets worse & worse over time.

Assessing & Cleaning the Damage
Unfortunately, once there's webbing, the bees can't do much about it.
The silk from wax moths acts like traps that your bees get stuck in as they try to clean it up.
This means you will have to be the one to clean off the frames.
Depending on how bad the damage is, you may not want to even bother trying.
Given how much time it can take to clean off a frame, sometimes it's just easier to scrape, render, and reuse the wax.
Since the wax moths can eat plastic you may even have to purchase new plastic foundations.
If your frames seem salvageable, you can try to use a steel wired brush or your hive tool to help you clean off the webbing & frass.
Once all of it is clean, stick it in the freezer for about 5 hours to kill all the eggs that might be hidden in the cells.
Then you can thaw the frames and put them back into the hive.
How to Kill Wax Moths
You don't have a wax moth problem until you have larvae. Then you have a big problem.
Wax moths can take over a hive in under 3 weeks.
To make things even more complicated, each stage of the wax moth's life cycle has different solutions.
Like all pests in your hive, you should squish them when you see them.
Even still, the eggs of the wax moth are particularly difficult to squish. The mother moth intentionally hides her eggs in the cracks & crevices of your hive so that they are hard to find.
The only true way to kill all the stages of the wax moth at once is by triggering the 'nuclear option' -- Freezing your frames.
- Freeze Frames (All Stages)
- Clean Equipment (Eggs, Pupae, and Larvae)
- Feed to Chickens (Pupae and Larvae)
Freeze Frames (All Stages)
Putting your frames in the freezer will kill everything. The wax moths, the small hive beetles, and even your bees' own larvae & pupae.
This makes for a quick and easy solution but comes with some sacrifices.
This may be your best option if the wax moths have completely taken over the frame already, but you'd still like to salvage it.
How to Freeze Frames
- Take the moth ridden frames out of your hive
- Give them a couple of hard shakes to dislodge any living bee that might still be hanging on them • If the frame is full of wax moth larvae, don't shake the frame
- Scrape off any pupae casings or silk with your hive tool or steel wire brush • Squish, burn, or feed these pupae casings to your chickens
- Place the frames in a clean trash bag
- Tie off the trash bag
- Put the bag in your freezer
- Let sit in your freezer till wax moths are dead • If your freezer is set to 20 degrees Fahrenheit or below it'll take about 5 hours
- After time has passed, thaw the frames back to room temperature
- Place them back in the hive
• If your freezer is set to 5 degrees or below, it'll take about 2 hours

Clean Equipment (Eggs, Larvae, and Pupae)
If you happen to be the recipient of someone else's equipment, consider cleaning it before using it.
Doing so will help prevent the spread of mildew, diseases, and pests.
How to Clean Plastic Foundations
Note: This method will work for all CellTech Foundations
- Remove the frame from the hive
- Scrape off all of the wax from the foundation • Be sure to scrape especially well where the wood of the frame connects to the edge of the foundations
- Once the wax is scraped, hold the wood frame and push on a corner of the foundation • This will pry the foundation away from the wood frame
- After the plastic foundations have been removed, place them into a large plastic tote
- Fill a 53-quart storage tote with 2 cups of Clorox bleach and 1 cup of Dawn dish detergent • The bleach will clean the foundations while killing any eggs that may be on them
- Let it sit for two weeks
- Then remove foundations and spray them with a power washer or scrape them vigorously with a wire brush
- Once thoroughly cleaned, rinsed off, and dried then you can snap them back into the frames
- Place frames back into the hive
• The soap will help dislodge the cocoons within the cells
How to Clean Wooden Frames
Note: This method will work for all CellTech Wooden Frames
- Remove the frame from the hive
- If you see pupae, use a wire brush or your hive tool to scrape them off.
- Scrape off all of the wax from the foundation • Be sure to scrape especially well where the wood of the frame connects to the edge of the foundations
- Once the wax is scraped, hold the wood frame and push on a corner of the foundation • This will pry the foundation away from the wood frame
- After the plastic foundations have been removed, set the wood frames aside
- You can clean the wood frames in a 53-quart storage tote or a 5-gallon bucket
- The tote would need 3 cups of Clorox bleach mixed into 12 Gallons of Water. The 5-gallon bucket would need 1 cup of Clorox Bleach mixed into 4.5 Gallons of Water
- Once the water and bleach have been combined, set the wood frames into the tote or 5-gallon bucket and let sit for 2 minutes • If you could only fit half of the frame into the bucket, then rotate the frame after two minutes and allow it to sit for two more minutes
- After the entire frame has soaked for 2 minutes
- Remove and allow them to dry
- Once dry, snap the plastic foundations back into the frame and reuse them
How to Clean Everything Else
Note: This method will work for all unpainted NuBee & Busy Bees 'n' More hive parts. Don't do this method on Hoover Hives' parts, as it may remove the outer beeswax layer. Instead scrape and freeze Hoover Hive parts in order to kill wax moths.
- This is the same process as when cleaning the wooden frames (above)
- If you see pupae, use a wire brush or your hive tool to scrape them off
- You can clean the wooden hive part in a 53-quart storage tote • Or a 5-gallon bucket if the hive part will fit
- Mix 3 cups of Clorox bleach into the 12 gallons of water in the tote. •Or mix 1 cup of Clorox bleach into 4.5 gallons of water in the 5-gallon bucket
- Allow hive part(s) to sit in the mixture for 2 minutes • If you have half the item sticking out of the mixture, flip it to submerge the dry side and allow to sit for 2 minutes
Feed to Chickens (Pupae and Larvae)
If you see a frame riddled with wax moths. Don't just throw it away yet.
Wax moth larvae and pupae make for great protein.
Set the frame down and call the chicken over to eat.
Once they're done you can scrape the wax off, melt it down, and use it to recoat your foundations with a nice even layer.
How to Prevent Wax Moths
Wax moths can be very hard to kill once you have them. That's why it's best to focus on preventing them all together.
Usually, wax moths are just a symptom of an underlying weak hive.
They smell fear.
Maybe not literally, but they do smell your bees, their honey, and their pollen. That's why some of the following prevention methods are based on producing a strong fragrance.
Strong Hive
By far the most important method to prevent wax moths (and many other pests) is to keep a strong hive.
A hive's strength isn't solely dependent on how many bees are in the hive.
It's more like a proportion between the population size and its physical size.
For example, let's say you have 100 people in your hometown, that's not very many people. However, if you have 100 people in your home, then that's a lot of people.
This is what I mean by population density. A beehive that is more packed like your home would be is going to be able to protect itself a lot more than if they had to protect more space.
This is why when you first get your hive we recommend you start out with just using a single deep brood box. Only once this brood box is getting full should you add a medium honey super on top.
If you provide too much space, the bees are going to have all sorts of problems like:
- Having a lack of focus
- Having slower productivity
- Gnawing away the beeswax on the foundations
- Being more vulnerable to wax moths, small hive beetles, wasps, robber bees, and more

Lay Traps
Wax moths are attracted to the smell of your beehive.
They love the sweet, floral, fermenting smell that it puts off.
It's possible to harness the power of this smell and use it to trap wax moths while keeping your honey bees safe.
In order to replicate the smell of a beehive, you'll need to follow the instructions below.
How to Make a Wax Moth Trap
Note: This mixture should result in the death of many wax moths, it may also attract/kill hornets and wasps.
- Find A Large Bottle
- Drill a 1/2” hole •Too large of a hole will allow the moths, hornets, and wasps to find a way out after they've been trapped.
- Fill it with this recipe • 1 Cup of Water
- Hang the bottle 100 yards away from your hives
• 1 Cup of Sugar
• 1 Cup of Apple Cider Vinegar
• 1 Old Banana Peel

Plant Mint
Another way to prevent the wax moths from getting to your hive is to disguise your hive.
Since it is your hives' smell that they are attracted to, try masking the smell by planting mint between them.
This method may just be a moth-myth, but there's enough hype in the beekeeping world and in my own experience that it's earned a spot on this list.
Also, there's no harm that can come of it. Mint is great against Tracheal mites. Mint-tasting honey is also delicious and perfect for tea. Plus, there's plenty of recipes you can use your homegrown mint for.

Rotate Frames
Moths love frames that have been used over and over again for creating brood.
It seems like the darker the wax, the more the wax moth will be attracted to it.
This is likely because, over time, the beeswax starts to absorb the nutrients that surround it. This is one reason you have to be cautious of the kinds of treatments you use for pests. NEVER USE MOTH BALLS - it gets soaked into your wax and can be harmful to humans.
Normally the darker wax has soaked up nutrients from worker jelly, cocoons, pollen, honey, and anything else that gets into the cells.

Scrape Bottom Boards
Every month or so you should scrape the bottom board of your beehive.
Especially the corners and edges where wax moths love to lay eggs.
Not only does this help prevent wax moth larvae, but it keeps your beehive clean. It saves the bees time by removing debris and the dead for them.
In a similar vein, some beekeepers use wood glue to "round out" these corners. By applying a small bead along the edges it makes it so there are no cracks and crevices there in the first place.
Reduce Number of Entrances
While scraping the bottom board, it'd be a great time to consider if you have too wide of an entrance.
A smaller notch means that your bees have an easier time guarding your hive.
If you keep the notch small all the time though, it can hinder the speed at which your bees gather pollen & nectar.
Entrance reducers like the one in the picture below are made to widen as your hive grows. If your hive is weak, consider setting the reducer to the smallest setting.
Another time to consider reducing your hive's entrance may be when you place a new box onto your hive. Adding a new box will make the population density of your hive go down. This would mean that you'd have a weaker hive at the moment.

In Conclusion
You don't have a wax moth problem until you have wax moth larvae. Then you have a big problem.
Wax moths can take over a hive in under 3 weeks.
It's by far easier to prevent wax moths than it is to kill them once they're in your hive.
If your hive is healthy, it's likely you'll never run into a wax moth problem. Ultimately, a wax moth problem is just a symptom of an underlying weak hive.
Wax moths are a great threat to your unoccupied boxes during winter. This is why we're dedicating the entire next article to cover the topic of storing your unused boxes.
Keep On Beekeeping On!
-Lane
Continue Your Bee Journey!
The following articles could be very helpful in taking your next steps.


Recommended First Hives
If you haven't yet purchased your first hive, we recommend one of our Starter Hive Kits. Each kit comes with all the essential parts of a beehive and the accessories you'll need for your first few years of beekeeping. We consider them "Nuc Ready" which means they come with 5 frames and are ready for the 5 that you buy when you purchase a 5-Frame Nuc of bees.


