
Create successful ePaper yourself
Turn your PDF publications into a flip-book with our unique Google optimized e-Paper software.
GB<br />
OWNERS MANUAL<br />
Congratulations on your purchase<br />
of an energy meter. Please take the<br />
time to read and understand this<br />
manual so you can begin to enjoy<br />
the energy saving benefits this<br />
product has to offer.<br />
FEATURES<br />
• Overload warning<br />
• Energy monitor and energy<br />
consumption tracking<br />
• Maximum current and wattage<br />
readings<br />
• Energy cost calculation<br />
• Energy usage time<br />
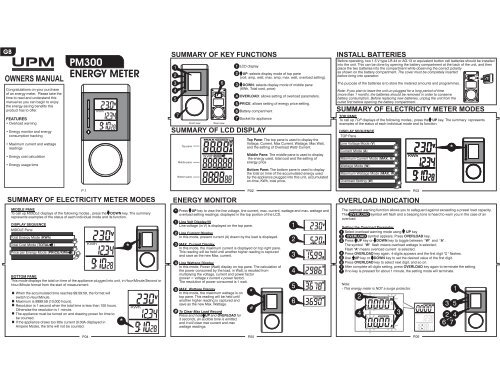
<strong>PM300</strong><br />
<strong>ENERGY</strong> <strong>METER</strong><br />
P.1<br />
SUMMARY OF ELECTRICITY <strong>METER</strong> MODES<br />
P.04<br />
KWh<br />
MIDDLE PANE<br />
To call up MIDDLE displays of the following modes , press the DOWN key. The summary<br />
represents examples of the status of each individual mode and its function.<br />
DISPLAY SEQUENCE<br />
MIDDLE Pane<br />
Total Energy Mode ( KWh)<br />
Total Cost Mode ( TOTAL )<br />
Price per Energy Mode ( PRICE/KWh )<br />
KWh<br />
BOTTOM PANE<br />
This mode displays the total on time of the appliance plugged into unit, in Hour/Minute/Second or<br />
Hour/Minute format from the start of measurement.<br />
When the accumulated time reaches 99:59:59, the format will<br />
switch to Hour/Minute. Maximum is 9999:59 (10,000 hours).<br />
V<br />
Resolution is 1 second when the total time is less than 100 hours.<br />
Otherwise the resolution is 1 minute.<br />
The appliance must be turned on and drawing power for time to<br />
KWh<br />
be counted.<br />
If the appliance draws too little current (0.00A displayed in<br />
Ampere Mode), the time will not be counted.<br />
*<br />
V<br />
V<br />
*<br />
SUMMARY OF KEY FUNCTIONS<br />
1<br />
2<br />
3<br />
4<br />
5<br />
7<br />
1 LCD display<br />
2 UP:<br />
selects display mode of top pane<br />
(volt, amp, watt, max. amp, max. watt, overload setting).<br />
3 DOWN:<br />
selects display mode of middle pane<br />
(KWh, Total cost, price)<br />
4 OVERLOAD:<br />
allows setting of overload parameters.<br />
5 PRICE:<br />
allows setting of energy price setting.<br />
6 Battery compartment<br />
7<br />
Socket for appliance<br />
SUMMARY OF LCD DISPLAY<br />
Top pane<br />
Middle pane<br />
Bottom pane<br />
MAX<br />
KWh TOTAL<br />
PRICE/KWh<br />
W<br />
V<br />
A<br />
<strong>ENERGY</strong> MONITOR<br />
P.02<br />
* Press UP key to view the line voltage, line current, max. current, wattage and max. wattage and<br />
overload setting readings; displayed in the top portion of the LCD.<br />
1 Line Volt Display(V)<br />
Line voltage (in V) is displayed on the top pane.<br />
2 Line Current Display<br />
In this mode, present current ( A)<br />
drawn by the load is displayed.<br />
3 MAX. Current Display<br />
In this mode, the maximum current is displayed on top right pane.<br />
This reading will be held until another higher reading is captured<br />
and save as the new Max. current.<br />
4 Line Wattage Display<br />
In this mode, Power (Watt) display on top pane. The calculation of<br />
the power consumed by the load, in Watt, is resulted from<br />
multiplying the voltage, current and power factor<br />
(power = voltage x current x power factor) .<br />
The resolution of power consumed is 1 watt.<br />
5 MAX. Wattage Display<br />
In this mode, the maximum wattage is on<br />
top pane. This reading will be held until<br />
another higher reading is captured and<br />
save as the new Max. Wattage.<br />
# To Clear Max Load Record<br />
Press and hold UP and OVERLOAD for<br />
3 seconds, an<br />
audible tone is emitted,<br />
and it will clear max current and max<br />
wattage readings.<br />
6<br />
Front view Rear view<br />
Top Pane:<br />
The top pane is used to display the<br />
Voltage, Current, Max Current, Wattage, Max Watt,<br />
and the setting of Overload Watt/ Current.<br />
Middle Pane: The middle pane is used to display<br />
the energy used, total cost and the setting of<br />
energy price<br />
Bottom Pane: The bottom pane is used to display<br />
the total on time of the accumulated energy used<br />
by the appliance plugged into this unit, accumulated<br />
on-time, KWh, total price.<br />
*<br />
#<br />
P.05<br />
1<br />
2<br />
3<br />
4<br />
5<br />
6<br />
MAX<br />
MAX<br />
V<br />
A<br />
A<br />
W<br />
W<br />
W<br />
INSTALL BATTERIES<br />
Before operating, two 1.5 V type LR-44 or AG-13 or equivalent button cell batteries should be installed<br />
into the unit. This can be done by opening the battery compartment at the back of the unit, and then<br />
place the two batteries into the compartment while observing the correct polarity<br />
as shown on the battery compartment. The cover must be completely inserted<br />
before bring into operation.<br />
The purpose of the batteries is to store the metered amounts and programmes.<br />
Note: If you plan to leave the unit un-plugged for a long period of time<br />
(more than 1 month), the batteries should be removed in order to conserve<br />
battery consumption. Before replacing new batteries, unplug the unit from the<br />
outlet first before opening the battery compartment.<br />
SUMMARY OF ELECTRICITY <strong>METER</strong> MODES<br />
TOP PANE<br />
To call up TOP displays of the following modes , press the UP key. The summary represents<br />
examples of the status of each individual mode and its function.<br />
DISPLAY SEQUENCE<br />
TOP Pane<br />
Line Voltage Mode ( V)<br />
Current Mode ( A)<br />
Maximum Current Mode ( MAX. A)<br />
Wattage Mode ( W)<br />
Maximum Wattage Mode ( MAX. W)<br />
Overload Setting ( W)<br />
2<br />
W<br />
KWh<br />
P.03<br />
OVERLOAD INDICATION<br />
The overload warning function allows you to safeguard against exceeding a preset load capacity.<br />
The OVERLOAD symbol will flash and a beeping tone is heard to warn you in the case of an<br />
overload.<br />
Setting the Overload Parameter<br />
1 Select overload warning mode using UP key<br />
2 OVERLOAD symbol appears. Press OVERLOAD key.<br />
3 Press UP key or DOWN key to toggle between " W" and " A"<br />
.<br />
The symbol " W"<br />
flash means overload wattage is selected;<br />
Flash " A"<br />
means overload current is selected.<br />
4 Press OVERLOAD key again. 4-digits appears and the first digit " " flashes.<br />
5 Use UP key or DOWN key to set the desired value of the first digit.<br />
6 Press OVERLOAD key to select next digit, and so on.<br />
7 After complete all digits setting, press OVERLOAD key again to terminate the setting.<br />
* If no key is pressed for about 1 minute, the setting mode will terminate.<br />
*<br />
Note:<br />
- This energy meter is NOT a surge protector.<br />
P.06<br />
VV<br />
W<br />
3<br />
*<br />
4 KWh 2 4<br />
A<br />
3<br />
6<br />
7<br />
1<br />
5
<strong>ENERGY</strong> CONSUMPTION AND COST<br />
* Press DOWN key to view the total energy, total cost and price per energy; displayed in the<br />
middle portion of the LCD.<br />
A<br />
Total Energy Consumed (KWh) Display<br />
This mode displays the total accumulated energy used by the appliance (in KWh) from<br />
the start of measurement. The resolution is 0.001 KWh and the maximum is 9999.99KWh.<br />
B Total Time Consumed Display<br />
The total time that the meter is turned on and display in the Bottom portion of the<br />
LCD, in Hour/Minute/Second or Hour/Minute format<br />
from the start of measurement.<br />
When the time reaches 99:59:59, the format will switch to Hour/Minute.<br />
Maximum is<br />
9999.59. Resolution is 1 second for total time less than 100 hours. Otherwise the<br />
resolution is 1 minute. Both power meter and the appliance itself has to be turned on<br />
for time to be counted. If the appliance draws too little current (0.00A displayed in<br />
Ampere Mode), the time will not be counted.<br />
C Price / KWh mode<br />
This mode displays the total on time of the accumulated energy used by the<br />
appliance plugged into unit. When the cost is over 999.999, there will be no decimal<br />
place, so the total cost can be shown up to<br />
price set in Price/KWh mode.<br />
999999. The total cost is based on the<br />
In this mode the price per KWh is displayed and set. The rate set here will affect<br />
“ cost of the energy used".<br />
To set the price of energy, use the following steps:<br />
1 Press the PRICE key and the first digit will begin to flash.<br />
2 Press the UP or DOWN key to set the first digit “ “ of the price.<br />
2 4<br />
3 Press the PRICE key and the second digit will begin to flash.<br />
4 Press the UP or DOWN key to set the second digit of the price.<br />
5 Repeat step 3 and 4 to set the third, forth, fifth and sixth digit of the price.<br />
6 Press PRICE key to complete the price setting mode.<br />
*<br />
!<br />
7 The permitted range is from 0.001/KWh to 999.999/KWh.<br />
1 3<br />
! Press and hold the DOWN key and PRICE together for about 3 seconds, 6<br />
an audible tone emitted, and the KWH reading, total cost and the total ON time<br />
will be clear to zero.<br />
P.07<br />
REMARKS<br />
The power meter shall be used only in installation<br />
category II (CAT II) according of IEC 664, i.e. in which transient voltages do not<br />
exceed 2500V. The mains supply for residential and commercial areas generally<br />
belongs to this category.<br />
P.10<br />
KWh<br />
AS<br />
TOTAL<br />
B<br />
b<br />
PRICE/KWh<br />
C<br />
ABNORMAL DISPLAY<br />
If the display on the meter is abnormal or non-existent, reinstalling the batterries<br />
described above, otherwise the meter may not function faultlessly.<br />
CONNECTING APPLIANCES<br />
1<br />
2<br />
*<br />
P.08<br />
SAFETY & MAINTENANCE INSTRUCTIONS<br />
• Use indoors only.<br />
• Keep children and pets away.<br />
• Keep away from water.<br />
• Inspect periodically.<br />
• The unauthorised rebuilding and/ or modifying of the device is not permitted.<br />
•<br />
•<br />
•<br />
Plug the energy meter into an electrical socket.<br />
Plug the power plug of an appliance such as refrigerator<br />
into the socket on the front of the energy meter.<br />
The energy meter displays the main voltage “V”,<br />
electricity consumption and how long it was switched on.<br />
If you are not sure about the operation, safety or the connection of the device,<br />
contact an expert.<br />
Repair work must only be carried out by a trained person who is familiar with the<br />
relevant regulations.<br />
The guarantees become invalid in the event of damage resulting from non-observance<br />
or improper use of the operation manual.<br />
• To avoid any hazard or misuse, please use this product only as described in user manual.<br />
1<br />
2<br />
KWh<br />
V<br />
TECHNICAL SPECIFICATION<br />
Operating voltage<br />
Operating current<br />
Lowest measurable current<br />
Voltage display range (V)<br />
Current display range (A)<br />
Wattage display range (W)<br />
KWh display range (in KWh)<br />
Power resolution<br />
: 230 V ~ 50 Hz<br />
: max. 16 A, 3680 W<br />
: 0.02 A<br />
: 190 V - 276 V<br />
: 0.00 A - 16.00 A<br />
: 0 W - 4416 W<br />
: 0.00 - 9999.99 KWh<br />
: 1 W<br />
Accuracy<br />
Voltage: +/-3 % of measured value<br />
Current: +/-3 % of measured value +/- 0.04 A<br />
Wattage: +/-5 % of measured value +/- 10 W<br />
kWh: +/-5 % of measured value +/- 0.1 kWh<br />
Accuracy figure based on<br />
- Line frequency of 45 ~ 65 Hz<br />
- Unit at normal room temperature<br />
- Harmonic distortion of voltage/ current < 15%<br />
Note: Accuracy of the power meter may be reduced when there is significant electrical noise<br />
present in the AC line. However, the accuracy will return to normal after the noise is removed.<br />
Range of environment conditions<br />
- Temperature 5 °C to 40 ° C<br />
- Maximum relative humidity: 90 %<br />
- For indoor use only<br />
- Altitude: up to 2000m<br />
P.09<br />
CLEANSING INSTRUCTIONS<br />
• Please unplug the device before you clean it.<br />
•<br />
•<br />
•<br />
Use dry soft cloth to clean the device surface.<br />
Never spill liquids on the device when cleansing.<br />
Never open the covers when cleansing.<br />
P.11 P.12