You also want an ePaper? Increase the reach of your titles
YUMPU automatically turns print PDFs into web optimized ePapers that Google loves.
CHAPTER 5<br />
■ ■ ■<br />
<strong>Omni</strong>-<strong>Biped</strong><br />
A lpha Rex is certainly cool. However, the turning mechanism is missing something, don’t<br />
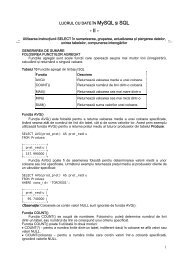
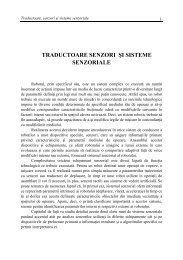
you think? In this chapter you’ll meet the <strong>Omni</strong>-<strong>Biped</strong> (see Figure 5-1), a smooth COG-shifting<br />
biped that can walk and also turn. It is omni-directional, hence the name. It shares the leg<br />
frame shape with Alpha Rex, but uses motors in a whole different way: each motor drives the<br />
leg to which it is attached. This feature allows the robot to turn quickly left and right within its<br />
own footprint.<br />
Figure 5-1. <strong>Omni</strong>-<strong>Biped</strong> with arms—an aesthetic addition<br />
143
144<br />
CHAPTER 5 ■ OMNI-BIPED<br />
History of a <strong>Biped</strong><br />
The biped robots that you see in these pages are not the first ones I’ve made, but they’re the<br />
result of years of trial and error, and much experience. In 2001, my quest to create the perfect<br />
biped started. With good old RCX, I achieved the results that were shown in Chapter 1. However,<br />
I was limited by the motors’ lack of precision and the everlasting lack of Rotation Sensors. In<br />
fact, in the good old Robotics Invention System set, such sensors were not included, but were<br />
available only in extension sets. Without Rotation Sensors, the robots’ movements could be<br />
driven only using precise timing; that is, to make a shaft turn for a small number of degrees,<br />
you had to start the motor, wait for an estimated number of milliseconds, and stop the motor.<br />
As you can guess, this method is based on the estimation of motor speed (how much will it<br />
travel in this lapse of time?), and therefore is rough. The new NXT servomotors integrate the<br />
Rotation Sensor (also called encoder) and so solve that old motors’ precision problem: now<br />
you can rotate a motor shaft by an exact amount of degrees.<br />
As soon as I got the new NXT set, in the early phase of the MINDSTORMS Developer<br />
Program (MDP), I didn’t even try to build the Tribot—the quick start guide rover bot. I immediately<br />
rushed on to the Alpha Rex, due to my curiosity to learn how LEGO designers had<br />
created a stable, smooth walking biped.<br />
It was a great-looking robot, indeed! It gave me a bright idea about how to integrate the<br />
bulky NXT servomotors inside the legs’ frame, and how to use the mass of the NXT brick as<br />
a counterweight, thus turning a possible cause of unsteadiness into an advantage. But I have<br />
to say that the steering mechanism, based on a rubber gripper, disappointed me. So, I thought<br />
up something different.<br />
In the <strong>Omni</strong>-<strong>Biped</strong>, each leg is entirely driven by a motor to obtain two coordinated<br />
movements: the ankle is bent to shift the robot’s center of gravity (COG), and the foot swings<br />
back and forth, to achieve stepping. With good reason, this biped belongs to the third of the<br />
categories introduced in Chapter 1, the “smooth COG shifting” one.<br />
The hardware configuration secures the stability, just as for the Alpha Rex. Furthermore,<br />
the software manages all leg-synchronization hassles, because this robot uses no sensor to<br />
know which side it’s leaning on or which foot is loaded. Synchronicity between legs is essential<br />
for this biped. When both motors turn in the same direction the robot walks straight; when the<br />
motors run in opposite directions, the <strong>Omni</strong>-<strong>Biped</strong> turns in place.<br />
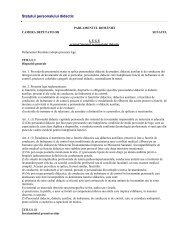
For the biped to walk and turn correctly, you must make sure to align the legs correctly<br />
every time you start the <strong>Omni</strong>-<strong>Biped</strong> program. To do this, rotate the bevel gear to align the<br />
5-long beam with the diagonal that connects the 24-tooth gear holes. Adjust the alignment<br />
of both legs, using Figure 5-2 as reference.
CHAPTER 5 ■ OMNI-BIPED 145<br />
Figure 5-2. Correct alignment of the legs<br />
Single-Tasking vs. Multitasking<br />
Before introducing the programs for the <strong>Omni</strong>-<strong>Biped</strong>, let’s discuss single-task and multitask<br />
programs. In the simplest case, a program can be seen as a sequence of actions; for example:<br />
• Go forward for three seconds.<br />
• Turn left for two seconds.<br />
• Wait for an incoming object.<br />
• Go backward until the object goes out of sight.<br />
• And so on . . .
CHAPTER 5 ■ OMNI-BIPED 163<br />
Building Instructions<br />
I’ll stop chattering—it’s time to build! You can build <strong>Omni</strong>-<strong>Biped</strong> using only the NXT retail set<br />
parts. If you stop before building the arms’ assembly (Step 70), you’ll have a walking base to be<br />
freely customized. For example, you could follow the MINDSTORMS retail set instructions to<br />
build the Alpha Rex upper body to attach to these legs; otherwise, you can embellish the model<br />
with many additions, such as arms, hands, a tail, or whatever you desire. You must pay attention<br />
not to upset the equilibrium of the robot and avoid excessively protruding or asymmetric<br />
features. To start with, build the body as illustrated in Steps 74–111.
164<br />
CHAPTER 5 ■ OMNI-BIPED<br />
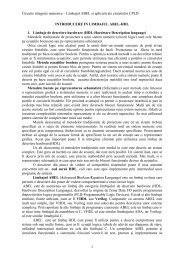
Figure 5-6. <strong>Omni</strong>-<strong>Biped</strong> bill of materials
CHAPTER 5 ■ OMNI-BIPED 165<br />
Table 5-1. <strong>Omni</strong>-<strong>Biped</strong> Bill of Materials<br />
Quantity Color Part Number Part Name<br />
1 56467.DAT Electric MINDSTORMS NXT Ultrasonic Sensor<br />
4 White 40490.DAT TECHNIC Beam 9<br />
6 Dark gray 32009.DAT TECHNIC Beam 11.5 Liftarm Bent 45 Double<br />
1 Black 55804.DAT Electric Cable NXT 20cm<br />
1 Black 55805.DAT Electric Cable NXT 35cm<br />
1 Black 55806.DAT Electric Cable NXT 50cm<br />
6 White 32278.DAT TECHNIC Beam 15<br />
2 53787.DAT Electric MINDSTORMS NXT Motor<br />
1 53788.DAT Electric MINDSTORMS NXT<br />
2 Light gray 48989.DAT TECHNIC Axle Joiner Perpendicular 1×3×3 with<br />
4 Pins<br />
2 Black 32054.DAT TECHNIC Pin Long with Stop Bush<br />
6 Light gray 3648.DAT TECHNIC Gear 24 Tooth<br />
2 Black 32184.DAT TECHNIC Axle Joiner Perpendicular 3L<br />
6 Dark gray 32523.DAT TECHNIC Beam 3<br />
2 Black 32034.DAT TECHNIC Angle Connector #2<br />
2 Light gray 55615.DAT TECHNIC Beam 5 Bent 90 (3:3) with 4 Pins<br />
8 Dark gray 32140.DAT TECHNIC Beam 5 Liftarm Bent 90 (4:2)<br />
2 Light gray 32073.DAT TECHNIC Axle 5<br />
5 Dark gray 32316.DAT TECHNIC Beam 5<br />
8 Dark gray 32526.DAT TECHNIC Beam 7 Bent 90 (5:3)<br />
2 Black 3706.DAT TECHNIC Axle 6<br />
6 Dark gray 32348.DAT TECHNIC Beam 7 Liftarm Bent 53.5 (4:4)<br />
4 White 32524.DAT TECHNIC Beam 7<br />
2 Black 3707.DAT TECHNIC Axle 8<br />
2 Light gray 3713.DAT TECHNIC Bush<br />
2 Light gray 3647.DAT TECHNIC Gear 8 Tooth<br />
4 Black 32013.DAT TECHNIC Angle Connector #1<br />
28 Blue 43093.DAT TECHNIC Axle Pin with Friction<br />
6 Light gray 6536.DAT TECHNIC Axle Joiner Perpendicular<br />
2 Black 32062.DAT TECHNIC Axle 2 Notched<br />
53 Black 2780.DAT TECHNIC Pin with Friction and Slots<br />
2 Light gray 3673.DAT TECHNIC Pin<br />
2 Black 32192.DAT TECHNIC Angle Connector #4 (135 degree)<br />
6 Black 32014.DAT TECHNIC Angle Connector #6 (90 degree)<br />
Continued
166<br />
CHAPTER 5 ■ OMNI-BIPED<br />
Table 5-1. Continued<br />
Quantity Color Part Number Part Name<br />
8 Orange 41669.DAT TECHNIC Bionicle 1 × 3 Tooth with Axlehole<br />
2 Light gray 32269.DAT TECHNIC Gear 20 Tooth Double Bevel<br />
18 Black 6558.DAT TECHNIC Pin Long with Friction and Slot<br />
2 Dark gray 42003.DAT TECHNIC Axle Joiner Perpendicular with 2 Holes<br />
4 Dark gray 41678.DAT TECHNIC Axle Joiner Perpendicular Double Split<br />
14 Light gray 4519.DAT TECHNIC Axle 3<br />
237 parts total (all included in the NXT retail set)
CHAPTER 5 ■ OMNI-BIPED 167<br />
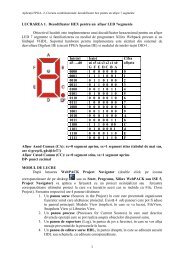
Start building the right foot. In Step 2, insert the blue axle pins at the end of the bent beams.
168<br />
CHAPTER 5 ■ OMNI-BIPED<br />
Add a 15-long beam with 8 black pins, then join the foot parts with the dark gray bent liftarms.<br />
Finally, add the ankle hinge.
CHAPTER 5 ■ OMNI-BIPED 169<br />
Add the other two ankle hinges that allow the biped to bend the ankle to shift the weight<br />
smoothly. The right foot is completed.
170<br />
CHAPTER 5 ■ OMNI-BIPED<br />
Now build the right leg. Here you must use two 15-long beams and a 9-long beam to join them.
CHAPTER 5 ■ OMNI-BIPED 171<br />
Reinforce the leg using 9-long and 7-long beams. Add the bent beam where the legs’ cams will be<br />
attached and add the black pins.
172<br />
CHAPTER 5 ■ OMNI-BIPED<br />
The right leg is done.
CHAPTER 5 ■ OMNI-BIPED 173<br />
Start building the left foot. In Step 27, insert the blue axle pins at the end of the bent beams.
174<br />
CHAPTER 5 ■ OMNI-BIPED<br />
Add a 15-long beam with eight black pins, then join the foot parts with the dark gray bent<br />
liftarms. Finally, add the ankle hinge.
Add the other two ankle hinges. The left foot is completed.<br />
CHAPTER 5 ■ OMNI-BIPED 175
176<br />
CHAPTER 5 ■ OMNI-BIPED<br />
Now build the left leg. Here you must use two 15-long beams and a 9-long beam to join them.
CHAPTER 5 ■ OMNI-BIPED 177<br />
Reinforce the leg using 9-long and 7-long beams. Add the bent beam where the legs’ cams will be<br />
attached, and the left leg is finished.
178<br />
CHAPTER 5 ■ OMNI-BIPED<br />
Attach the two legs together, using the central dark gray bent beams as a reference. Place the<br />
right leg forward and the left leg backward, as shown.
Now you’re building the left motor subassembly.<br />
CHAPTER 5 ■ OMNI-BIPED 179
180<br />
CHAPTER 5 ■ OMNI-BIPED<br />
Attach a black pin in a hole of the 24-tooth gear; this gear must be rotated so that two of its holes<br />
are aligned with the 5-long beam holes. Use Figure 5-2 as reference.
CHAPTER 5 ■ OMNI-BIPED 181<br />
Insert the left motor subassembly in place. The cam pin goes in the free hole of the central bent<br />
beams of the leg assembly, the last hole of the 5-long beam goes in the gray pin of the leg, and the<br />
external ankle hinge pin goes in the first round hole of the motor assembly’s bent beam.
182<br />
CHAPTER 5 ■ OMNI-BIPED<br />
Now you’re building the right motor subassembly.
CHAPTER 5 ■ OMNI-BIPED 183<br />
Attach the black pin in a hole of the 24-tooth gear, so that it is the opposite hole with respect to<br />
where you placed the pin in the other leg cam. This is not crucial now, but the correct alignment<br />
of cams and legs is essential later.
184<br />
CHAPTER 5 ■ OMNI-BIPED<br />
Insert the right motor assembly onto the robot structure as before. The walking base is completed.
CHAPTER 5 ■ OMNI-BIPED 185<br />
From now on, you are building the robot’s upper body. You can get creative or continue building<br />
as illustrated. Rotate the model and add the perpendicular joiners, blocking them with two<br />
5-long axles.
186<br />
CHAPTER 5 ■ OMNI-BIPED<br />
Add four black long pins.
Add the 7-long beams.<br />
CHAPTER 5 ■ OMNI-BIPED 187
188<br />
CHAPTER 5 ■ OMNI-BIPED<br />
Place the NXT on the legs and put three pins where shown. In the picture you see a “flying” NXT<br />
because the instructions are meant for both those who will use normal batteries or the Li-Ion<br />
battery pack, which makes the NXT one unit taller than normal.
Place two bent beams to lock the NXT on this side.<br />
CHAPTER 5 ■ OMNI-BIPED 189
190<br />
CHAPTER 5 ■ OMNI-BIPED<br />
Turn the model to see the robot’s back. Add three pins as before.
Add two bent beams again and the NXT is now completely locked onto the legs.<br />
CHAPTER 5 ■ OMNI-BIPED 191
192<br />
CHAPTER 5 ■ OMNI-BIPED<br />
Build the robot’s head.
CHAPTER 5 ■ OMNI-BIPED 193<br />
Attach the right motor to NXT output port B using a 50cm (20 inch) cable. See the next step (85)<br />
to see where to pass the cable.
194<br />
CHAPTER 5 ■ OMNI-BIPED<br />
The cable must pass tightly in the space between the motor’s white beams, and you must block it<br />
there with a long pin with the stop bush. The cable turn in the bottom of the foot must clear the<br />
ground or the robot won’t walk correctly.
CHAPTER 5 ■ OMNI-BIPED 195<br />
Attach the left motor to NXT output port A using a 35cm (14 inch) cable. Pass and block the<br />
cable as shown. Check the previous caption as a guide.
196<br />
CHAPTER 5 ■ OMNI-BIPED<br />
Attach the Ultrasonic Sensor to NXT input port 1 using a 20cm (8 inch) cable.
CHAPTER 5 ■ OMNI-BIPED 197<br />
Start building the arms’ decorative assembly. This submodel is optional and can be replaced or<br />
customized as you want, just paying attention not to compromise the robot’s balance.
198<br />
CHAPTER 5 ■ OMNI-BIPED<br />
Build the arms themselves and attach them to the rest of the assembly.
Build the hands.<br />
CHAPTER 5 ■ OMNI-BIPED 199
200<br />
CHAPTER 5 ■ OMNI-BIPED<br />
Attach the arms’ subassembly to the robot.
CHAPTER 5 ■ OMNI-BIPED 201<br />
The <strong>Omni</strong>-<strong>Biped</strong> is completed.<br />
Summary<br />
In this chapter, you’ve been introduced to a small and quick biped robot—the walker alternative<br />
to the LEGO wheeled Tribot. This is a simple project, with respect to other ones you’ll find<br />
later in the book. Still, it offers many ideas, and an occasion to show some techniques that could<br />
be useful in other situations.<br />
Alpha Rex inspired the <strong>Omni</strong>-<strong>Biped</strong> legs’ shape, but notice how small but fundamental modifications<br />
have notably improved the gait, especially regarding turning. The motor is a mobile part<br />
of the leg itself, while in Alpha Rex, motors are hung inside the leg frame and don’t move during<br />
the gait. Here, every motor drives a whole leg, both stepping and leaning, while in Alpha Rex the<br />
motors control different movements of both legs together; that is, one motor controls robot leaning,<br />
the other controls the stepping. Furthermore, the turning mechanism is much more elegant<br />
in <strong>Omni</strong>-<strong>Biped</strong> than in Alpha Rex, whose solution (with rubber grippers) is not realistic.<br />
On the software side, you saw the difference between single-task and multitask programs.<br />
We also touched the tip of the iceberg with regards to concurrent programming difficulties<br />
and their solution: the mutual exclusion semaphores. Also, the modulo operator (%) could
202<br />
CHAPTER 5 ■ OMNI-BIPED<br />
be useful in your future projects. Finally, we analyzed the operation, the uses, and the implementation<br />
of the hysteresis cycle.<br />
Having three sensor ports left, there’s plenty of space for add-ons and new features. Don’t<br />
forget the third motor in your box that is waiting for action! The following exercises might also<br />
inspire you to build some new type of robot. If your creativity needs to be sparked some more,<br />
keep on reading the next chapters.<br />
Exercise 5-1. Hardware Ideas<br />
Rebuild the leg frames to shape a chicken-like leg, with a reverse bent knee. Modify the motor placement accordingly,<br />
to keep using the motors as structural support.<br />
Add a tail and a head (like a dinosaur) that would follow the legs’ movement, helping the COG shifting. For example,<br />
when the robot is leaning left, the tail would be bent left, and the same for the right side, balancing the robot.<br />
You might drive the tail with the third motor or use the leg motors themselves.<br />
After having read the AT-ST instructions in Chapter 4, try to add sensors and modify the software to let your robot<br />
reset its leg position automatically at program startup.<br />
Don’t let that third motor go to waste! After having read Chapter 7, you can use its fetching arm as a starting idea<br />
to develop a grabber for <strong>Omni</strong>-<strong>Biped</strong>. Could you give it the ability to find objects autonomously?<br />
The world is full of line-following robots on wheels. There aren’t that many line-following walkers. There’s no need<br />
to say a word more. Do it!<br />
Exercise 5-2. Software Ideas<br />
Using the multitask version of the software, add new tasks to play a melody while walking, and display animation.<br />
Be careful when using the mutex variables to synchronize display access for animation and string messages, and<br />
voice announcements with music.<br />
After having read Chapter 3 about FSMs and Chapter 6 about the NXT Turtle, try to give the <strong>Omni</strong>-<strong>Biped</strong> an autonomous<br />
behavior. You can use as state names (and corresponding functionality) Lazy, Normal, Worried, and Dancing; transition<br />
events among states could be an incoming obstacle, a sharp sound, a sound pattern, or a timer elapsing. The<br />
robot in Lazy state could stand still, performing some random movement; when it senses a sharp sound, its state<br />
could become Worried and it would walk a bit. If the sounds continue around it, the Dancing state could be triggered,<br />
and the robot would eventually start to dance. In Normal state, finally, it could walk, avoiding obstacles. These are<br />
just a few ideas, but you can customize the robot’s behavior as you prefer.