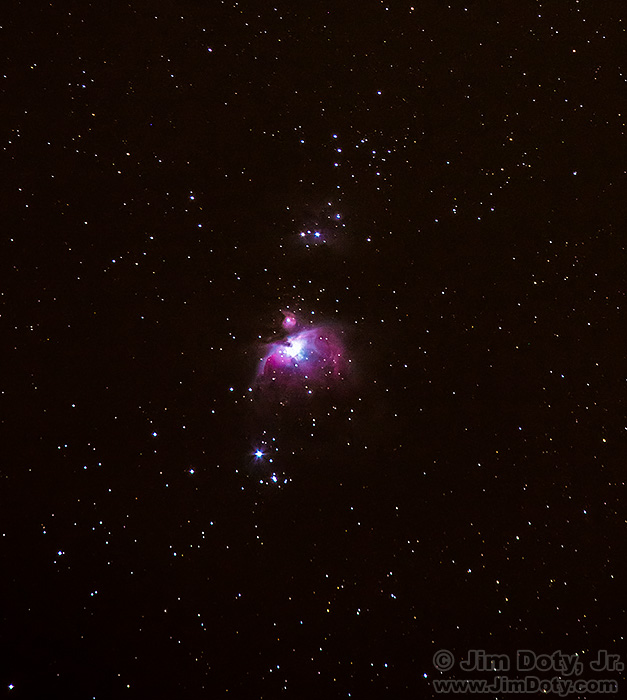
Orion Nebula and Nebula NGC 1977. Three minute exposure with a 300mm lens and camera mounted on an iOptron SkyTracker. This is cropped from a larger image.
After a one minute exposure using the iOptron SkyTracker (see the photo in part one), I tried a 3 minute exposure with the same 300mm lens to create the image above (which is cropped from a larger image which you can see below). The Orion Nebula (M42 and M43) shows up quite well and you can even see some of the nebulosity of NGC 1977 just above the Orion Nebula around the 5th magnitude stars Orionis 42 and 45. The iOptron StarTracker is an impressive piece of equipment.
Posted March 17, 2016. Updated Dec. 5, 2017
Update, Dec, 5, 2017: This article is based on my version of the SkyTracker. A new version is available but almost all of the advice in this article is still applicable.
There is some slight trailing of the stars in this image (which is cropped from a larger image which you will see later this article), but all in all the Sky Tracker did an excellent job. For a first test of new astrophotography gear, I couldn’t be more pleased. With a camera, lens, and tripod I already own, the $300 iOptron Sky Tracker allowed me to take pictures that would have been impossible without some kind of specialized equipment, most of it costing many times more than the iOptron SkyTracker.
Of course you can get great images doing guided astrophotography by piggy backing your camera and lens on an expensive telescope with a clock drive but we are talking about a lot of time and effort to set up the scope, get it polar aligned, and mount the camera gear. And for some kinds of astrophotography with exposure times running 30 to 60 minutes a guided telescope is the only option.
But the iOptron SkyTracker is so small and easy to use that astrophotographers with thousands of dollars in telescope equipment prefer the convenience of using the Sky Tracker for some kinds of photography. It is just the ticket when they want to use lenses that are 300mm or shorter in focal length and use exposure that are a few minutes or less. It saves them from hauling a lot of heavy and expensive gear and spending a lot of time setting it up when they don’t need it for this kind of astrophotography.
For everyone else that doesn’t own an expensive telescope it opens the door to photos that wouldn’t otherwise be possible for the relatively modest cost of around $300.
There are a couple of technical challenges you should be aware and I will cover them later. First lets talk about the set up.
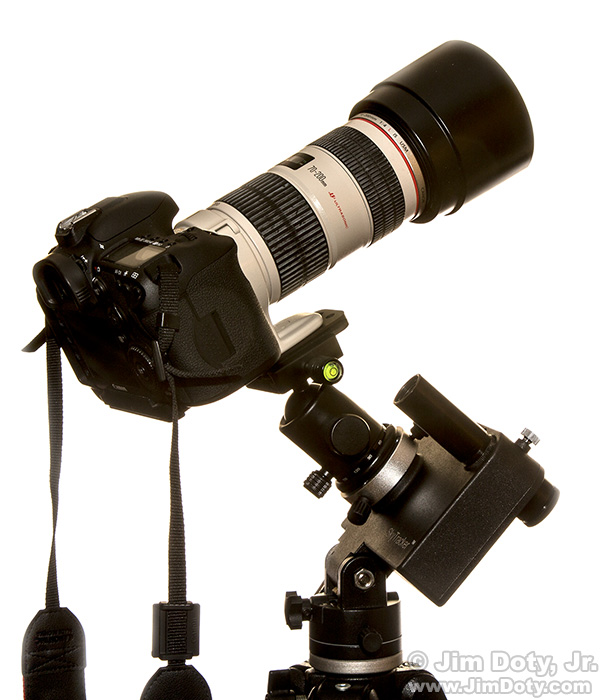
The iOptron Sky Tracker is shaped like a box about the size of a small paperback book with a round mounting plate for your ball head and camera/lens combination. It also comes with a polar scope that slides in a hole in the Sky Tracker. The polar scope has an illuminated reticule so you can polar align the Sky Tracker. It runs on 4 AA batteries or you can plug in an auxiliary power cable. In a nutshell, mount a ball head (your own or one from iOptron) on the round mounting plate which iOptron calls a “camera mounting block”. The round mounting plate attaches to a grooved rotating mechanism on the surface of the Sky Tracker. It is the grooved mechanism that rotates to follow the stars when you turn the Sky Tracker on. The iOptron ball head is well made and plenty stable enough to hold a camera and 70-200mm or 70-300mm zoom lens. (See part one for Arca Swiss compatibility information.)
Advance Set Up
The instructions that come with the iOptron are clear and simple (though not in the best grammatical English). Take the iOptron out of the box and follow the instructions to install the batteries.
I prefer to put several items together at home before I head out to my shooting location. That beats losing a thumb screw in tall grass in the middle of nowhere while trying to put things together in the dark. Lets look at the details of the advance set up.
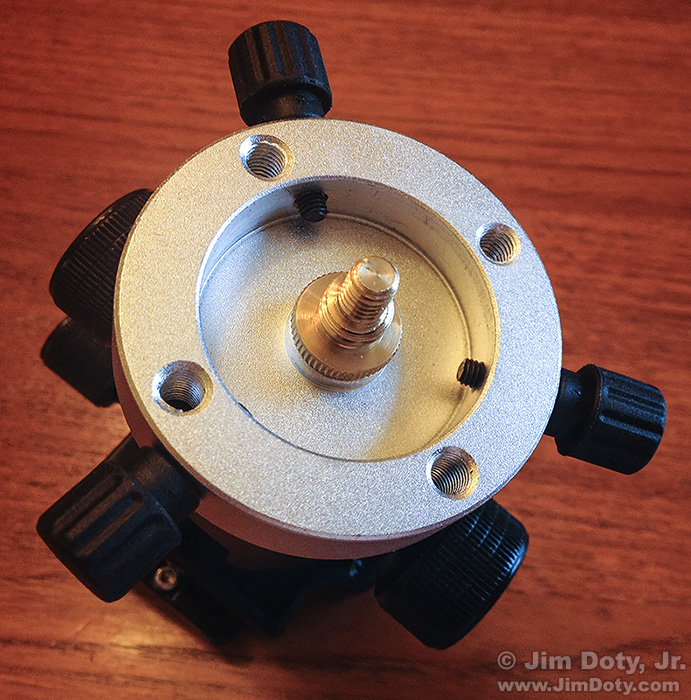
Loosen the three thumb screws enough to remove the round, metal mounting plate from the rotating mechanism underneath. Don’t take any of the thumb screws all the way out. If you do, screw it back in a bit. Whatever you do, don’t move any thumb screws from one hole to another since one is shorter than the other two.
The assembly that follows is pretty straight forward.
Take the brass threaded screw and use it to attached the round mounting plate to the bottom of your ball head. The brass threaded screw goes through the bottom of the round mounting plate and into the bottom of the ball head head. Grab the knurled ring on the threaded screw and make sure the brass threaded screw is hand tight and secure. The brass threaded screw is reversible with 3/8 inch threads on one end and 1/4 inch threads on the other. Most ball heads (including the iOptron ball head) will take the 3/8 inch threads.
I have another ball head that I use for most of my photography so I bought the iOptron ball head so it can be attached to the round mounting plate all the time. That way I have one less thing to mess with when I want to use the iOptron SkyTracker. All I have to do is put the ball head/mounting plate on the SkyTracker’s rotating mechanism, screw it into place and I am ready to head out. At $58 (as of the update date of this article), the iOptron ball head is a real bargain.
There is a grooved rotating mechanism on the front side of the Sky Tracker. When the SkyTracker is turned on, this is the mechanism that slowly rotates to track the motion of the stars across the sky.
Once your ball head is securely attached to the round mounting plate (“camera mounting block”), slide the bottom of the round mounting plate over the grooved, rotating mechanism. Make sure the mounting plate is all the way down on the rotating mechanism so the thumb screws go into the groove when you tighten them. If you don’t get the screws into the groove, the mounting plate, ball head, camera and lens are at risk of crashing to the ground.
Make sure the switch on the back of the Sky Tracker is set to the correct hemisphere. North is down.
Lastly, screw the base of the Sky Tracker onto the 3/8 threaded screw on top of your tripod. The whole tripod mounted rig goes into the back seat of your car.
You do need a sturdy, well made tripod for this kind of work. The flimsy, “plasticy” tripods you get at big box stores just don’t cut it. A decent size tripod from Gitzo, Manfrotto, or Induro will do the job. For recommendations read Tripod Recommendations: The Best of the Best.
I don’t add the polar scope, camera, and lens to this set up until I am on location.
Location Set Up
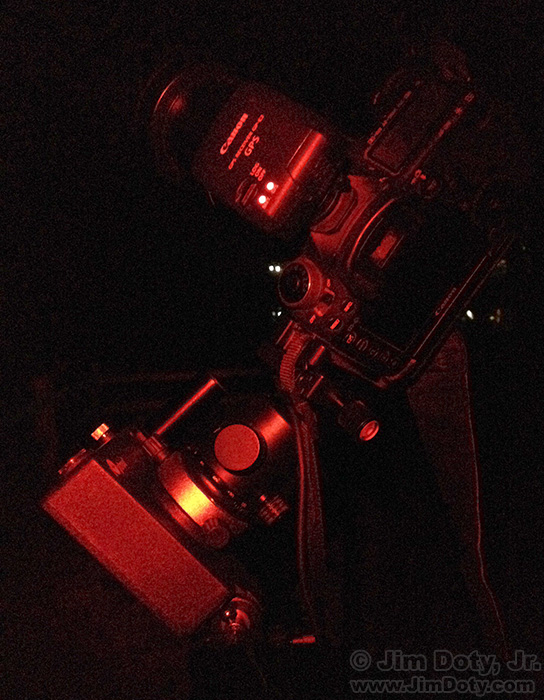
iOptron Sky Tracker with silver mounting plate (and thumb screws), ball head, vertically mounted camera and 70-300mm lens.
This is my rig out on location the first night. I took a quick iPhone photo by the red light of my headlamp.
Having a headlamp with a red LED is important, it keeps both of your hands free. The red LED is important for maintaining the dark adaptation of your eyes to the night sky. You can buy a headlamp for about $25 at Home Depot that has one red LED and several white LEDs. Stick to the red LED when you are setting up on location and shooting. If you turn on a white light it will take your eyes another 20-30 minutes to fully dark adapt, making focus almost impossible. So stick to the red LED until you are ready to pack up and go home. Then it is a good idea to turn on the white LEDs and look around your shooting location to make sure you didn’t leave anything behind.
Polar Alignment
Don’t put your camera and lens on your ball head just yet, and don’t insert the polar scope.
The first technical challenge is to polar align the SkyTracker. In the Northern Hemisphere we use the North Star which is not at true north in the sky so it will be offset from the center of the polar scope. How much of an offset depends on your location in degrees latitude. The angle of the offset is determined by the hour of the day and the date of the year.
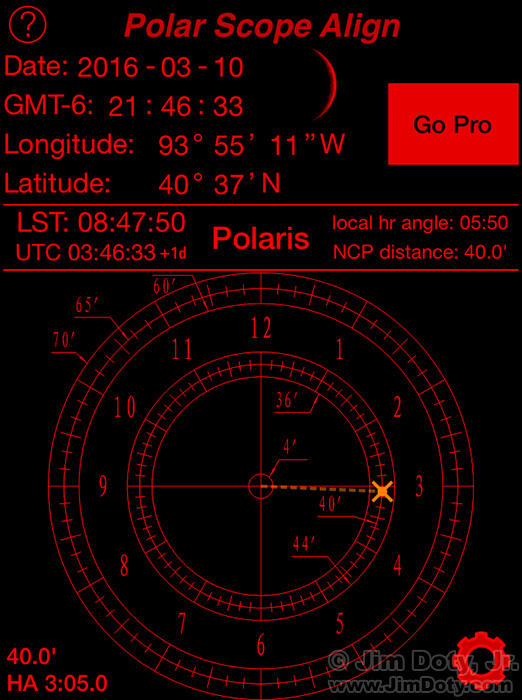
By all means follow the suggestion that came with the SkyTracker’s instructions and align the North Star in the center of the polar scope hole before you insert the polar scope. If you get the North Star right in the center of the hole it will make is easier to find in the polar scope. Once you have the North Star centered, insert the polar scope in the hole, lock it in place with the set screw and turn on the StarTracker. That will turn on a little red light that will illuminate the reticule in the polar scope. Find the North Star and center it in the reticule of the polar scope. Now for the alignment part. You can do it with one of the free downloadable PDF charts described in this article or you can use an app on your smart phone. The official iOptron polar align app does not work with the operating system of my older model iPhone so I downloaded the “Polar Scope Align” app which works just fine. It is free but you will get ads at the bottom of the screen.
When you turn on the Polar Scope Align app, the pattern of lines you see on the app matches the same reticule pattern of lines that you see when you look through the polar scope on your Sky Tracker. You see the 12 hours of a clock (which do NOT indicate your local time) and several sets of circles. The inner circles labeled 36′, 40′, and 42′ indicate your location in degrees latitude in the Northern Hemisphere. The outer lines are for use in the Southern Hemisphere (see the iOptron instructions if you are south of the equator). But you don’t need to worry about any of this when you use the app (except to make sure the Northern/Southern hemisphere switch is set to the correct position).
When you turn on the app it uses the GPS system in your smartphone to determine your location and the exact time as indicated by the GPS satellites. The app draws an orange X to show you where you should put the North Star on the reticule in the polar scope. In this particular case the X is just a little outside 40 degrees and a little past 3 o’clock (3:05 to be exact, which is also indicated in the lower left corner of the app).
Look through the polar scope and turn the latitude screw on the Sky Tracker to align the North Star up and down, and rotate the Sky Tracker to align the North Star left and right. When you get the North Star in the correct location in the reticule, lock down the thumb screws so the Sky Tracker doesn’t shift. So far, so good. Now put your camera and lens on the ball head, point the lens at your subject and tighten the knobs on the ball head. Focus the lens (more on that in a moment) and look through the polar scope again.
The weight and angle of the camera and lens will tork the system so the North Star will no longer be exactly where it is supposed to be on the reticule. While holding the camera and lens in one hand (to steady it so it doesn’t move things dramatically) loosen the set screws, realign the North Star, and tighten down the set screws. Guess what, when you tighten everything up and then let go of the camera/lens, the North Star will shift a bit, usually downward from where it is supposed to be. So here is the secret. Grab the camera/lens, loosen the screws and put the North Star a little higher than where it is supposed to be so that when you lock everything down, the North Star will drift down a bit and end up where it belongs. It took me 3 or 4 attempts to position the North Star just high enough so it would drift right down to where it belonged when I tightened things up. Don’t give up until the North Star is really close to where it belongs – the closer the better.
So that is the first technical challenge. It took me about 5 minutes to get the polar alignment right. It takes a bit of patience.
Focusing the Lens
The second challenge is focusing your lens. Cameras can’t autofocus on stars in the night sky. You will have to focus manually and that isn’t the easiest thing to do. Be sure to turn off autofocus (and turn off image stabilization if your lens has that feature).
Point your camera at the brightest star in the sky that is near the area you intend to photograph and center the star in the field of view. I used one of the belt stars in Orion. Then switch to Live View mode and magnify the image to focus manually. This article will show you how.
If you don’t have live view mode you will have to experiment. Focus as best you can, take a picture, tweak the focus and take another picture. Keep this up until you find the best focus which is indicated by the smallest star images. Out of focus stars look like circles and the more out of focus you are the bigger the circles will get. Keeping focusing and taking pictures until the stars are as small as you can make them. Once everything is in focus, recompose the camera image to the area you want to photograph.
There is another option. When it is still light enough to see, focus on something far, far aware in the landscape, take a picture and zoom in to make sure the focus is sharp, and then tape the focusing ring into position so it doesn’t move. Then wait for the stars to come out.
When should you focus your lens?
I would suggest you put the camera, lens and ball head on the Sky Tracker after you have aligned the Star Tracker with the polar scope. Point the camera/lens at a bright star, lock down the knobs on the ball head, and focus the lens. Then point your lens at your subject and tweak the polar alignment as described above.
If you finish photographing one area of the night sky and decide to point your lens at a different area of the sky to take more pictures, the new camera/lens position it will change the weight and tork of the camera/lens on the system so you will need tweak the polar alignment again.
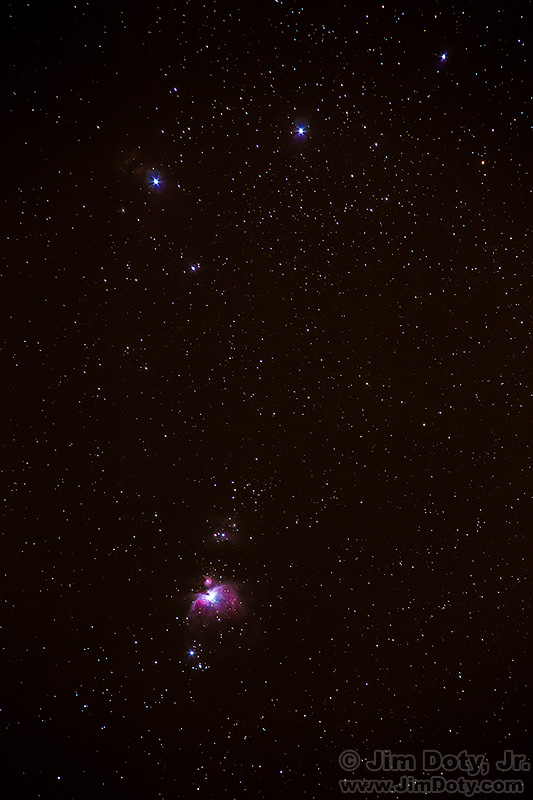
This is the full image from which the image at the top was cropped. The exposure time was 177 seconds. (I was counting seconds in my head until I hit 3 minutes so I was off by three seconds.)Â I used a locking cable release so I wouldn’t jiggle the camera when I opened and closed the shutter. My camera was in “live view” mode so the mirror was up before I opened the shutter. Having the mirror up reduces vibrations in the system.
Spare Batteries
It is a good idea to have a spare battery charged up and ready to go for your camera. Long exposures on a cool evening (it was 55° F) just about drained my fully charged battery in an hour. Orion dropped out of sight at my location or I would have needed to change batteries to keep shooting. The AA batteries in the iOptron should last for several night’s photography unless it is very cold.
Take lots of Pictures
Things happen out in the dark so take lots of pictures. Tripod get bumped. A tripod foot might slip on a small pebble. Walking around on spongy ground can move the tripod even if you don’t touch it. A knob isn’t tight. The wind comes up and jiggle the camera/lens. Some of my photos came out great and some not so good. There is a bit of flex in the system. Just keep at it. Make sure all the tripod legs and connections are locked down tight. The same for the iOptron’s screws. Make sure everything is tight so nothing moves but the rotating clock drive mechanism.
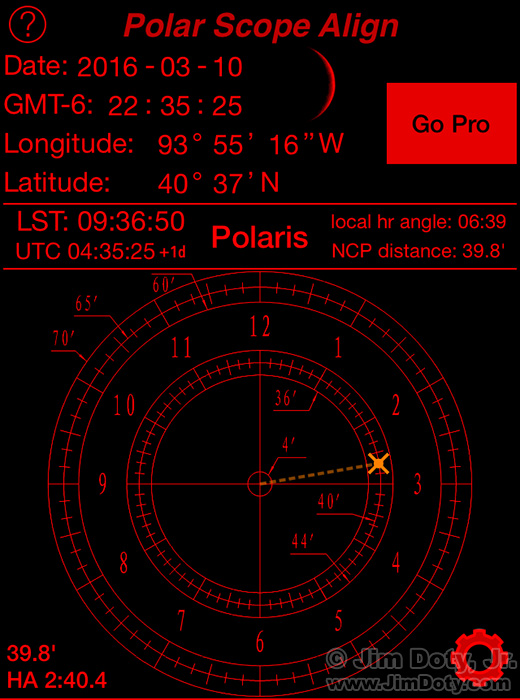
I checked the Polar Scope Align app later in the evening and the orange X had moved from 3:05 to 2:40. That matched the location of the North Star in the reticule of the polar scope. This is what is supposed to happen as the rotating mechanism of the Sky Tracker follows the apparent motion of the stars. Note that the orange X in the app and the North Star in the reticule of the polar scope will move counter clockwise around the face of the clock if you are in the Northern Hemisphere. The orange X on the app and the North Star in the polar scope reticule move at half the rate of your watch. In other words two hours of time on your watch equals one hour of backward motion of the orange X on the app and the North Star on the reticule clock.
SkyTracker Speed
If there is nothing but sky in your photo, set the Sky Tracker to 1X speed.
If you are using a super wide angle lens and including some of the landscape in the scene, limit your exposure to about one minute and set the Sky Tracker to 1/2 speed. For the longest usable exposure time, use the “Rule of 500” (see part one) and then try doubling the exposure time when the Sky Tracker is set at 1/2 speed. If the Rule of 500 says 20 seconds, try 40 seconds when using the Sky Tracker. If your landscape is too blurred for your preferences, cut back on the exposure time. At 1/2 speed the Sky Tracker is splitting the difference between the non-moving landscape and the motion of the stars.
Photo Location
It helps to do this under a dark sky, the darker the better. If you are in a big city, sky fog will dramatically reduce the length of your exposure times. For these photos I was south of Lamoni Iowa, a small college town in a rural area. My camera was pointed in a direction away from the lights of the town. Since I was shooting generally toward the south and a west it would not have worked to be on the north east side of town shooting over the lights.
Look for hard ground. I was set up in a hard gravel parking lot. Soft spongy ground won’t work since the tripod will move as you step on the soft ground around the tripod. If you have no choice but to shoot on soft ground – do not move when the shutter is open.
Recommended Books
Michael Covington wrote two of my favorite astrophotography books: Astrophotography for the Amateur and Digital SLR Astrophotography. I have the original version. It is an excellent guide, the exposure recommendations are still good, and I still use it as a reference. I do not have newer digital version, so I can’t speak about it from personal experience but the reviews at Amazon are very good.
Photo Data: Canon 5D Mark III. Canon EF 70-300mm DO IS lens at 300mm. f/11, 177 seconds, ISO 800. Camera and iOptron ball head mounted on an iOptron Sky Tracker set to 1X speed.
Update history. This article was originally posted March 17, 2016 and expanded March 29, 2016 to include more set up illustrations. It was updated again Dec. 5, 2017.
Series Links
“How To†Series: Astrophotography with the iOptron SkyTracker – series overview
iOptron Sky Tracker and Ball Head
First Night: Testing an iOptron Sky Tracker, Part One
First Night: Testing an iOptron Sky Tracker, Part Two
iOptron Polar Scope Alignment with a Simple Chart
Related Links
The Best Night, Astronomy, and Astrophotography Books
How To Get Critical Focus in “Live View†Mode with a Magnified Image
Tripod Recommendations: The Best of the Best
Tripod Head Recommendations: Some of the Best of the Best
Purchase Links
The iOptron Astrophotography Gear section of my photography store has iOptron equipment and planispheres. The books section of my photography store has a selection of The Best Night, Astronomy, and Astrophotography Books. My photography store has direct links to Amazon.com so you get Amazon’s great prices, fast delivery, and excellent guarantee.
Buyer’s Guide Series Link
This is one in a series of articles that will guide you to the best of all things photographic. The rest of the series is here: Buyer’s Guide: Recommendations For The Best Photography Equipment, Software, Books, Magazines, DVDs, Online Photo Labs and More.

