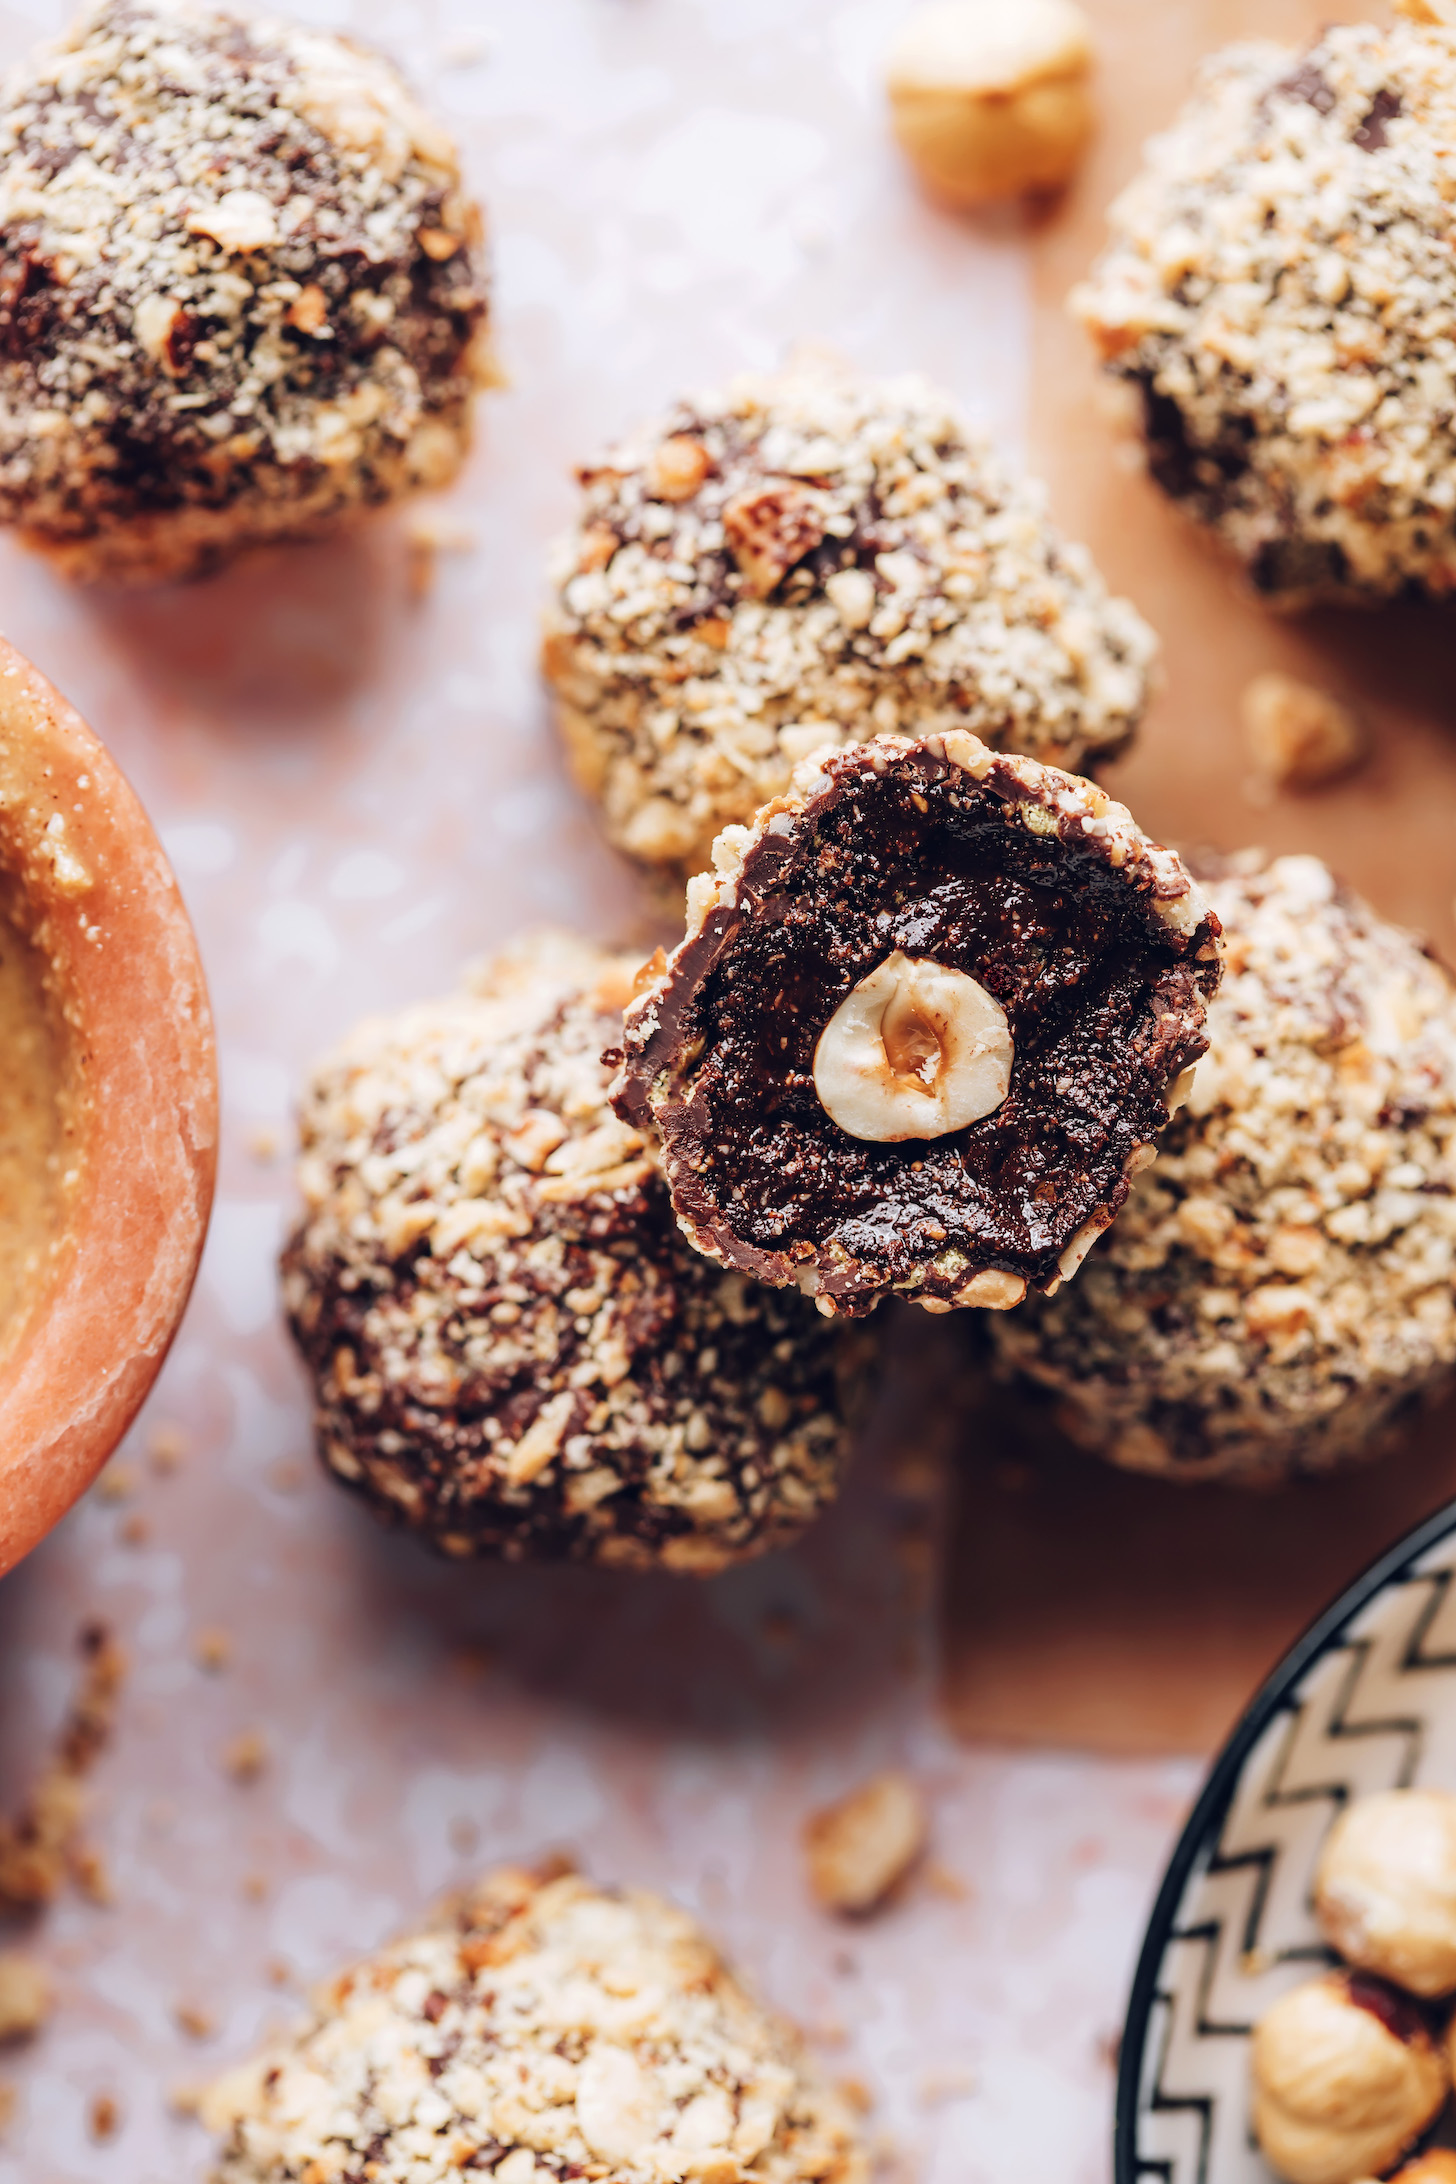
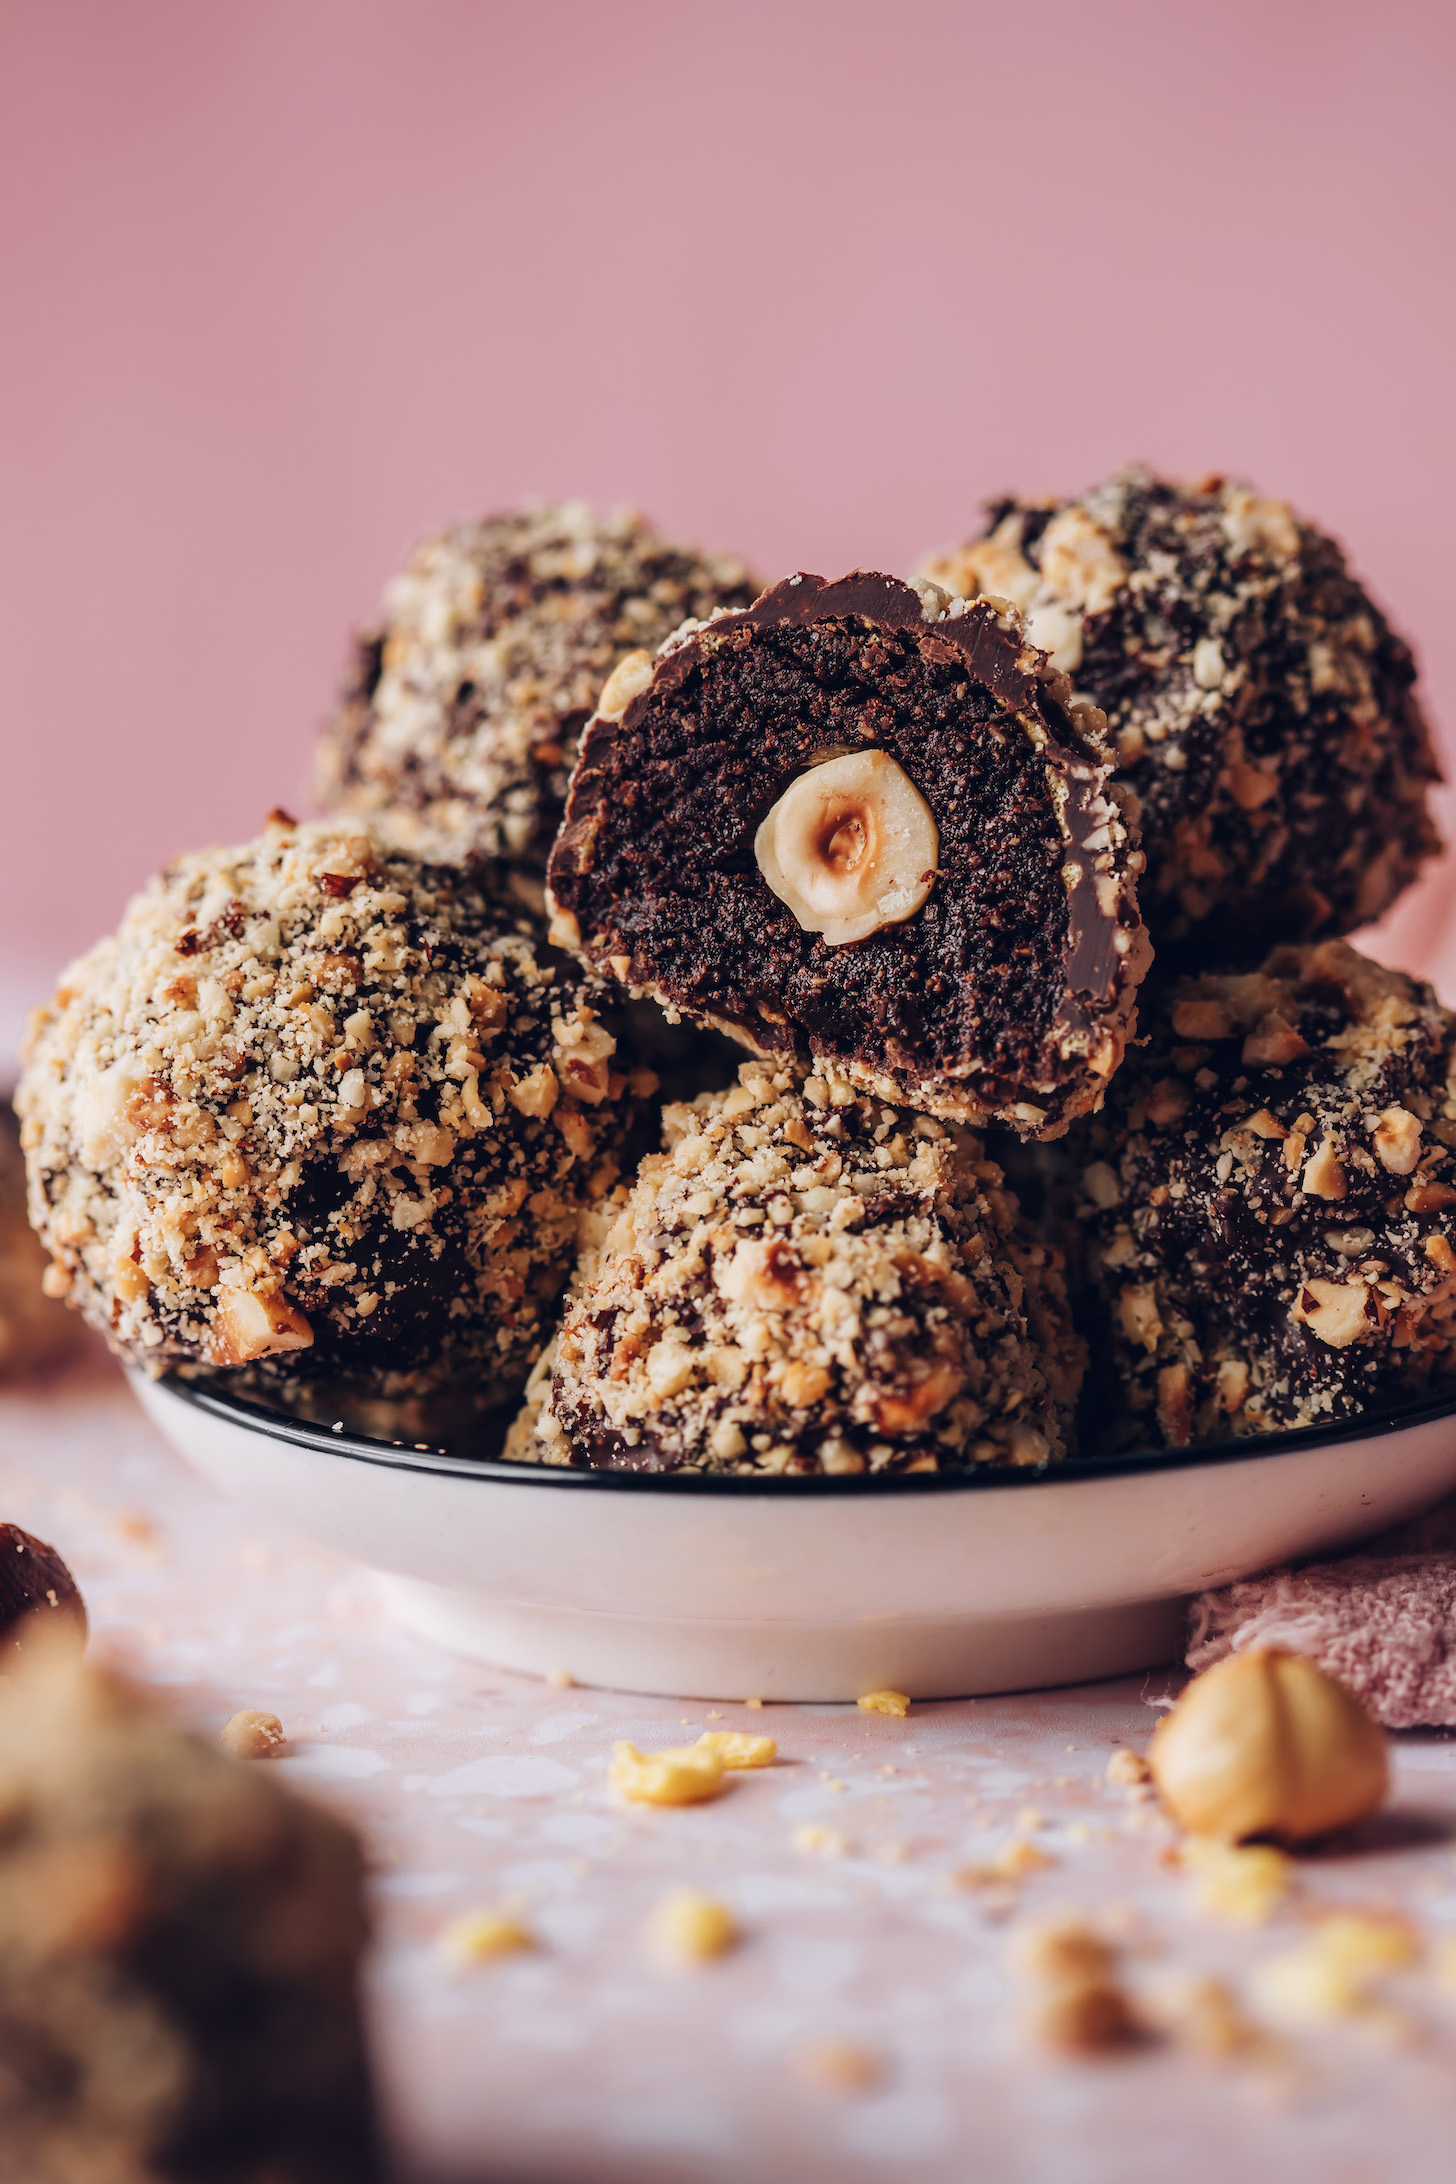
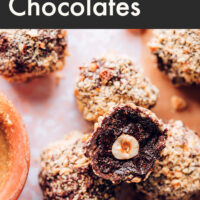
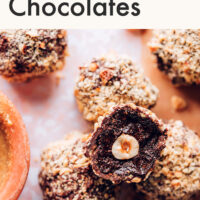
Friends, we can’t wait for you to try this DIY version of Ferrero Rocher dark chocolate truffles! They have all the chocolaty, hazelnutty goodness you know and love, but they’re gluten-free and vegan. Like, whoa, are you ready!?
These one-bite wonders are perfectly crispy, incredibly decadent, and are sure to wow anyone you serve them to! They taste just like the real thing, but maybe even more satisfying! They require just 8 ingredients, and they might just change your life (big claim, but we stand behind it!). Let us show you how it’s done!
How to Make Homemade Ferrero Rocher
To create the ultimate homemade Ferrero Rocher chocolate truffles, we analyzed the flavors and textures of the classic store-bought treat so we could recreate its magic! But in vegan, gluten-free form!
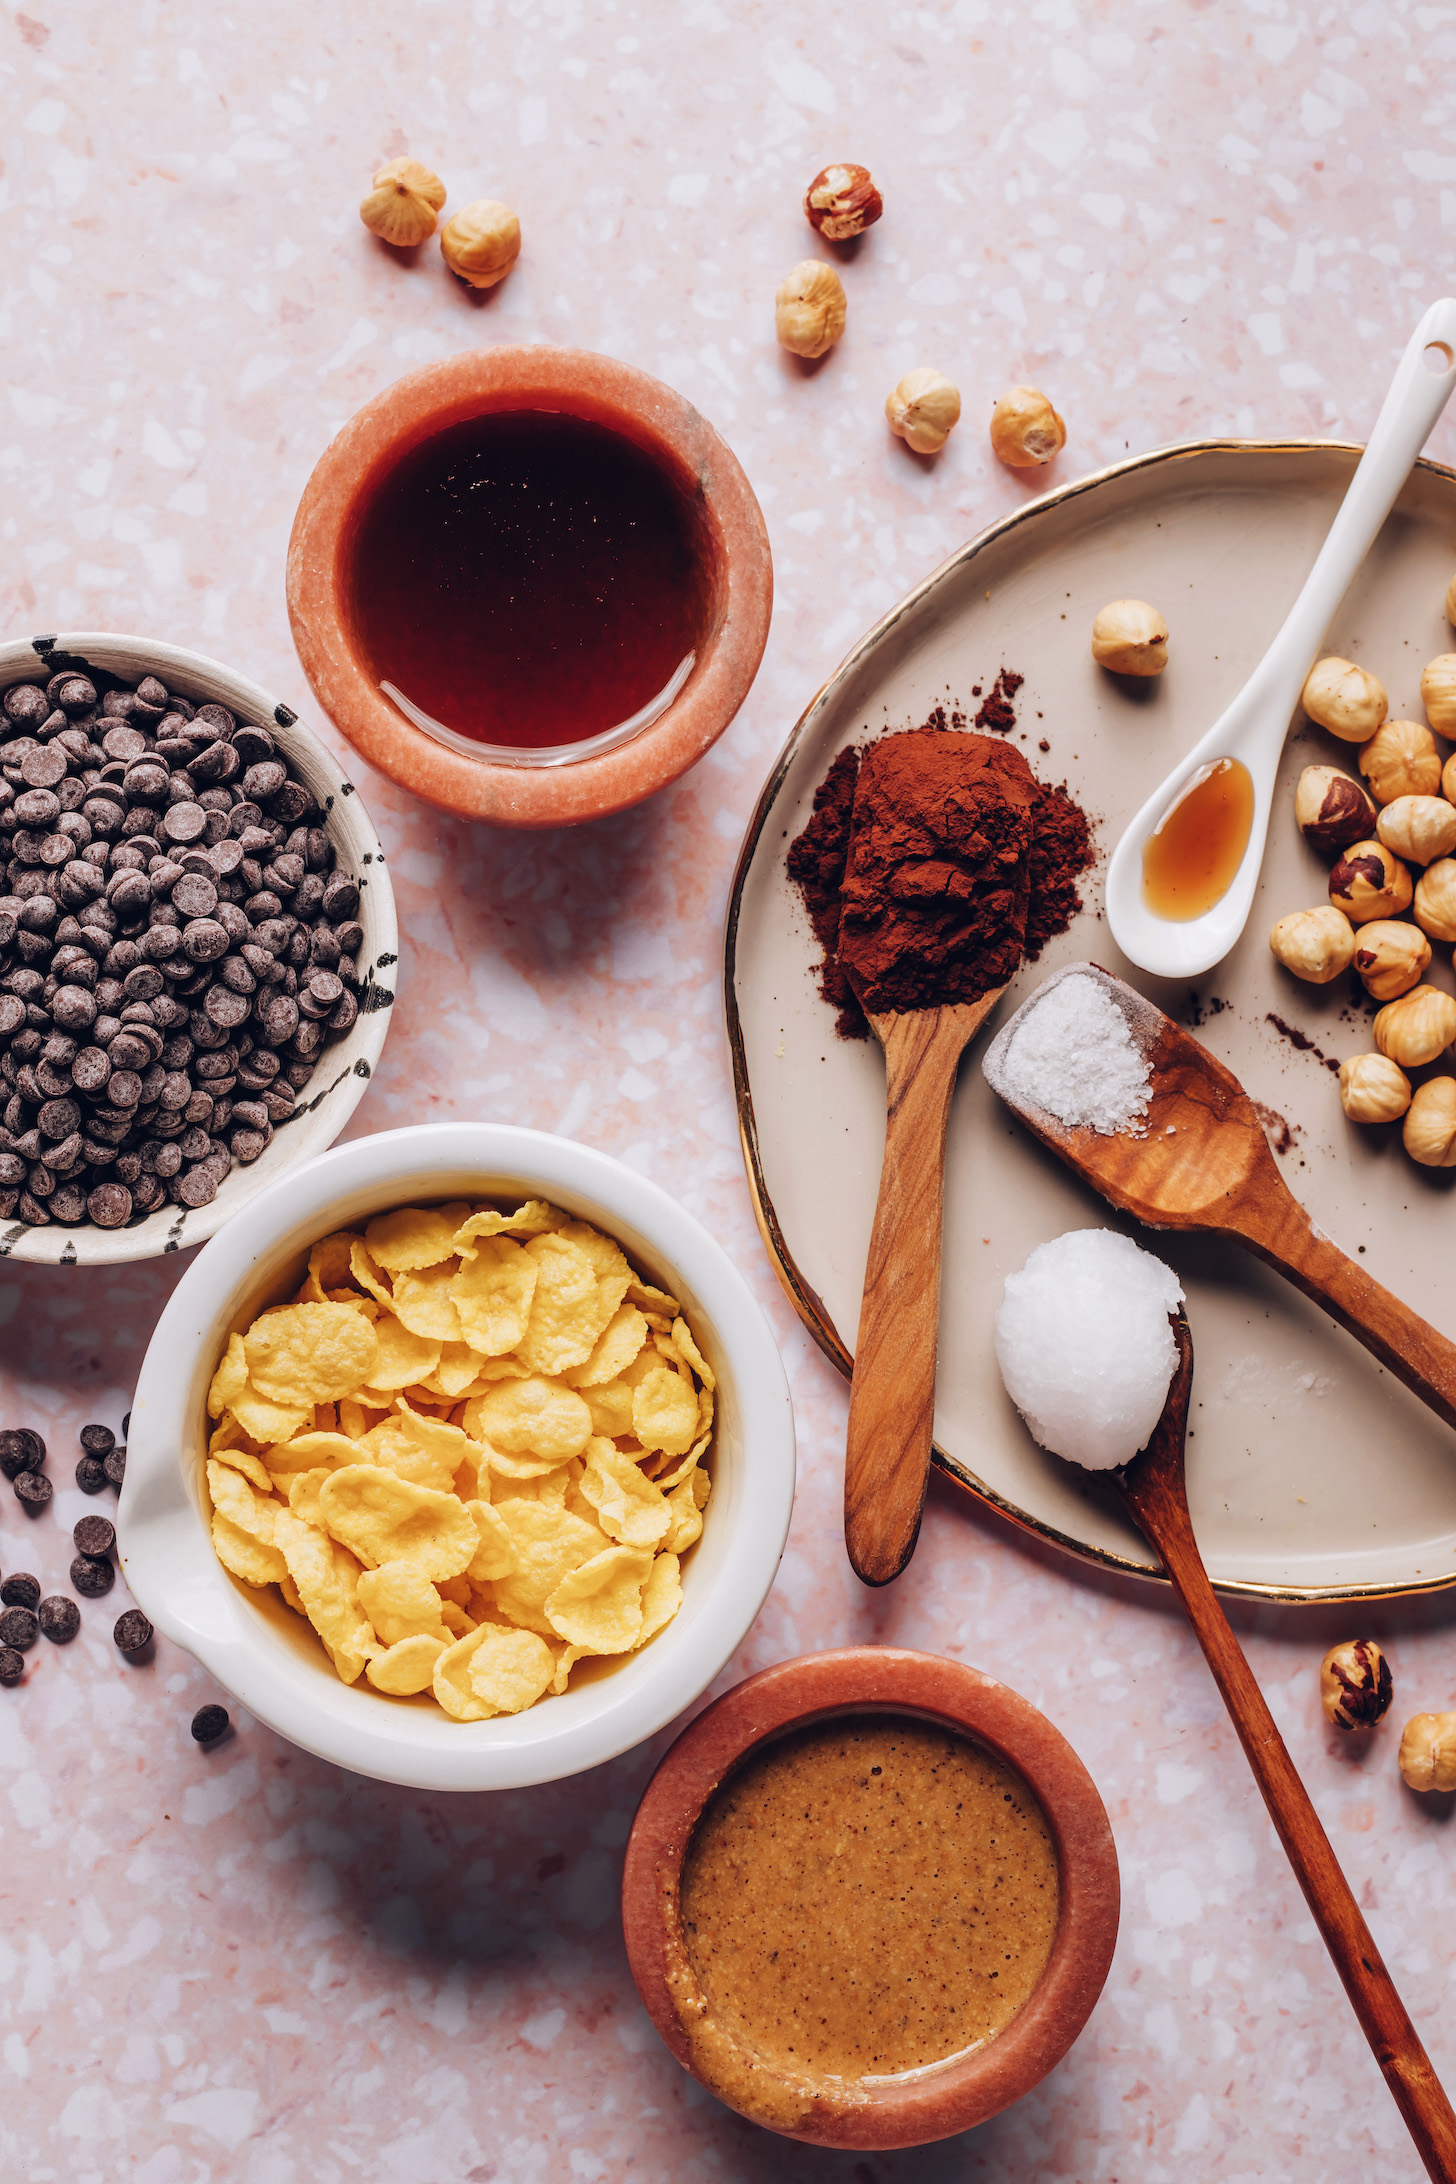
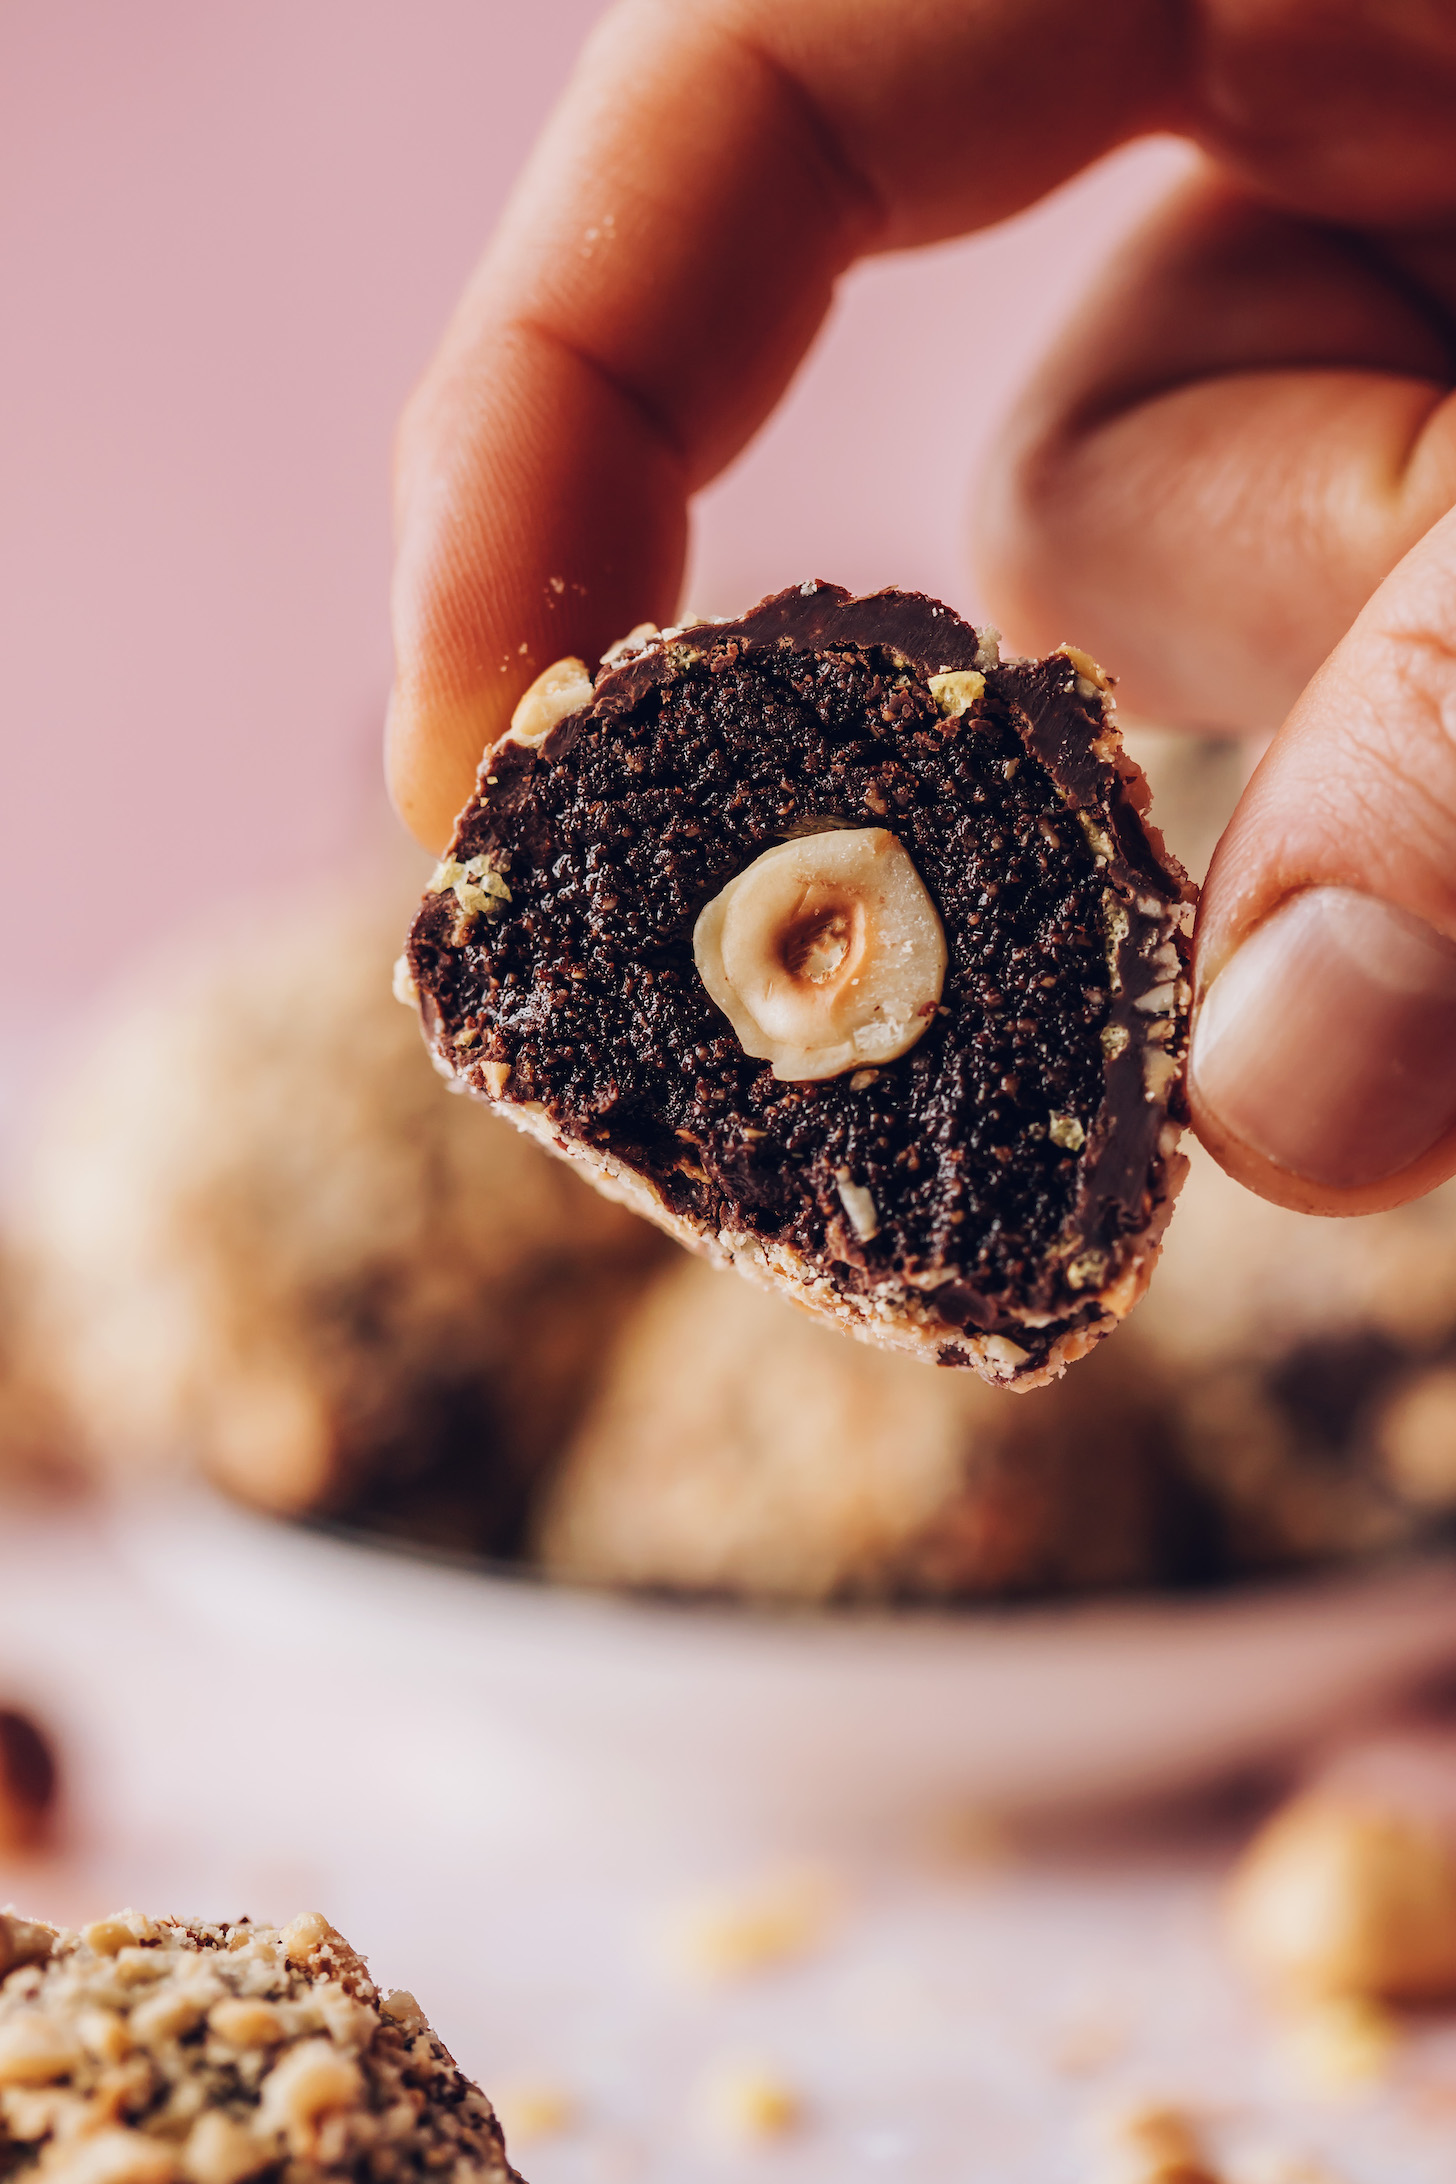
The nut inside of a classic Ferrero Rocher chocolate? Hazelnut! So we started there.
Around the hazelnut center is a chocolate hazelnut ganache-like layer, similar to Nutella! For a similarly fudgy texture and chocolaty, hazelnutty flavor, we adjusted our Honey Mama’s Bar recipe, infusing the mixture with hazelnut butter. It’s unreal how good it tastes!
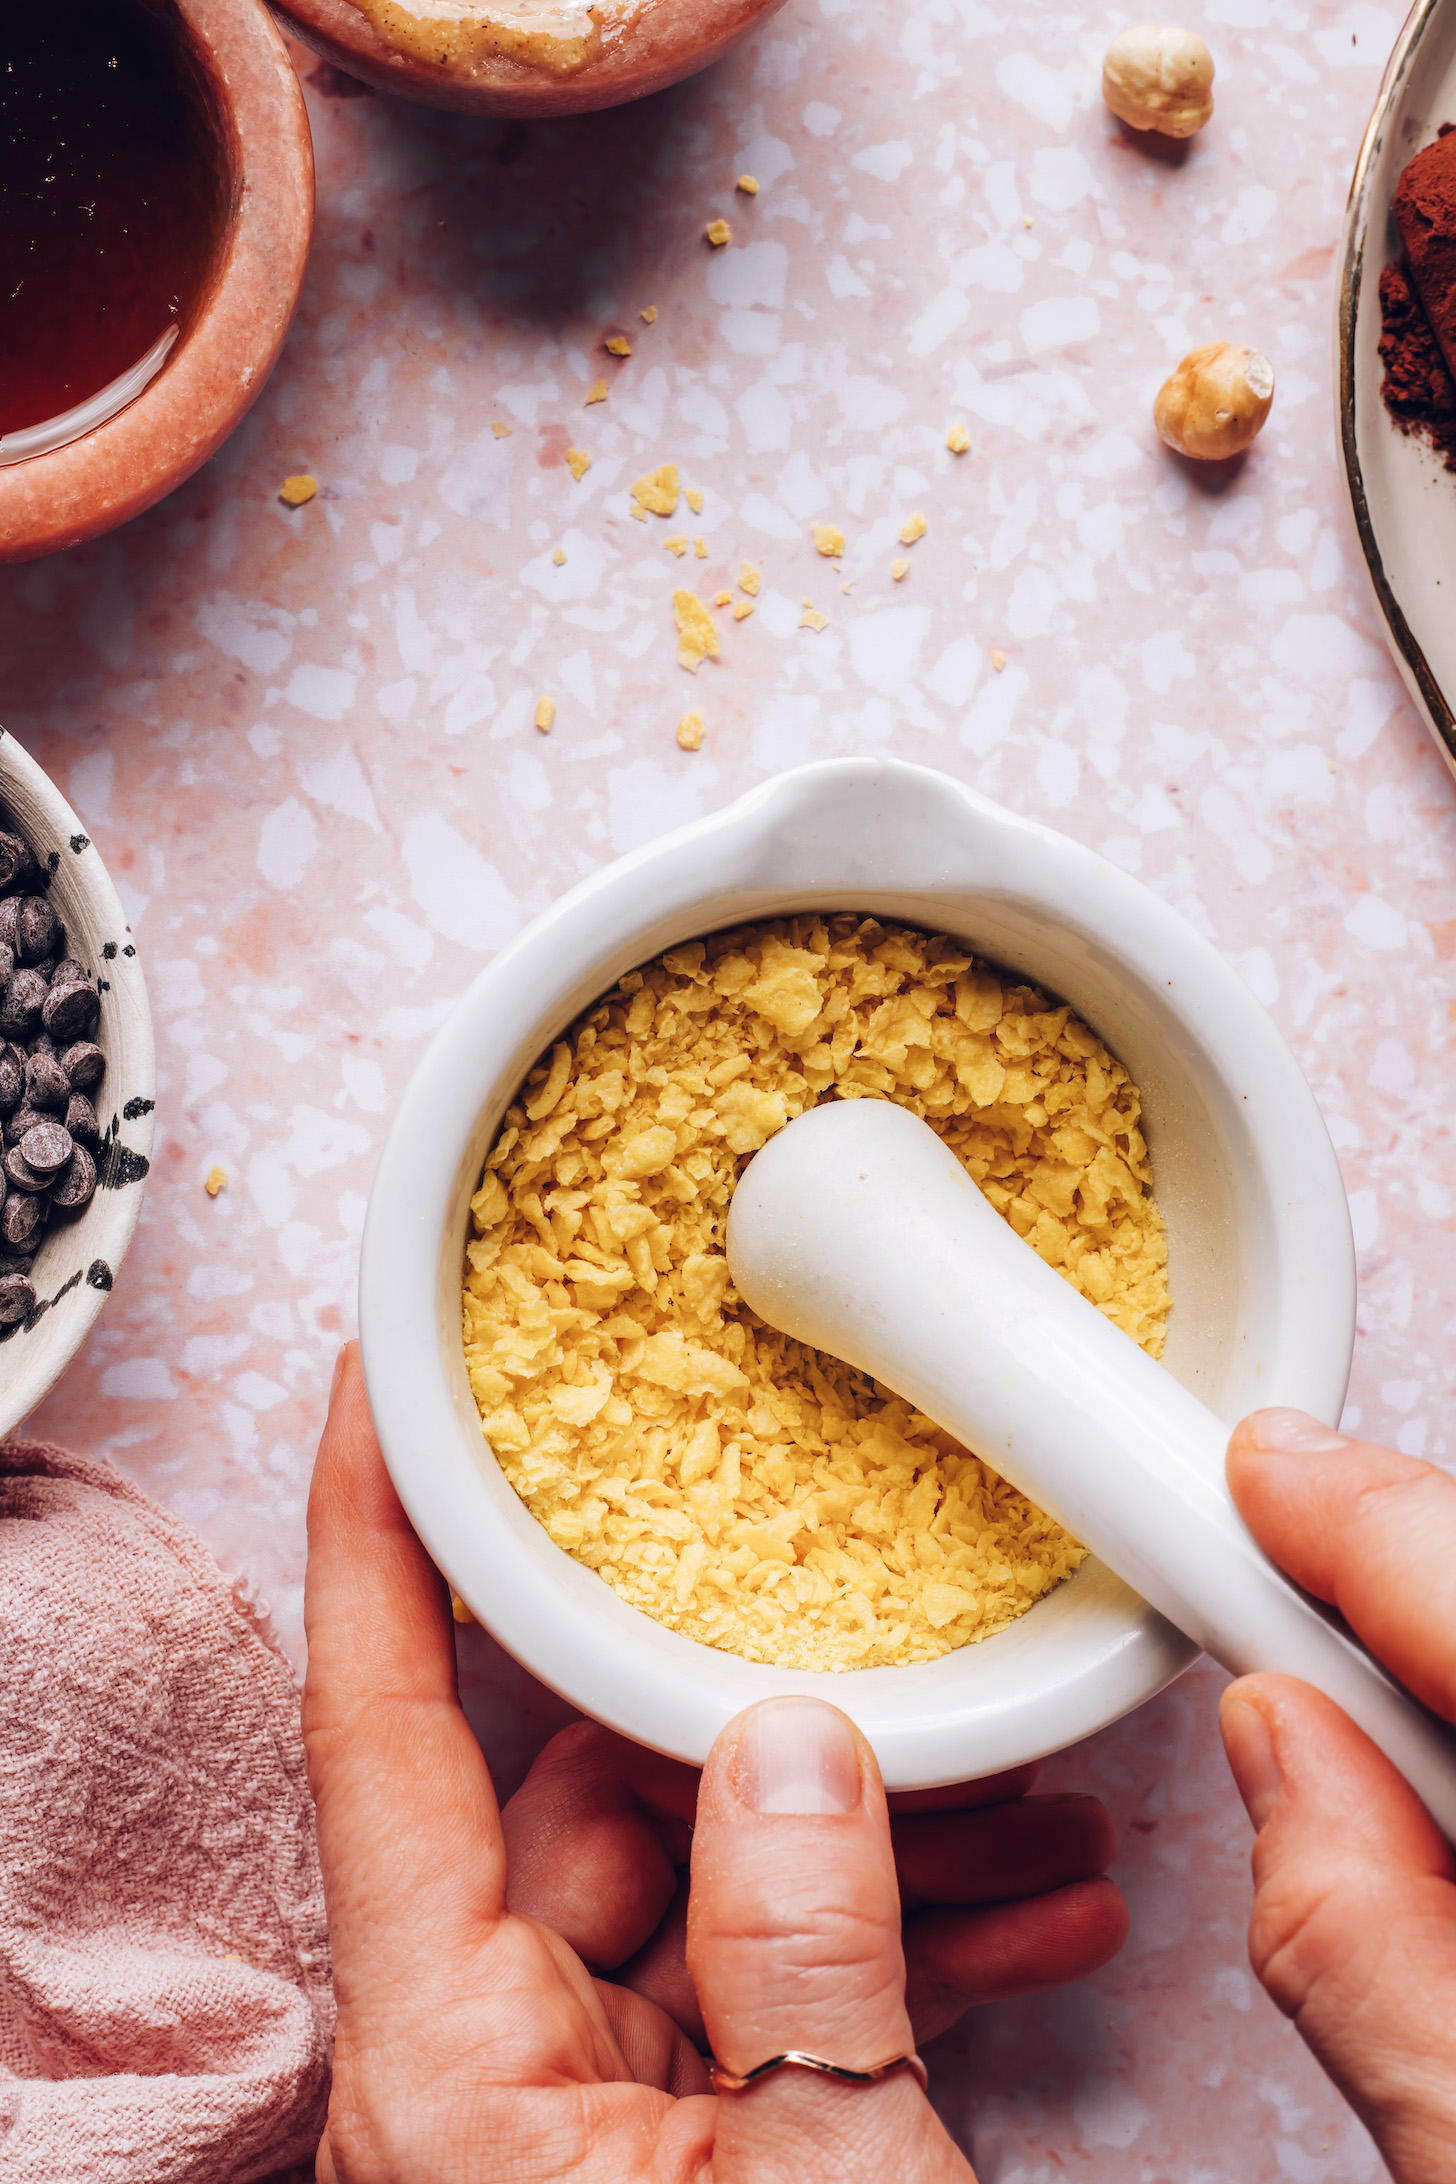
Classic Ferrero Rocher have a light, crispy, wafer layer that is distinctly delicious. We tried a variety of DIY options such as popped amaranth and crushed rice cereal, but our favorite? Crushed corn flakes (we used Nature’s Path brand)! They’re the perfect gluten-free alternative to a wafer…but with the same crispy result!
But even without the cornflake layer (it’s optional), these truffles are dangerously good!

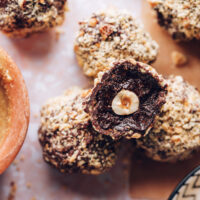
After wrapping the hazelnuts in the decadent, fudgy mixture and crispy cornflake layer, they go into the freezer, which helps them set.
For the final coating, we dip the truffles into melted chocolate and roll them in crushed roasted hazelnuts for a crunchy outer layer just like the classics!
Then just pop them in the refrigerator to let the truffles set, and your new favorite candy will be entering your mouth shortly!
We’re SO excited for you to try these DIY Ferrero Rocher! They’re:
Super Chocolaty
Nutty
Crispy
Crunchy
Fudgy
& Decadent!
They’re the perfect treat for Valentine’s Day, dark chocolate lovers, or fellow Ferrero Rocher enthusiasts! Enjoy them as an after-meal treat, decadent snack, or any time the chocolate craving strikes.
More DIY Candy Recipes
- Easy Homemade Peanut Butter Cups
- 5-Ingredient Vegan Chocolate Turtles
- 2-Ingredient Vegan PayDay Bites
- Easy Homemade Twix Bars
If you try this recipe, let us know! Leave a comment, rate it, and don’t forget to tag a photo #minimalistbaker on Instagram. Cheers, friends!
DIY Ferrero Rocher Chocolates (Vegan + GF)
Ingredients
- 3/4 cup roasted hazelnuts
- 3/4 cup crushed corn flakes (optional, we used Nature’s Path // ensure gluten-free as needed)
- 1/3 cup unsweetened cocoa powder, sifted
- 3 Tbsp hazelnut butter* (DIY, store-bought, or sub almond butter)
- 1/4 cup maple syrup
- 2 Tbsp coconut oil, melted (DIVIDED)
- 1/2 tsp vanilla extract
- 1 healthy pinch sea salt
- 2/3 cup semisweet vegan chocolate chips (we like Enjoy Life brand)
Instructions
- Optional: If using raw hazelnuts, roast whole hazelnuts on a bare baking sheet at 350 F (176 C) for 12-15 minutes or until fragrant. Set aside.
- CORNFLAKES (optional to mimic the wafer layer): Using a mortar and pestle, food processor, or a plastic bag and rolling pin, crush the corn flakes until they are in small even pieces (~1/8 inch in size). Place in a small mixing bowl and set nearby.
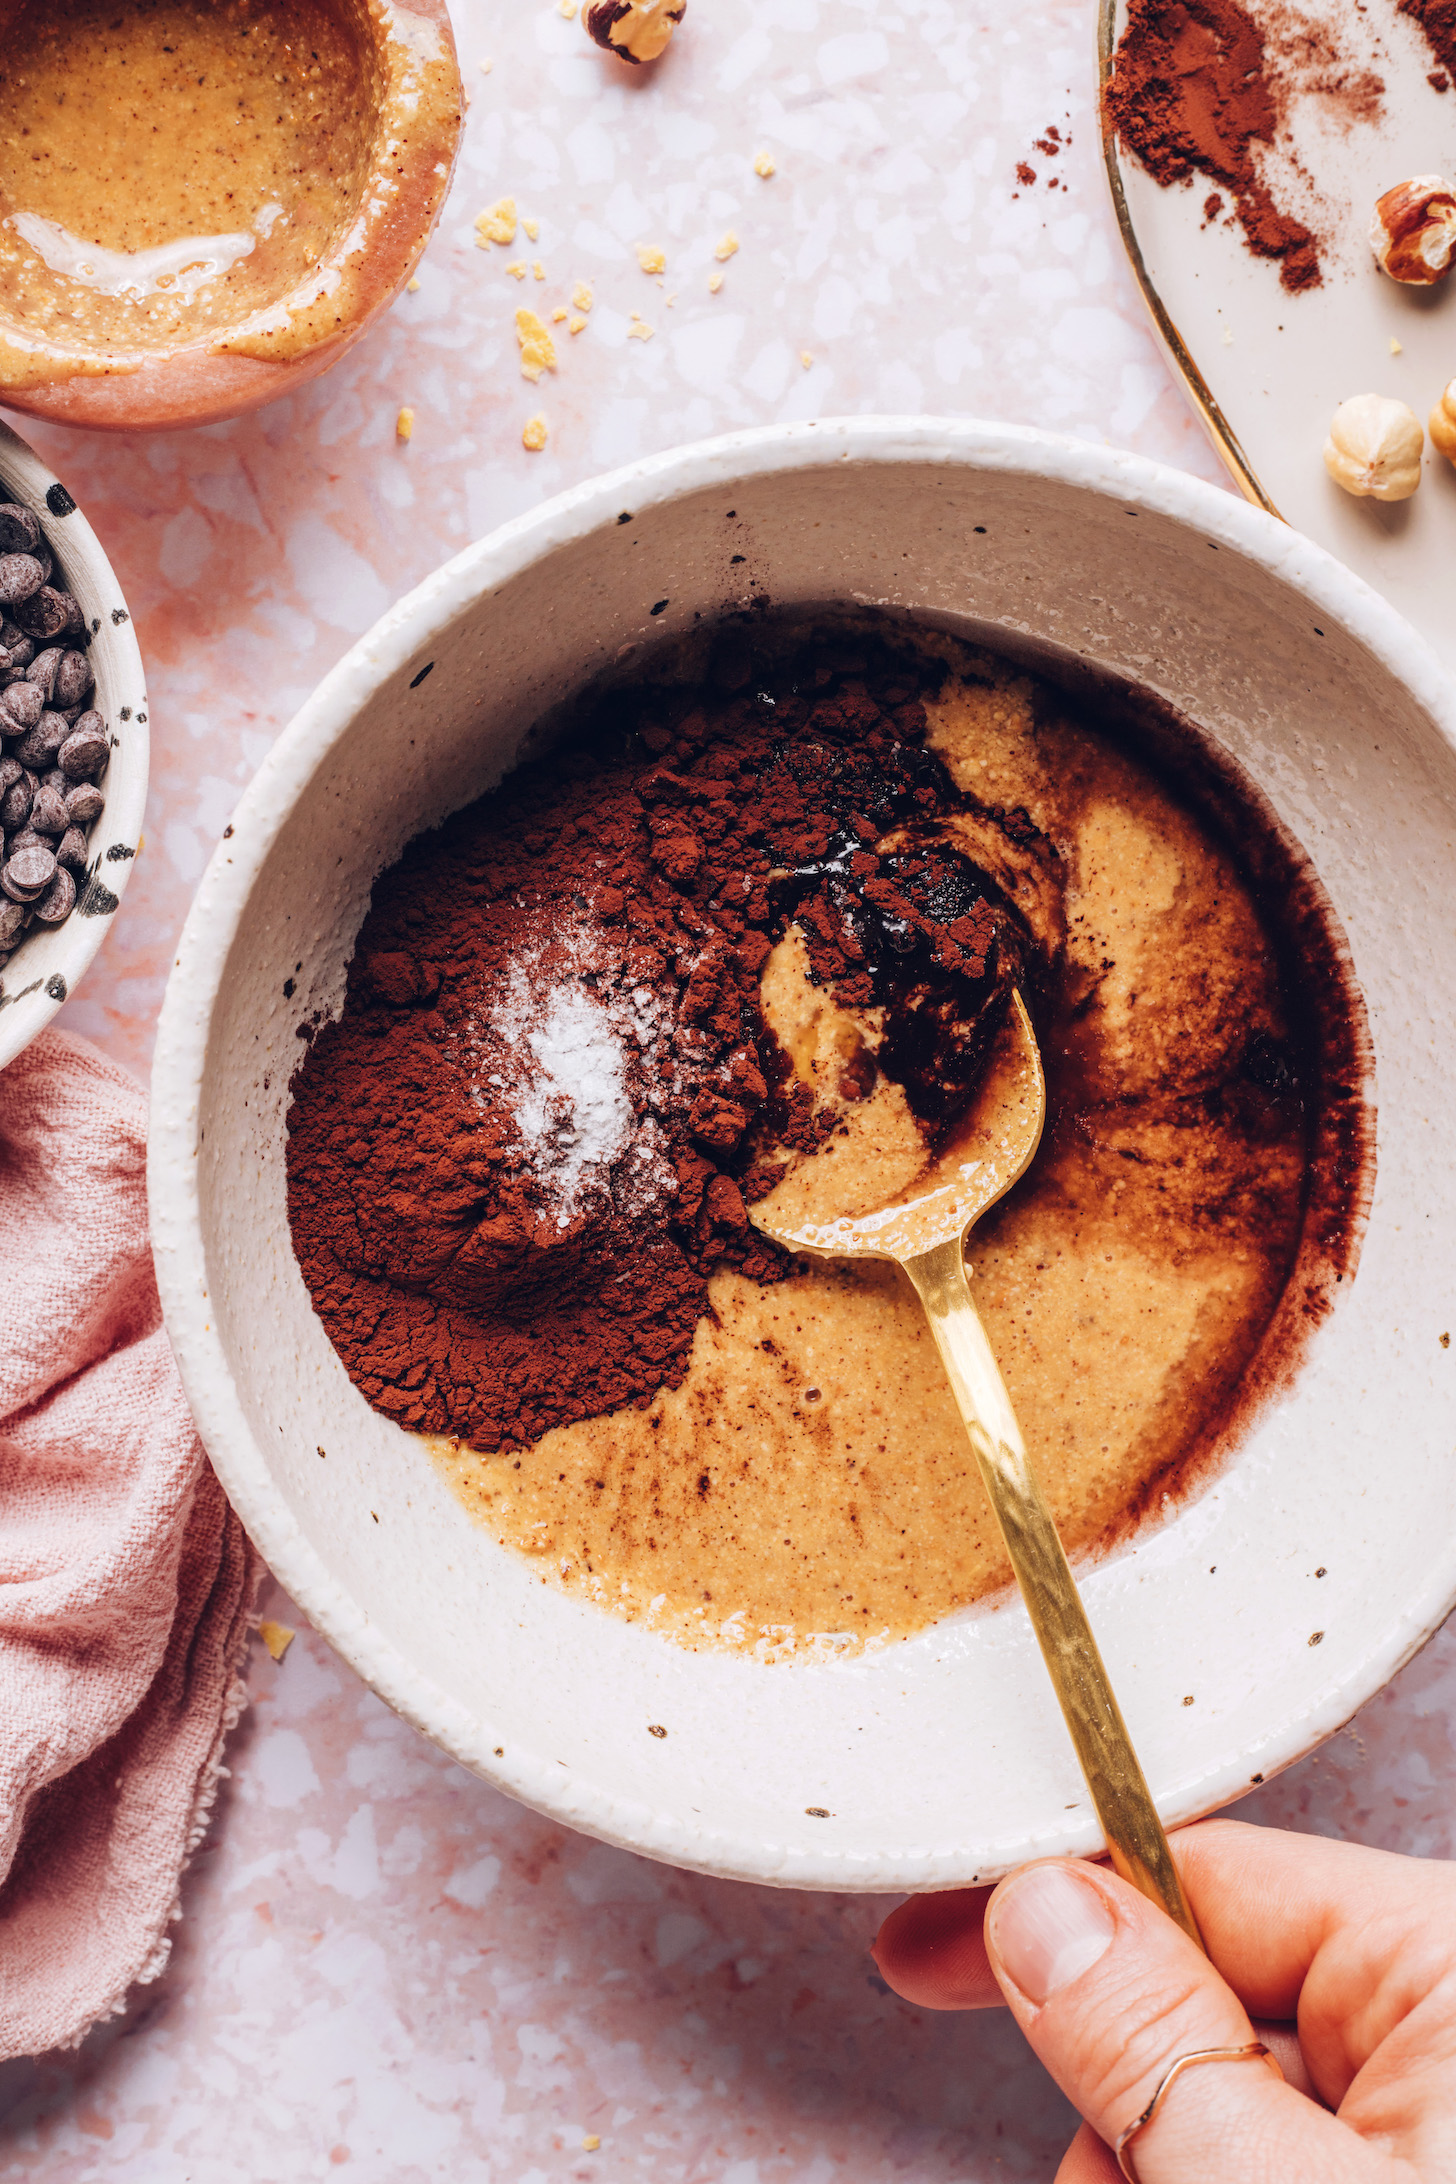
- FUDGE LAYER: In a medium mixing bowl combine sifted cocoa powder, hazelnut butter, maple syrup, 1 Tbsp (15 ml) coconut oil (adjust amount if altering number of servings), vanilla, and salt. Gently stir with a spoon to combine into a thick paste.
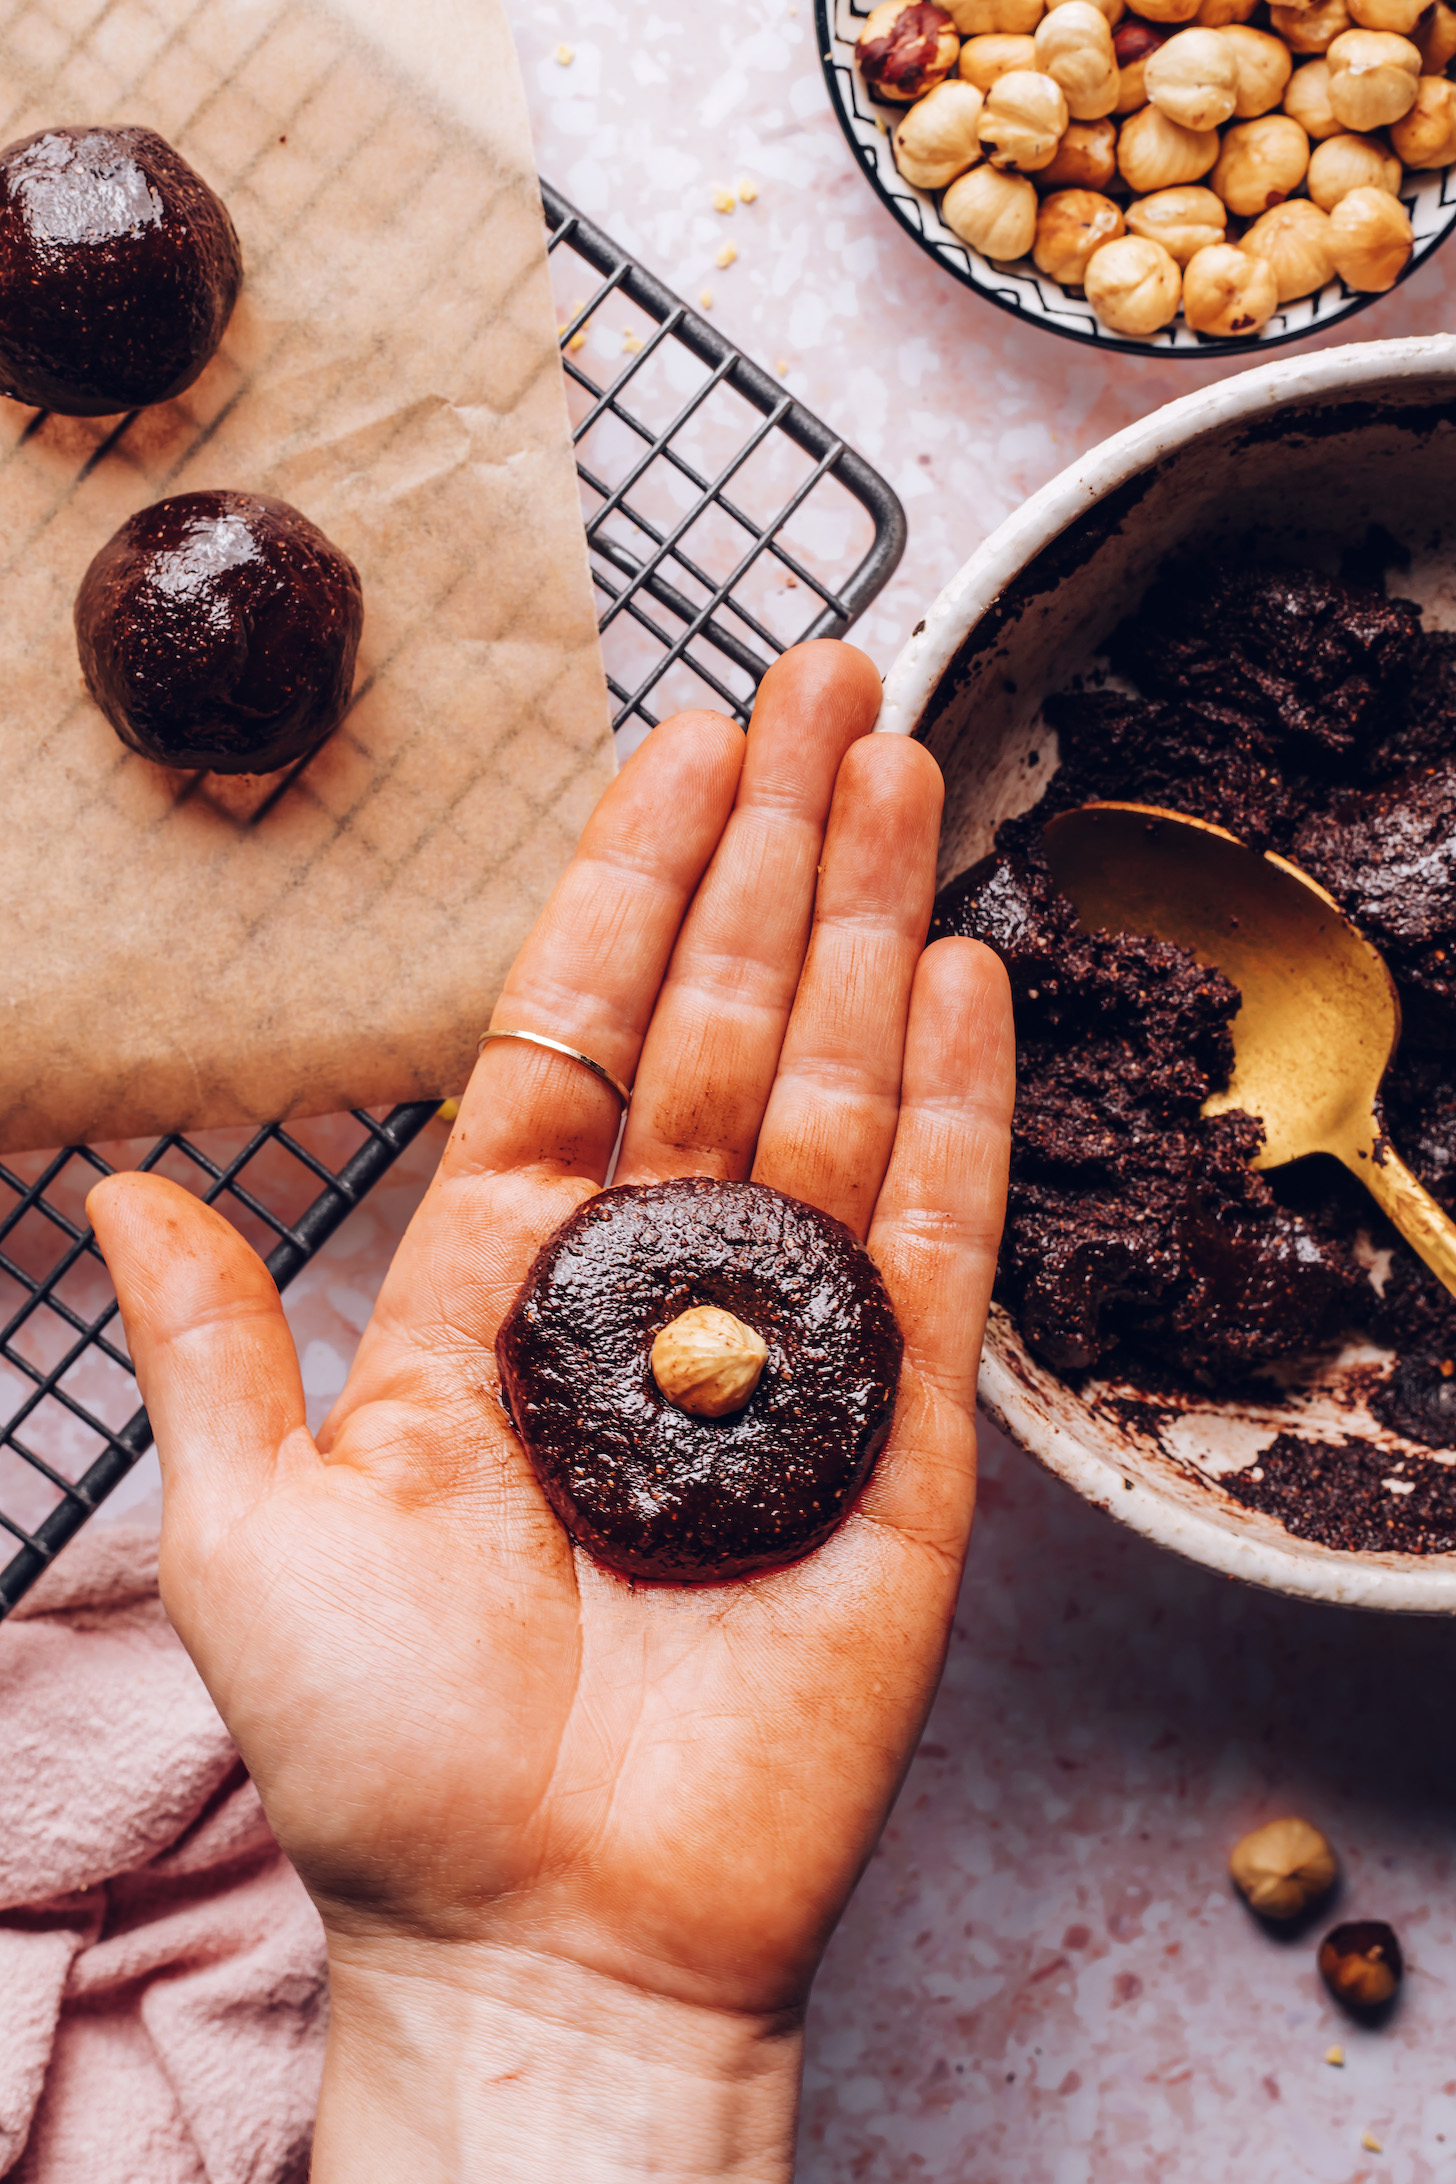
- Line a plate with parchment paper and set nearby. Take ~1/2 Tbsp of the fudge mixture and form it into a rough ball. Then place a whole hazelnut in the middle, forming the fudge around it so it is hidden inside the ball. Repeat until you have 12 fudge balls with hazelnuts inside (the remaining hazelnuts will be used for coating).
- Next, coat your fudge balls in the crushed cornflakes (if using) — we found the best way to do this is to gently drop the balls into the corn flakes, rather than rolling them. Transfer your fudge/corn flake balls to the freezer for 15 minutes.
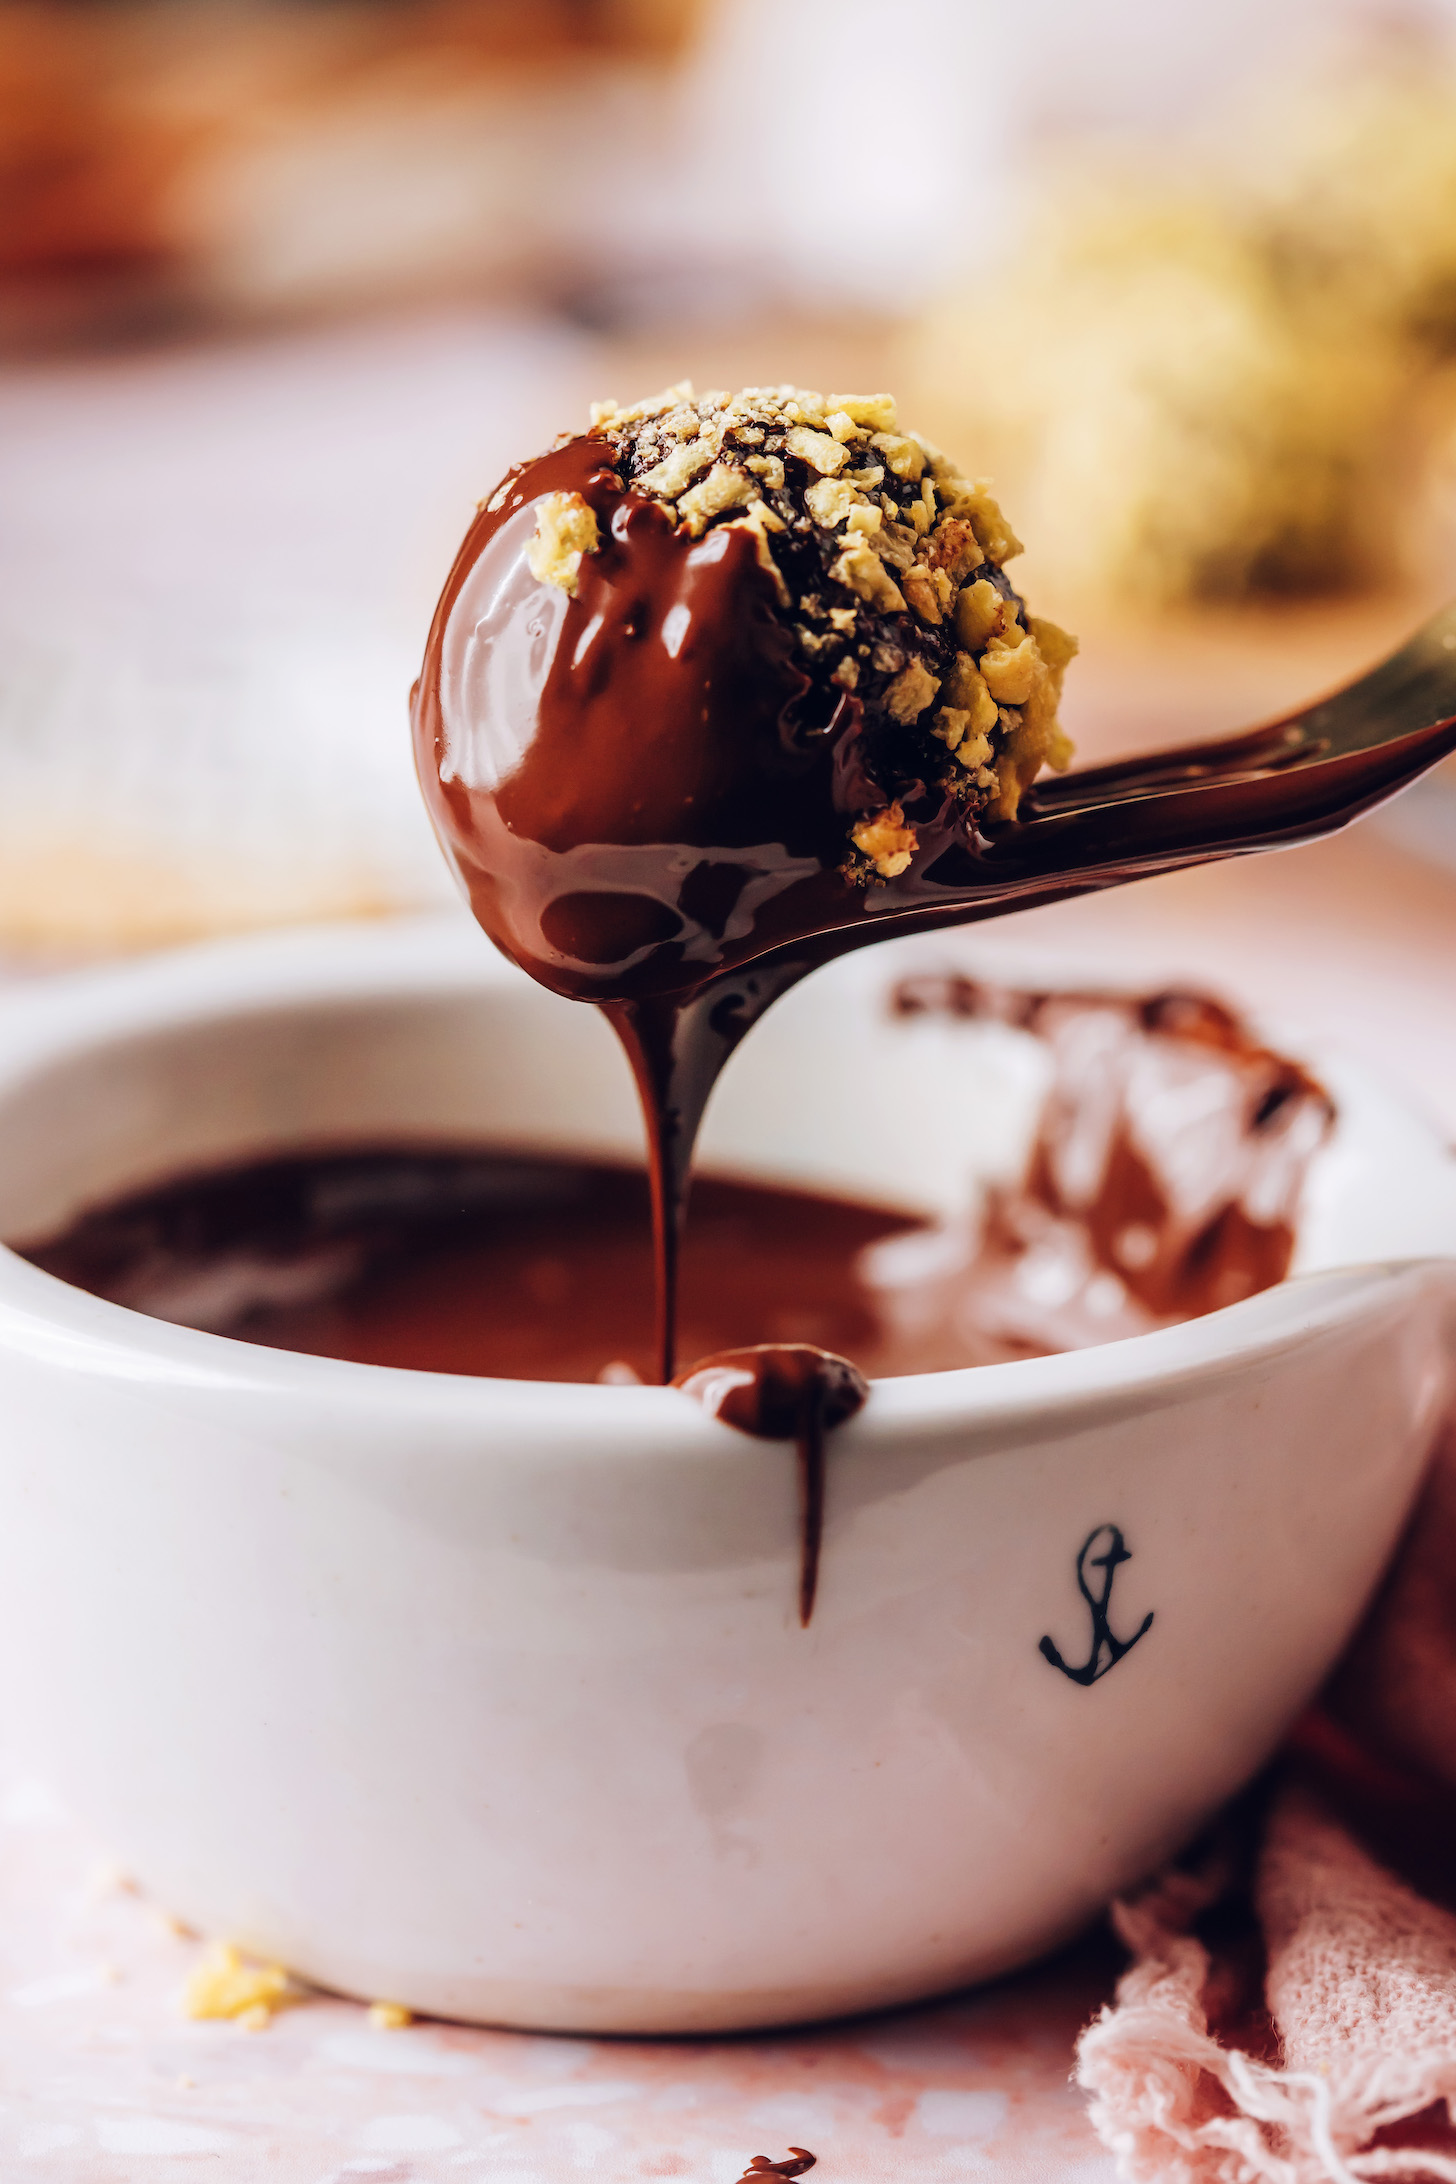
- MELTED CHOCOLATE LAYER: While the balls are chilling, add 1 inch water to a small saucepan and bring to a low boil over medium heat. Once boiling, reduce heat to low / simmer. Add the chocolate chips to a small glass or metal bowl, along with the remaining 1 Tbsp (15 ml) coconut oil (adjust amount if altering number of servings). Carefully place the bowl on top of the saucepan with simmering water. Heat, stirring occasionally with a spatula or spoon, until melted and no lumps remain (~5 minutes). You can also melt the chocolate mixture in a heat-proof bowl in the microwave in 20-second increments. Remove chocolate from heat.
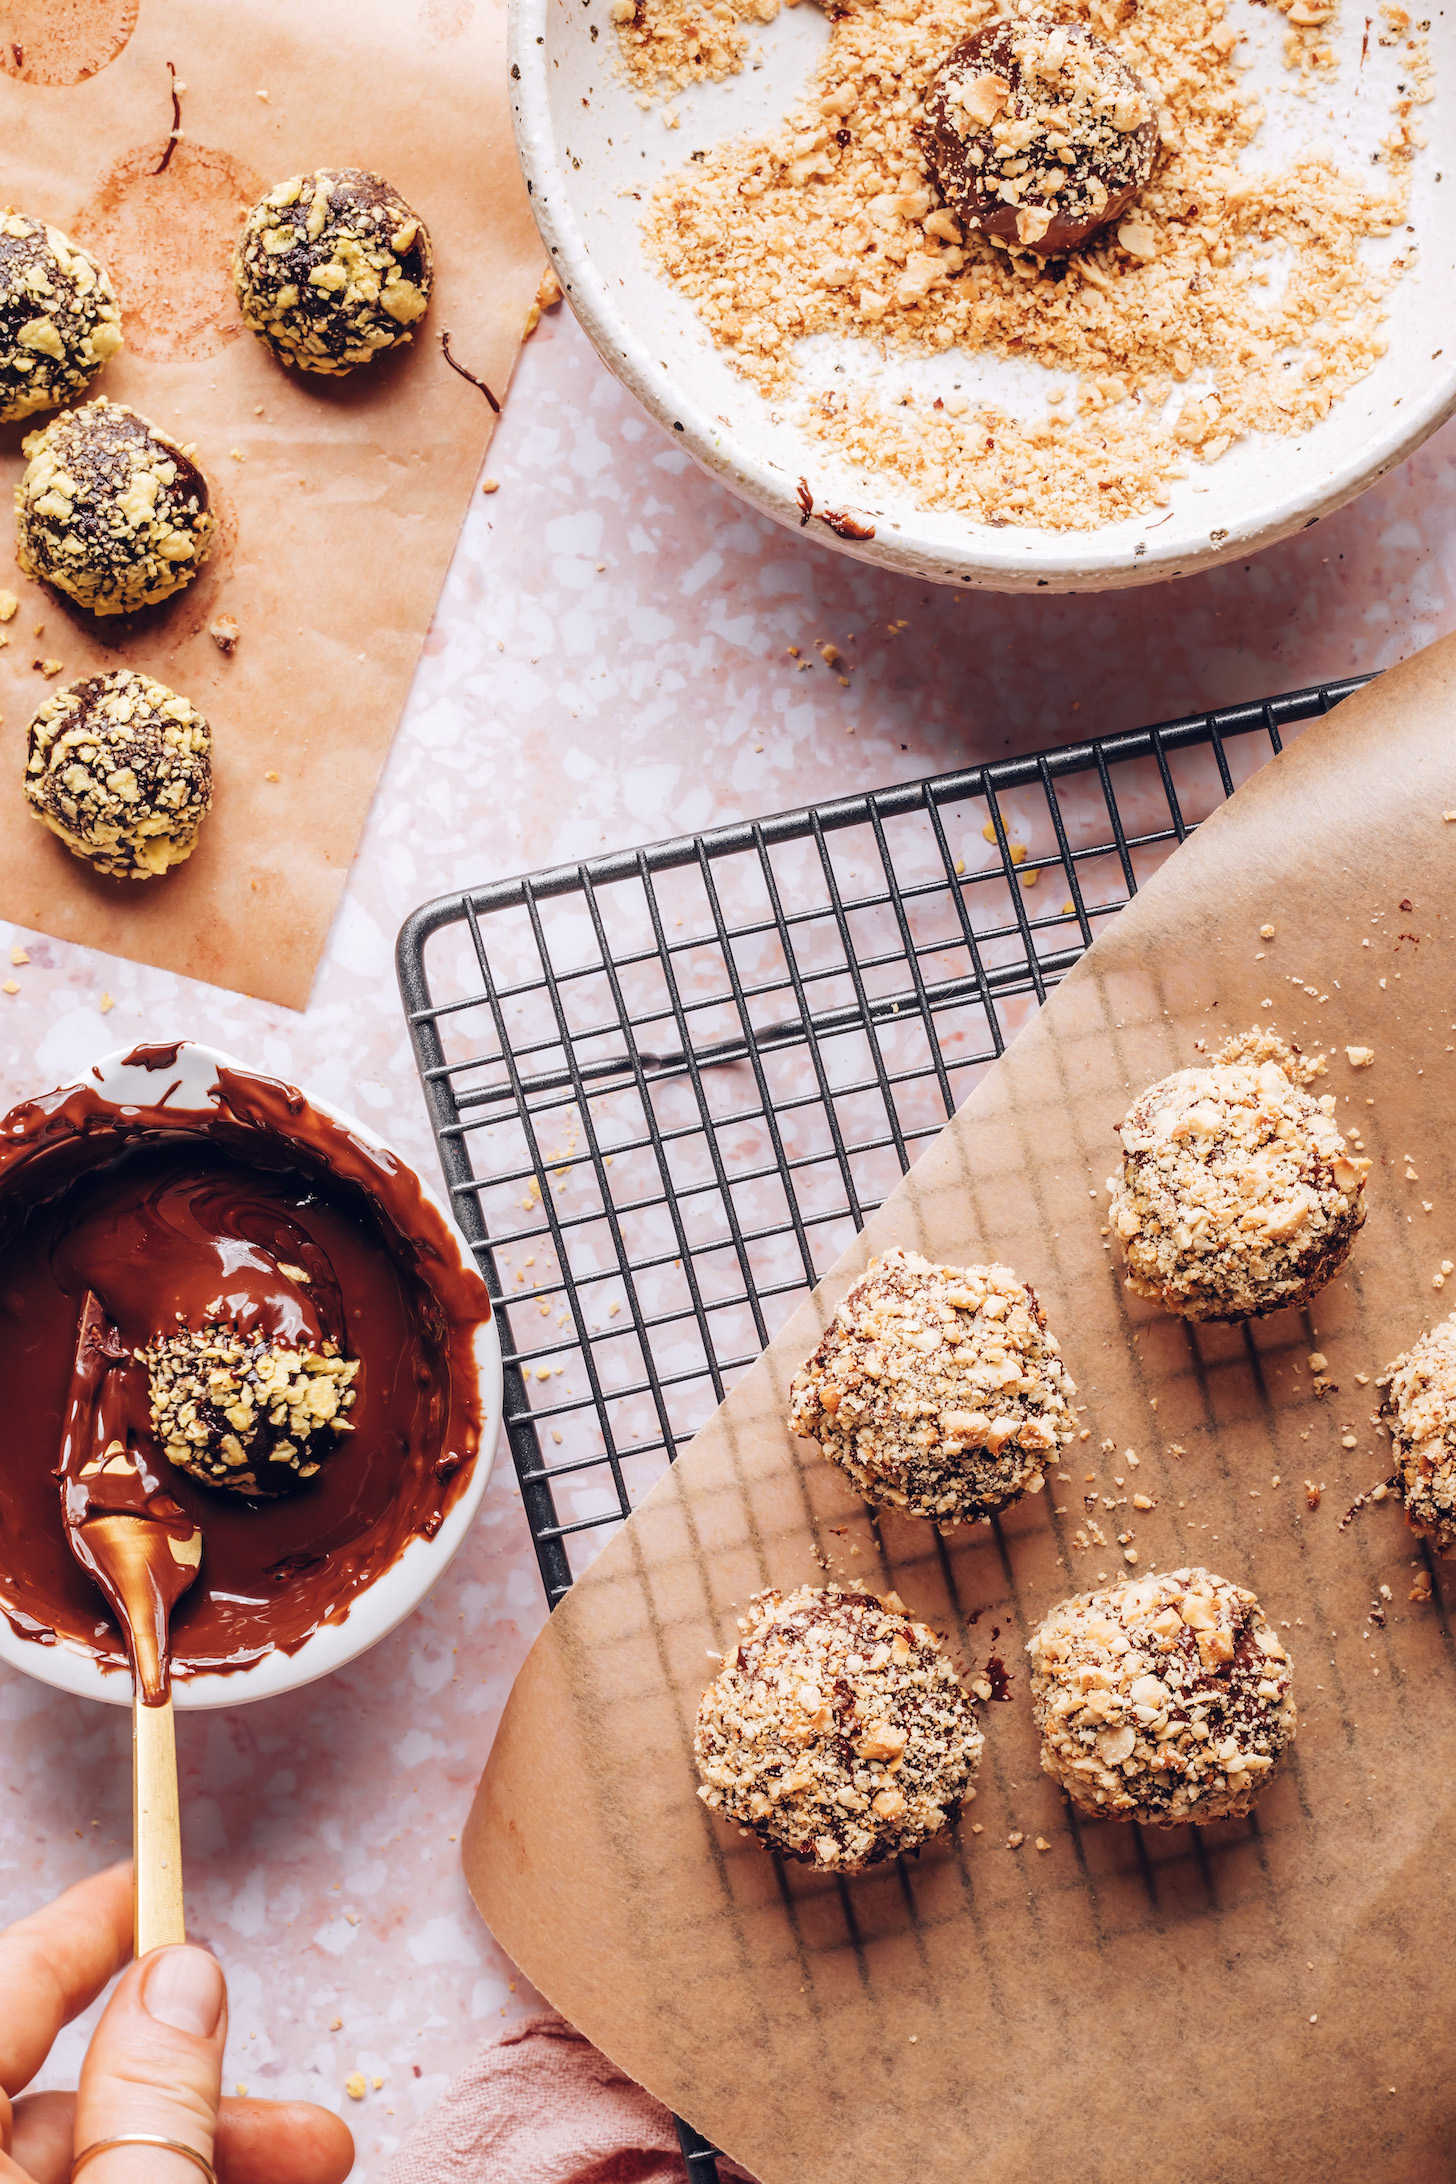
- CHOPPED HAZELNUTS: Finely chop (or food process) the remaining roasted hazelnuts until they are very fine and even in size, with no pieces larger than 1/4-inch. Place in a bowl and set nearby.
- Remove the fudge balls from the freezer. Place one on a fork, and gently dunk the bottom into the melted chocolate, then use a spoon to drizzle the melted chocolate over the ball (don’t roll it, or the cornflakes will come off). Tap the fork handle on the side of the bowl to shake off excess chocolate, then place the ball in the chopped hazelnuts and generously sprinkle nuts over the top. Pick up the ball and press it into the nuts until it’s fully coated, then place back onto the parchment-lined plate. Repeat with the remaining balls until you have 12 completed Ferrero Rocher! Chill for 20 minutes in the refrigerator or until firm to the touch. Enjoy!
- Leftover Ferrero Rocher will keep for 5 days in the refrigerator, or in the freezer for up to 1 month.
Video
Notes
*Nutrition information is a rough estimate calculated without corn flakes.


Shirin Sevim says
Oh my god. The best. I dont do comments usually, but these hazelnut balls taste really good although I am a bad baker and no receipe works with me. This is fool proof and sooooo good thank you !
Yay! So glad you enjoyed these, Shirin. Thank you for the lovely review!
Nathalie says
Absolutely delicious and not too difficult to make. My fudge was a little softer than I would have liked, even after putting it in the refrigerator. I’m not sure how to correct that for next time – maybe freeze it for a bit? Regardless, the taste and texture are on point!
Yay! Thanks for the great review, Nathalie. Freezing would definitely firm up the fudge more, if you prefer that!
Dee says
Hi!
Wondering if there’s an easy swap for the coconut oil? Coconut allergies and so many vegan baking recipes use coconut oil/milk etc in everything.
Thank you!
Hi Dee! For the fudge layer we’d suggest trying 1 extra Tbsp of hazelnut butter… if it’s too sticky at that point you could try adding a small amount (~1-2 tsp) of another neutral oil – perhaps avocado, or even hazelnut if you can find it. For the chocolate coating, you can possibly omit the oil with good results, but we haven’t tried it. Hope this helps!
lilyb says
These simply wonderful. The truffles are the closest thing I’ve had to the store-bought stuff, yet somehow even more delicious!!!
I used rolled wafers (i.e., wafer sticks like Manner or Pirouline) instead of crushed cornflakes and they worked beautifully.
It’s definitely more of a cold-weather project (let me tell you, the assembly part gets MESSY when the fudge bit keeps melting in your hands in assembly in this scorching heat – though that bit’s 100% on me, as I’ve made it 2 times already this summer) so this will definitely become a Christmas staple in my household.
10/10, perfection, thank you for sharing this recipe!
Aw! We’re so glad you enjoyed them. Thank you so much for your kind words and support! xo
Brianna says
These were delicious and though I was initially intimidated to try them, the construction actually wasn’t that difficult. Note, I couldn’t find cornflakes so I used crushed rice chex and it was very tasty and crunchy.
We’re so glad you enjoyed them, Brianna! Thank you for sharing your experience and modification! xo
Lenks says
I made these ones for my friend for Easter. She loved them, even told me its better than original. They were pretty easy to make. Left them in the freezer for about 30min to be sure they are firm. The only mistake I made was that I didnt grind the hazelnuts for final coating properly so it got bit messy. Otherwise perfect. Thank you
Woohoo! So glad this recipe was a success for you, Lenks. Thanks for the great review!
Jolly says
These are SO GOOD! I found this recipe to be super easy, if a bit time and step intensive for admittedly impatient me. BUT dang, these were worth the effort! I made the recipe as written with homemade hazelnut butter and also needed to freeze the mixture to get it to a scoop-able consistency. This is definitely a keeper. Thanks so much!
Yay! So glad to hear this recipe was worth it. Thanks so much for the great review, Jolly!
Lauren T says
These tasted so good. I found the fudge layer to be quite wet so i had to place it in the freezer for 15 minutes to make it scoop-able. I used store bought hazelnut butter so perhaps it was too runny. I used soy protein crisps (from Coles Australia) instead of cornflakes and it worked so well. I omitted the oil from the chocolate layer as I don’t like an overly oily mouthfeel. Make sure you have everything ready to go in a small production line in your kitchen to make the rolling and dipping process seamless.
We’re so glad you enjoyed them, Lauren! Yes, a production line is key for this one! Thank you for the lovely review and for sharing your modifications! xo
Kim says
I love theses so much! My fudge mixture was close to brownie batter consistency so I had to place in the freezer for a bit before I could shape into balls. Also, I only used about 1/4 cup of the crushed cornflakes so will crush less next time… and the time after that. Thanks so much for this recipe, you have filled a void in my life. Going to keep these stocked in the freezer forever.
Aw, yay! We’re so glad to hear you enjoyed them, Kim! Thank you for sharing! xo
Larissa Freelove says
Super tasty
Yay! Thank you for the lovely review, Larissa! xo
Donna says
I made these for Valentine’s for my hubby. He gave them 2 thumbs up. I did have to pop them in the freezer for a bit so I could handle them and make them into scoopable balls. Folliwed the recipe as written using almond butter, although I may have over roasted my hazelnuts a little. Still they were are a lovely treat!
Wonderful! Thanks so much for the review and for sharing your modifications, Donna. So glad you both enjoyed!
Baiba says
Dear Dana & Team,
This is my favourite candy, so I had to make this. At first I wanted to make them without the chocolate coating, but then I thought – the hell with it – it’s Valentines Day soon, so I made them for my husband, but mostly myself :D
I made the hazelnut butter, but forgot that those were my only hazelnuts. So instead I put almonds inside and coated with roasted salted peanuts + cornflakes (because I had a lot left over after coating the candy).
What can I say – delicious and festive.
Thank you so much for your recipes!
Xoxo
Ooo, love that creativity! The mix of nuts sounds so delish. Thanks so much for the great review, Baiba, we’re so glad you enjoyed!
Elana says
This is the first comment I’ve ever left on ANY food blog! These were SO AMAZING!! If you want to impress your friends, make these!!! I’ll be making these again for sure :)
WOOHOO! Thanks so much for the wonderful review, Elana. So glad you enjoyed!
Carol Castle says
What would you recommend to replace the coconut oil?
Hi Carol! For the fudge layer we’d suggest trying 1 extra Tbsp of hazelnut butter… if it’s too sticky at that point you could try adding a small amount (~1-2 tsp) of another neutral oil – perhaps avocado, or even hazelnut if you can find it. For the chocolate coating, you can possibly omit the oil with good results, but we haven’t tried it. Hope this helps!
Brooke Stillwell says
THIS SOUNDS ABSOLUTELY DELICIOUS!!!! I cant wait to try them out. What would you suggest as a good alternative to coconut oil (I’m allergic)?
Hi Brooke! This is tricky, for the fudge layer we’d suggest trying 1 extra Tbsp of hazelnut butter… if it’s too sticky at that point you could try adding a small amount (~1-2 tsp) of another neutral oil – perhaps avocado, or even hazelnut if you can find it. For the chocolate coating, you can possibly omit the oil with good results, but we haven’t tried it. Hope this helps!
Sunrise says
I am unable to eat cornflakes because of the carbs. in corn? Do you have a substitute to make them crunchy that is low in carbs.? Thank you.
Hi there! We’d suggest simply omitting them, they add a subtle crunch but the chocolates will still be delicious without them!
Jessica says
I can’t wait to try it. They sound amazing! What do you think a good substitute for corn flakes would be? Rice Crisp cereal perhaps?? I have someone in the household that is VERY sensitive to corn.
Hi Jessica! That could work, but we tested with rice cereal and weren’t super impressed with the results. We’d suggest simply omitting that step – they will still be super delicious!
Jennifer says
All I can say is, GOD BLESS YOU for developing this recipe! These are my favorite and I literally just sabotaged my January Whole30 because someone gave me a box of these as a late Christmas present, and I couldn’t NOT eat them. haha whoops!
SO excited to make this at home!!!! :)
Love this comment! Can’t wait to hear what you think if you give them a try, Jennifer!
Donna says
Thank you for this recipe. Can’t wait to try it. So many of these types of bites have dates in them which my husband can’t eat. I will rate these once he tries them though I’m sure to get 2 thumbs up!!
Yay! We may be biased, but they’re SO good! Hope you both love them! xo